from:http://www.debasish.in/2014/04/attacking-audio-recaptcha-using-googles.html
0x00 背景
关于验证码和验证码破解的入门,请看:http://drops.wooyun.org/tips/141
什么是reCaptcha?
reCaptchas是由Google提供的基于云的验证码系统,通过结合程序生成的验证码和较难被OCR识别的图片,来帮助Google数字化一些书籍,报纸和街景里的门牌号等。
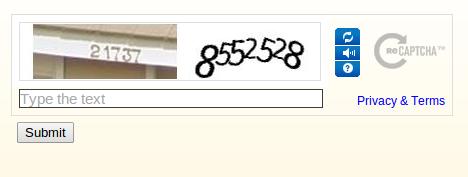
reCaptcha同时还有声音验证码的功能,用来给盲人提供服务。
0x01 细节
中心思想:
用Google的Web Speech API语音识别来破解它自己的reCaptcha声音验证码.
下面来看一下用来语音识别的API
Chrome浏览器内建了一个基于HTML5的语音输入API,通过它,用户可以通过麦克风输入语音,然后Chrome会识别成文字,这个功能在Android系统下也有。如果你不熟悉这个功能的话这里有个demo:
https://www.google.com/intl/en/chrome/demos/speech.html
我一直很好奇这个语音识别API是如何工作的,是通过浏览器本身识别的还是把音频发送到云端识别呢?
通过抓包发现,好像的确会把语音发送到云端,不过发送出去的数据是SSL加密过的。
于是我开始翻Chromium项目的源码,终于我找到了有意思的地方:
http://src.chromium.org/viewvc/chrome/trunk/src/content/browser/speech/
实现过程非常简单,首先从mic获取音频数据,然后发送到Google的语音识别Web服务,返回JSON格式的识别结果。 用来识别的Web API在这里:
https://www.google.com/speech-api/v1/recognize
比较重要的一点是这个API只接受flac格式的音频(无损格式,真是高大上)。
既然知道了原理,写一个利用这个识别API的程序就很简单了。
./google_speech.py hello.flac
源代码:
'''
Accessing Google Web Speech API using Pyhon
Author : Debasish Mandal

'''

import httplib
import sys

print '[+] Sending clean file to Google voice API'
f = open(sys.argv[1])
data = f.read()
f.close()
google_speech = httplib.HTTPConnection('www.google.com')
google_speech.request('POST','/speech-api/v1/recognize?xjerr=1&client=chromium&lang=en-US',data,{'Content-type': 'audio/x-flac; rate=16000'})
print google_speech.getresponse().read()
google_speech.close()
研究了一下reCaptcha的语音验证码后,你会发现基本上有两种语音验证码,一种是非常简单的,没有加入很多噪音,语音也很清晰。另外一种是非常复杂的,故意加了很多噪音,连真人很难听出来。这种验证码里面估计加了很多嘶嘶的噪声,并且用很多人声作为干扰。
关于这个语音验证码的细节可以参考这里https://groups.google.com/forum/#!topic/recaptcha/lkCyM34zbJo
在这篇文章中我主要写了如何解决前一种验证码,虽然我为了破解后一种复杂的验证码也做了很多努力,但是实在是太困难了,即使是人类对于它的识别率也很低。
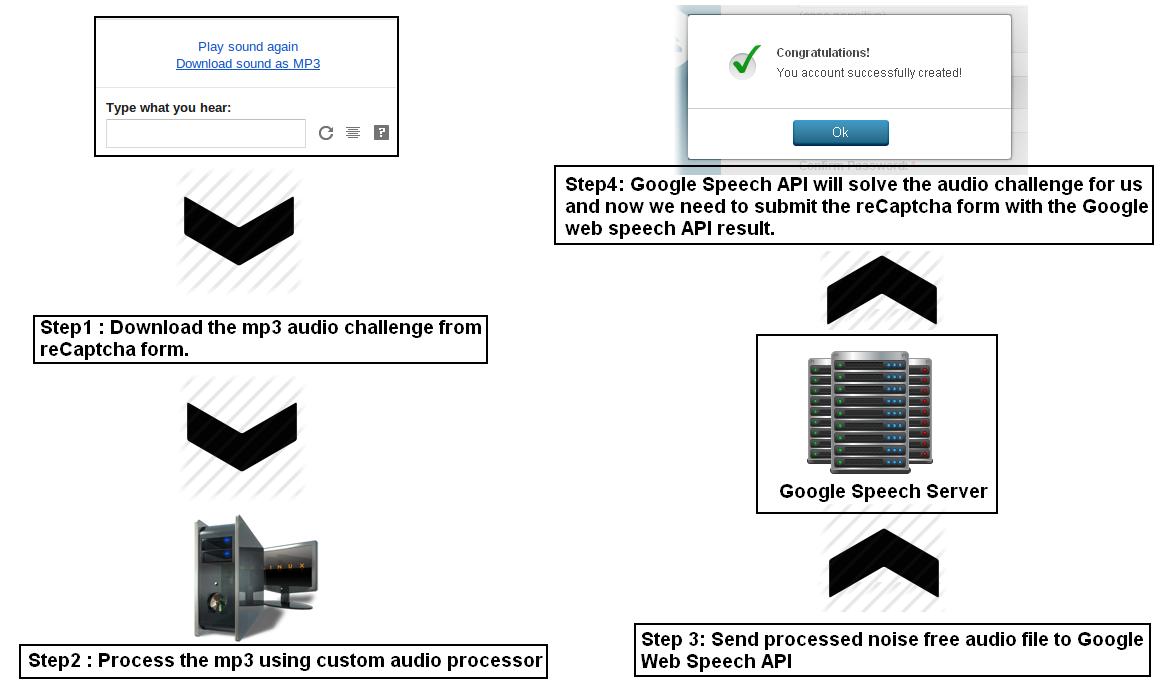
用户可以把recaptcha的语音验证码以mp3格式下载下来,但是Google语音识别接口只接受flac格式,所以我们需要对下载回来的mp3进行一些处理然后转换成flac再提交。
我们先手工验证一下这样行不行:
首先把recaptcha播放的音频下载成mp3文件。
然后用一个叫Audacity的音频编辑软件打开,如图
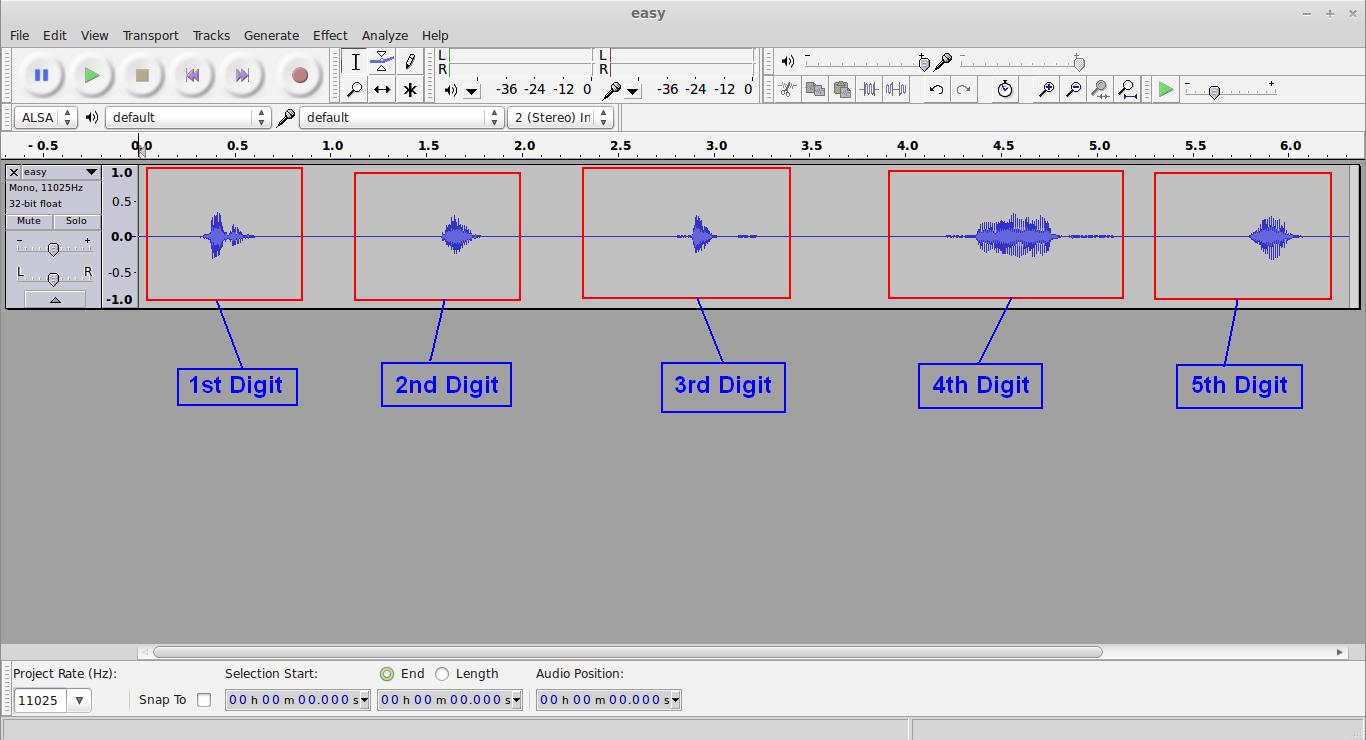
把第一个数字的声音复制到新窗口中,然后再重复一次,这样我们把第一位数字的声音复制成连续的两个相同声音。
比如这个验证码是76426,我们的目的是把7先分离出来,然后让7的语音重复两次。
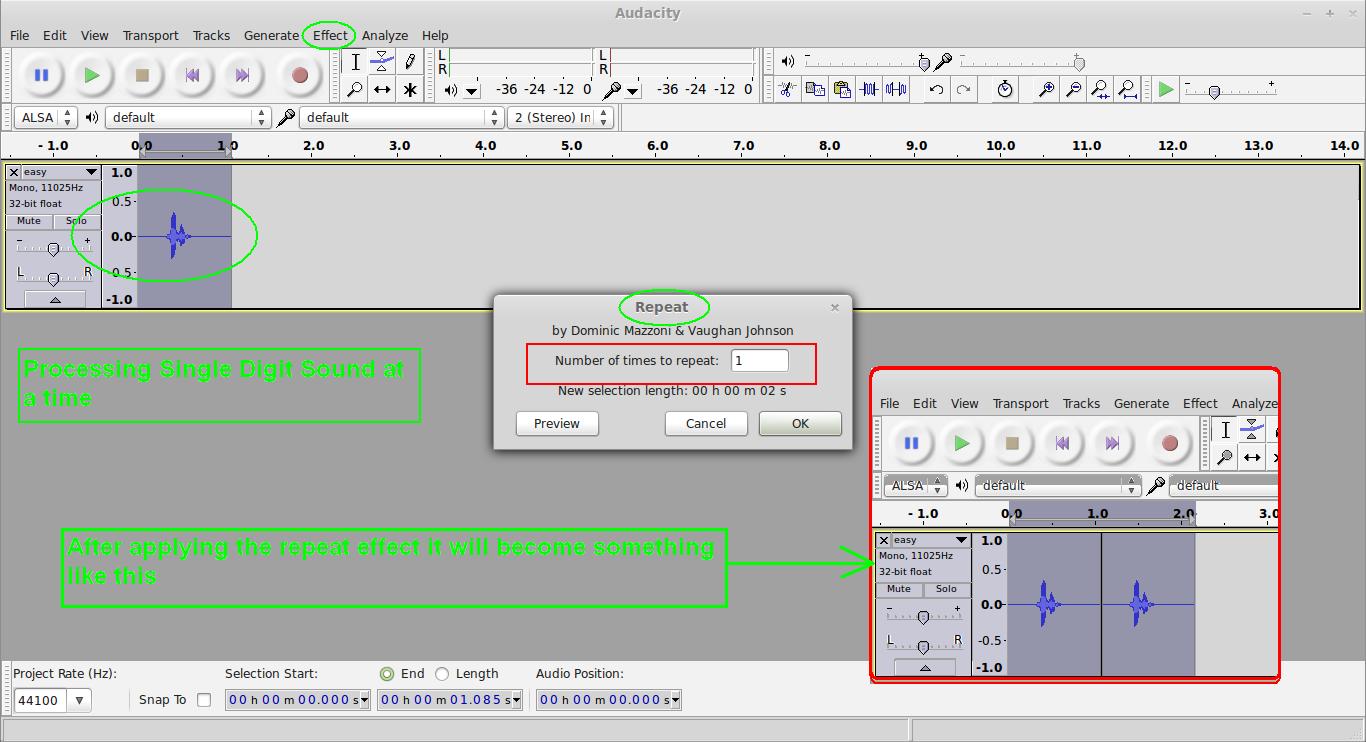
最后把这段音频保存成wav格式,再转换成flac格式,然后提交到API。
debasish@debasish ~/Desktop/audio/heart attack/final $ sox cut_0.wav -r 16000 -b 16 -c 1 cut_0.flac lowpass -2 2500
debasish@debasish ~/Desktop/audio/heart attack/final $ python send.py cut_0.flac
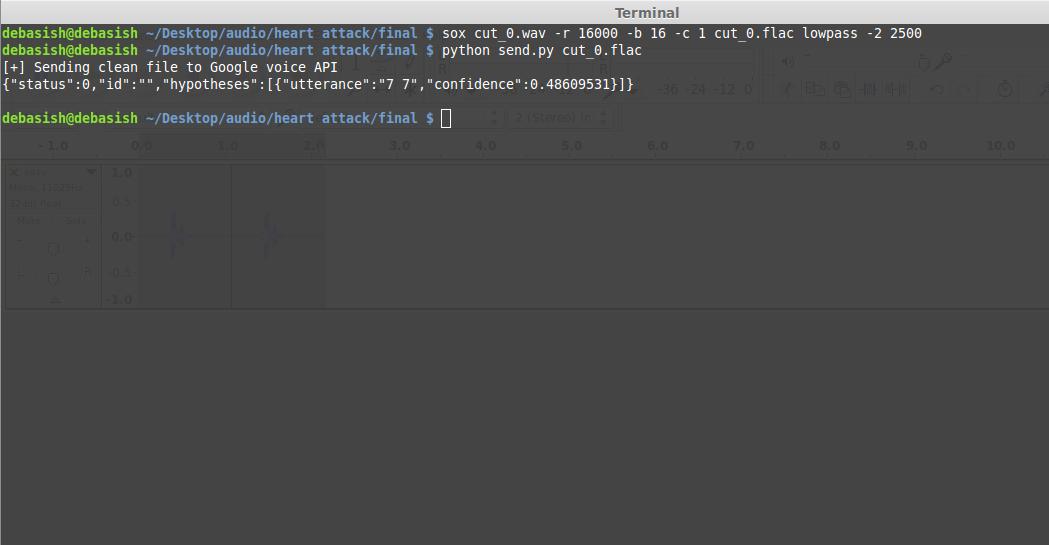
很好,服务器成功识别了这段音频并且返回了正确的结果,下面就需要把这个过程自动化了。
在自动提交之前,我们需要了解一下数字音频是处理什么原理。
这个stackoverflow的问题是个很好的教程:
http://stackoverflow.com/questions/732699/how-is-audio-represented-with-numbers
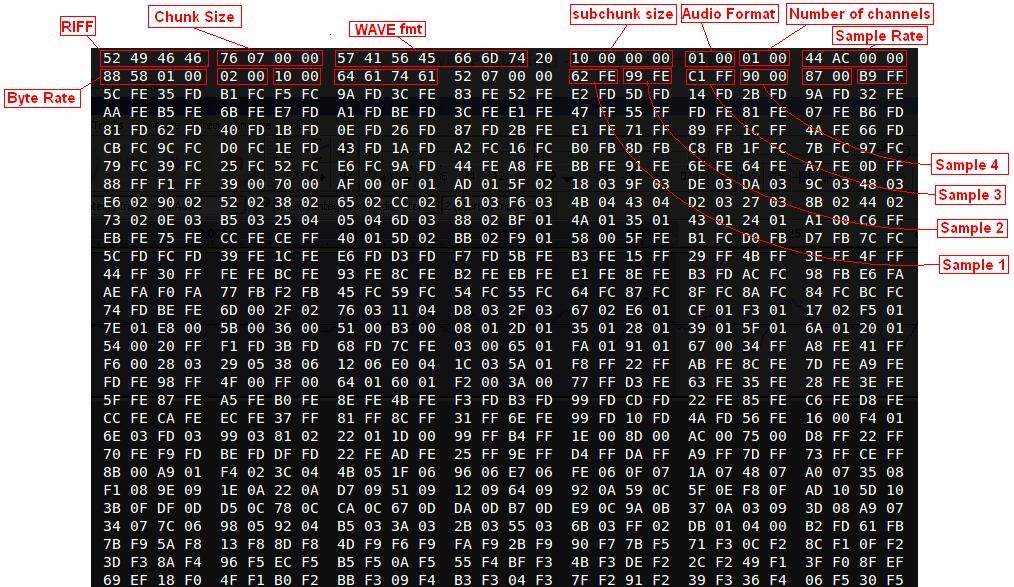
把一个wav格式的文件用16进制编辑器打开:
用Python WAVE模块处理wav格式的音频:
wave模块提供了一个很方便接口用来处理wav格式:
import wave
f = wave.open('sample.wav', 'r')
print '[+] WAV parameters ',f.getparams()
print '[+] No. of Frames ',f.getnframes()
for i in range(f.getnframes()):
    single_frame = f.readframes(1)
    print single_frame.encode('hex')
f.close()
getparams()函数返回一个元组,内容是关于这个wav文件的一些元数据,例如频道数量,采样宽度,采样率,帧数等等。
getnframes()返回这个wav文件有多少帧。
运行这个python程序后,会把sample.wav的每一帧用16进制表示然后print出来
[+] WAV parameters (1, 2, 44100, 937, 'NONE', 'not compressed')
[+] No. of Frames 937
[+] Sample 0 = 62fe    <- Sample 1
[+] Sample 1 = 99fe   <- Sample 2
[+] Sample 2 = c1ff    <- Sample 3
[+] Sample 3 = 9000
[+] Sample 4 = 8700
[+] Sample 5 = b9ff
[+] Sample 6 = 5cfe
[+] Sample 7 = 35fd
[+] Sample 8 = b1fc
[+] Sample 9 = f5fc
[+] Sample 10 = 9afd
[+] Sample 11 = 3cfe
[+] Sample 12 = 83fe
[+] ....
从输出文件中我们可以看到,这个wav文件是单通道的,每个通道是2字节长,因为音频是16比特的,我们也可以用 getsampwidth()函数来判断通道宽度,getchannels() 可以用来确定音频是单声道还是立体声。
接下来对每帧进行解码,这个16进制编码实际上是小端序保存的(little-endian),所以还需要对这段python程序做一些修改,并且利用struct模块把每帧的值转换成带符号的整数。
import wave
import struct

f = wave.open('sample.wav', 'r')
print '[+] WAV parameters ',f.getparams()
print '[+] No. of Frames ',f.getnframes()
for i in range(f.getnframes()):
    single_frame = f.readframes(1)
    sint = struct.unpack('<h', single_frame) [0]
    print "[+] Sample ",i," = ",single_frame.encode('hex')," -> ",sint[0]
f.close()
修改完毕后再次运行,输出内容差不多这样:
[+] WAV parameters (1, 2, 44100, 937, 'NONE', 'not compressed')
[+] No. of Frames 937
[+] Sample 0 = 62fe -> -414
[+] Sample 1 = 99fe -> -359
[+] Sample 2 = c1ff -> -63
[+] Sample 3 = 9000 -> 144
[+] Sample 4 = 8700 -> 135
[+] Sample 5 = b9ff -> -71
[+] Sample 6 = 5cfe -> -420
[+] Sample 7 = 35fd -> -715
[+] Sample 8 = b1fc -> -847
[+] Sample 9 = f5fc -> -779
[+] Sample 10 = 9afd -> -614
[+] Sample 11 = 3cfe -> -452
[+] Sample 12 = 83fe -> -381
[+] Sample 13 = 52fe -> -430
[+] Sample 14 = e2fd -> -542
这样是不是更明白了?下面用python的matplotlib画图模块把这些数值画出来:
import wave
import struct
import matplotlib.pyplot as plt

data_set = []
f = wave.open('sample.wav', 'r')
print '[+] WAV parameters ',f.getparams()
print '[+] No. of Frames ',f.getnframes()
for i in range(f.getnframes()):
    single_frame = f.readframes(1)
    sint = struct.unpack('<h', single_frame)[0]
    data_set.append(sint)
f.close()
plt.plot(data_set)
plt.ylabel('Amplitude')
plt.xlabel('Time')
plt.show()
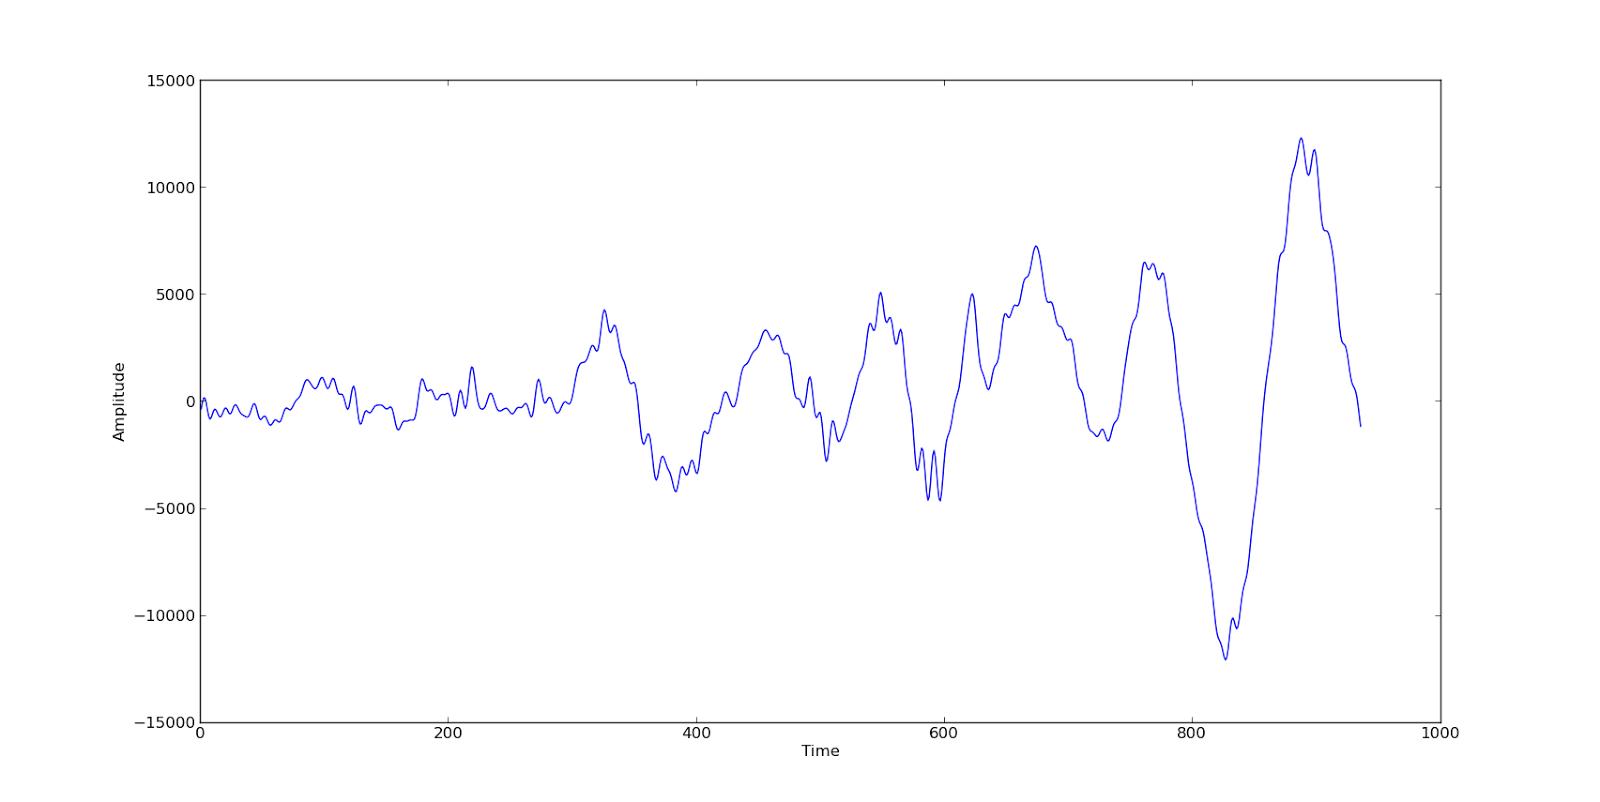
这个图实际上就是声音的波形图
进一步自动化:
下面这段python程序通过音量不同把音频文件分割成多个音频文件,相当于图片验证码识别中的图片分割步骤。
'''
简单的基于音量的音频文件分割程序


作用:

1. 简单的降噪处理
2. 识别文件中的高音量部分
3. 根据高音量部分的数目把文件分割成独立文件

'''

import wave
import sys
import struct
import os
import time
import httplib
from random import randint


ip = wave.open(sys.argv[1], 'r')
info = ip.getparams()
frame_list = []
for i in range(ip.getnframes()):
    sframe = ip.readframes(1)
    amplitude = struct.unpack('<h', sframe)[0]
    frame_list.append(amplitude)
ip.close()
for i in range(0,len(frame_list)):
    if abs(frame_list[i]) < 25:
        frame_list[i] = 0
################################  Find Out most louder portions of the audio file ###########################
thresh = 30
output = []
nonzerotemp = []
length = len(frame_list)
i = 0
while i < length:
    zeros = []
    while i < length and frame_list[i] == 0:
        i += 1
        zeros.append(0)
    if len(zeros) != 0 and len(zeros) < thresh:
        nonzerotemp += zeros
    elif len(zeros) > thresh:
        if len(nonzerotemp) > 0 and i < length:
            output.append(nonzerotemp)
            nonzerotemp = []
    else:
        nonzerotemp.append(frame_list[i])
        i += 1
if len(nonzerotemp) > 0:
    output.append(nonzerotemp)

chunks = []
for j in range(0,len(output)):
    if len(output[j]) > 3000:
        chunks.append(output[j])
#########################################################################################################

for l in chunks:
    for m in range(0,len(l)):
        if l[m] == 0:
             l[m] = randint(-0,+0)

inc_percent = 1 #10 percent

for l in chunks:
    for m in range(0,len(l)):
        if l[m] <= 0:
            # negative value
            l[m] = 0 - abs(l[m]) + abs(l[m])*inc_percent/100
        else:
            #positive vaule
            l[m] =     abs(l[m]) + abs(l[m])*inc_percent/100

########################################################

# Below code generates separate wav files depending on the number of loud voice detected.

NEW_RATE = 1 #Change it to > 1 if any amplification is required

print '[+] Possibly ',len(chunks),'number of loud voice detected...'
for i in range(0, len(chunks)):
    new_frame_rate = info[0]*NEW_RATE
    print '[+] Creating No. ',str(i),'file..'
    split = wave.open('cut_'+str(i)+'.wav', 'w')
    split.setparams((info[0],info[1],info[2],0,info[4],info[5]))
#   split.setparams((info[0],info[1],new_frame_rate,0,info[4],info[5]))

    #Add some silence at start selecting +15 to -15
    for k in range(0,10000):
        single_frame = struct.pack('<h', randint(-25,+25))
        split.writeframes(single_frame)
    # Add the voice for the first time
    for frames in chunks[i]:
        single_frame = struct.pack('<h', frames)
        split.writeframes(single_frame)

    #Add some silence in between two digits
    for k in range(0,10000):
        single_frame = struct.pack('<h', randint(-25,+25))
        split.writeframes(single_frame)

    # Repeat effect :  Add the voice second time
    for frames in chunks[i]:
        single_frame = struct.pack('<h', frames)
        split.writeframes(single_frame)

    #Add silence at end
    for k in range(0,10000):
        single_frame = struct.pack('<h', randint(-25,+25))
        split.writeframes(single_frame)

    split.close()#Close each files
当这个文件被分割成多份之后我们可以简单的把他们转换成flac格式然后把每个文件单独发送到Google语音识别API进行识别。
视频已翻墙下载回来:
Solving reCaptcha Audio Challenge using Google Web Speech API Demo
现在我们已经解决了简单的音频验证码,我们再来尝试一下复杂的。
这个图片是用前面的程序画出来的复杂语音验证码的波形图:
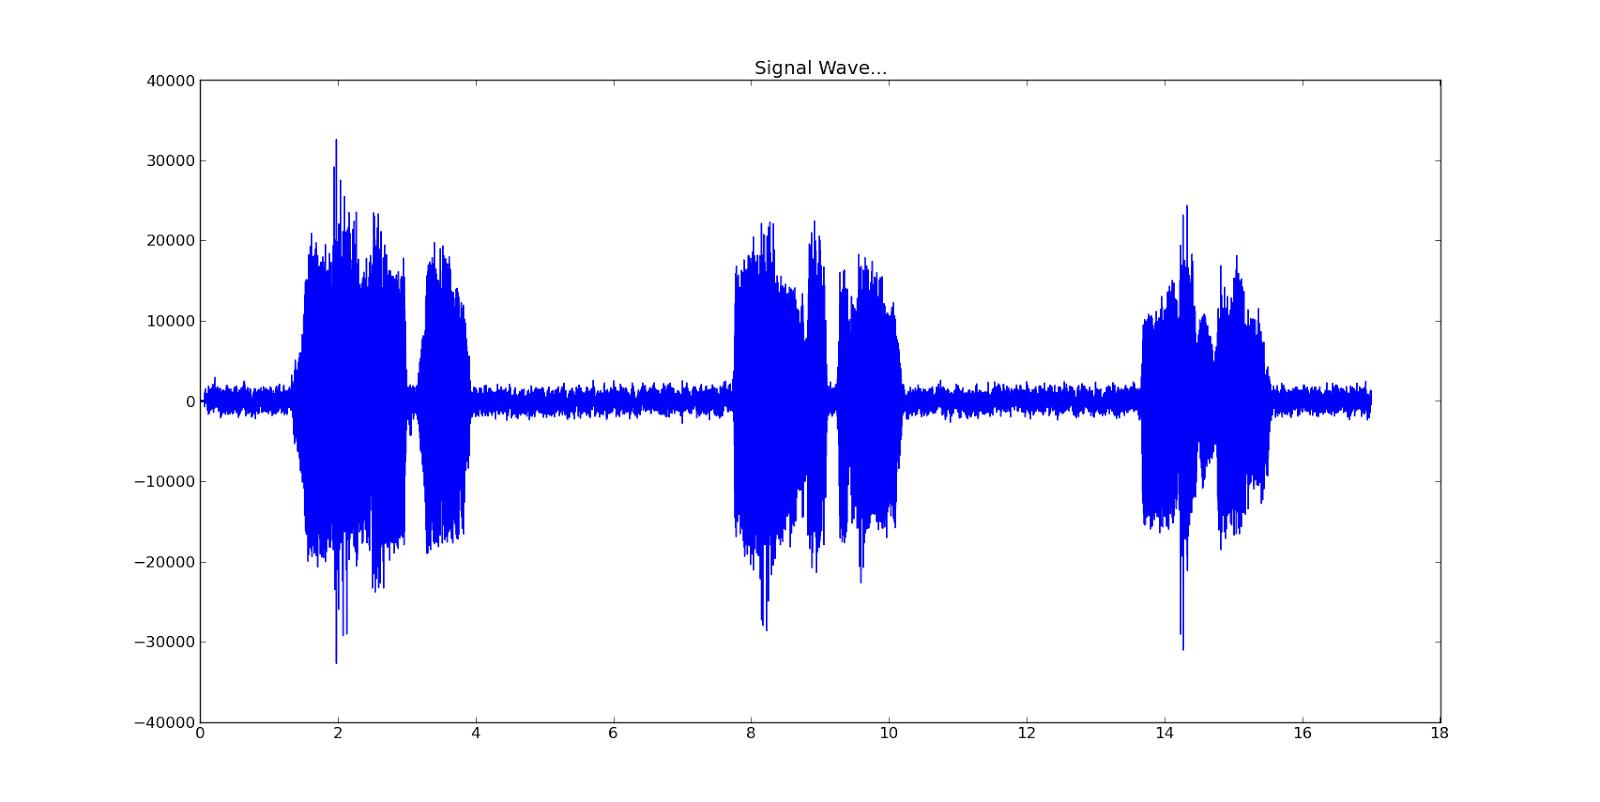
从图里我们可以看到,这段音频中一直存在一个恒定的噪声,就是中间横的蓝色的那条,对于这样的噪声我们可以用标准的离散傅里叶变换,通过快速傅里叶变换fast Fourier transform(挂在高树上的注意了!)来解决。
回到多年前校园中的数字信号处理这门课,让我们在纯洁的正弦波s(t)=sint(w*t)上叠加一个白噪声,S(t)=S(t+n), F为S的傅里叶变换,把频率高于和低于w的F值设为0,噪声就被这样过滤掉了。
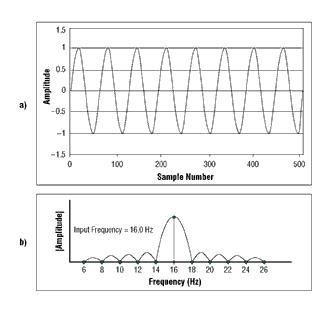
比如这张图里,正弦波的频谱域被分离了出来,只要把多余频率切掉,再逆变换回去就相当于过滤掉部分噪音了。其实自己写这样的过滤器实在太蛋疼了,Python有不少音频处理库并且自带降噪滤镜。
但是就像识别图形验证码一样,噪音(相当于图片里的干扰线和噪点)并不是破解语音验证码的难点,对于计算机来说,最难的部分还是分割,在复杂的语音验证码里,除了主要的人声之外,背景中还有2,3个人在念叨各种东西,并且音量和主要的声音差不多,无法通过音量分离,这样的手段即使对于人类也很难识别的出。
我把目前的代码放在了https://github.com/debasishm89/hack_audio_captcha
这些代码还很原始,有很大改进的余地。
0x02 结论
我把这个问题报给了Google安全团队,他们说这个东西就是这样设计的(苦逼的作者),如果系统怀疑对方不是人是机器的时候会自动提升到高难度验证码,目前Google不打算改进这个设计。