前言:
由于前段时间网鼎杯一道Android题目中用了这个,具有一定研究价值,便做一个壳的实现分析
https://github.com/luoyesiqiu/dpt-shell
其实这个是一个假的抽取壳,虽然函数抽取壳确实是将dex文件中的函数代码给nop,然后在运行时再把字节码给填回,但是不会填回内存中原dex位置,是填回内存中的一个解析后的结构体,比如梆梆加固,普通的工具是dump不到dex的。
虽然但是,能写出这个的也足以说明作者对Android的了解。即使作者也有howtowork文档去解释如何实现的,但是很多都被省略掉,这里做个源码分析,许多抽取壳也有类似的操作。
proccessor模块-源码分析
项目结构这里就不再说了,作者已经给出:https://github.com/luoyesiqiu/dpt-shell/blob/main/doc/HowItWorks.md
我们对照着项目结构对源码进行分析
主要是proccessor和shell两个部分
我们先分析可以将普通apk处理成加壳apk的proccessor模块
代码在dpt\src\main\java\com\luoye\dpt文件夹中
从Dpt.java开始分析
准备工作
-
读取命令行参数,获取我们电脑上的apk路径,并创建新的加壳apk文件路径
```java
private static void usage(){
System.err.println("Usage:\n\tjava -jar dpt.jar [--log] <ApkFile>");
}private static void processApk(String apkPath){ if(!new File("shell-files").exists()) { System.err.println("Cannot find shell files!"); return; } File apkFile = new File(apkPath); String apkFileName = apkFile.getName(); //获取apk名称 String currentDir = new File(".").getAbsolutePath(); // 当前命令行所在的目录 if (currentDir.endsWith("/.")){ currentDir = currentDir.substring(0, currentDir.lastIndexOf("/.")); } String output = FileUtils.getNewFileName(apkFileName,"signed");//新建output文件名 System.err.println("output: " + output); File outputFile = new File(currentDir, output);//创建一个File对象并获取其父文件夹路径 String outputApkFileParentPath = outputFile.getParent();```
-
获取工作目录径dptOut的绝对路径并将apk解压到工作目录
java String apkMainProcessPath = ApkUtils.getWorkspaceDir().getAbsolutePath(); System.out.println("Apk main process path: " + apkMainProcessPath); ApkUtils.extract(apkPath,apkMainProcessPath);//将apk解压到工作目录 -
解析AndroidManifest.xml获取packageName
getPackageName调用了getValue(file,"manifest","android","package");,然后getValue中利用pxb.android.axml.AxmlParser获取了manifest标签内命名空间为android的package属性的值,也就是存放我们包名的地方
java
Global.packageName = ManifestUtils.getPackageName(apkMainProcessPath + File.separator + "AndroidManifest.xml");
(重点)解析dex代码存入文件, 生成新的代码被nop了的dex
        //从解压的apk工作目录下获取各个dex里面的代码存放到OoooooOooo文件中, 且创建了方法的code被填写为了nop的dex
        ApkUtils.extractDexCode(apkMainProcessPath);
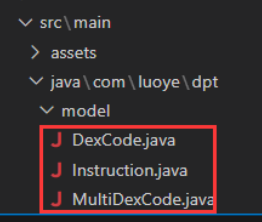
获取解压后的工作目录下的所有dex文件并遍历,调用 DexUtils.extractAllMethods,返回dex代码List<Instruction>,一个Instruction的List,其实一个Instruction就是dex中一个方法解析后存放的对象,不理解随时回去看这几个类
public static void  extractDexCode(String apkOutDir){
        List<File> dexFiles = getDexFiles(apkOutDir);//获取工作目录下所有的dex文件
        List<List<Instruction>> instructionList = new ArrayList<>();
        String appNameNew = "OoooooOooo";
        String dataOutputPath = getOutAssetsDir(apkOutDir).getAbsolutePath() + File.separator + appNameNew; //OoooooOooo文件
        for(File dexFile : dexFiles) {//遍历dex文件
            String newName = dexFile.getName().endsWith(".dex") ? dexFile.getName().replaceAll("\\.dex$", "_tmp.dex") : "_tmp.dex";
            File dexFileNew = new File(dexFile.getParent(), newName);
            //抽取dex的代码, 一个Instruction存放一个方法的code, 返回的ret Instruction数组存放了该dex的方法的code, 并创建了新的被填入了nop的dex
            List<Instruction> ret = DexUtils.extractAllMethods(dexFile, dexFileNew);
            instructionList.add(ret);
            //更新dex的hash
            File dexFileRightHashes = new File(dexFile.getParent(),FileUtils.getNewFileName(dexFile.getName(),"new"));
            DexUtils.writeHashes(dexFileNew,dexFileRightHashes);
            dexFile.delete();
            dexFileNew.delete();
            dexFileRightHashes.renameTo(dexFile);
        }

        MultiDexCode multiDexCode = MultiDexCodeUtils.makeMultiDexCode(instructionList);//生成MultiDexCode结构存放所有dex的原本的code(这里是直接存放的代码, 我们其实可以将其加密之后存放)

        MultiDexCodeUtils.writeMultiDexCode(dataOutputPath,multiDexCode);//将MultiDexCode结构写入到OoooooOooo文件中
    }
接下来我们分析DexUtils.extractAllMethods,这个函数的作用很重要,也就是利用com.android.dex.Dex来解析dex文件,得到dex原本的各个方法的代码,一个方法对应一个解析后的Instruction对象,并且创建新的dex,将指令nop掉,后面会使用这个dex重新打包
public static List<Instruction> extractAllMethods(File dexFile, File outDexFile) {
        List<Instruction> instructionList = new ArrayList<>();   //方法结构体 数组
        Dex dex = null;
        RandomAccessFile randomAccessFile = null;
        byte[] dexData = IoUtils.readFile(dexFile.getAbsolutePath());
        IoUtils.writeFile(outDexFile.getAbsolutePath(),dexData);//将原本代码先write到新的outDexFile

        try {
            dex = new Dex(dexFile);//利用com.android.dex.Dex来解析
            randomAccessFile = new RandomAccessFile(outDexFile, "rw");
            Iterable<ClassDef> classDefs = dex.classDefs();//获取dex中的全部类
            for (ClassDef classDef : classDefs) {      //遍历dex文件中的类
                boolean skip = false;
                //跳过系统类(上面的excludeRule中定义的不抽取的类的规则)
                for(String rule : excludeRule){
                    if(classDef.toString().matches(rule)){
                        skip = true;
                        break;
                    }
                }
                if(skip){
                    continue;
                }
                if(classDef.getClassDataOffset() == 0){//获取类数据偏移
                    String log = String.format("class '%s' data offset is zero",classDef.toString());
                    logger.warn(log);
                    continue;
                }

                ClassData classData = dex.readClassData(classDef);//获取class数据

                String className = dex.typeNames().get(classDef.getTypeIndex());
                String humanizeTypeName = TypeUtils.getHumanizeTypeName(className);

                ClassData.Method[] directMethods = classData.getDirectMethods();
                ClassData.Method[] virtualMethods = classData.getVirtualMethods();
                for (ClassData.Method method : directMethods) {//遍历directMethods
                    Instruction instruction = extractMethod(dex,randomAccessFile,classDef,method);
                    if(instruction != null) {
                        instructionList.add(instruction);
                    }
                }

                for (ClassData.Method method : virtualMethods) {//遍历virtualMethods
                    Instruction instruction = extractMethod(dex, randomAccessFile,classDef, method);
                    if(instruction != null) {
                        instructionList.add(instruction);
                    }
                }
                processedClassList.add(humanizeTypeName);
            }
        }
        catch (Exception e){
            e.printStackTrace();
        }
        finally {
            IoUtils.close(randomAccessFile);
        }

        return instructionList;
    }
extractMethod方法(看我的注释进行理解)
private static Instruction extractMethod(Dex dex ,RandomAccessFile outRandomAccessFile,ClassDef classDef,ClassData.Method method)
            throws Exception{
        String returnTypeName = dex.typeNames().get(dex.protoIds().get(dex.methodIds().get(method.getMethodIndex()).getProtoIndex()).getReturnTypeIndex());//获取返回值类型
        String methodName = dex.strings().get(dex.methodIds().get(method.getMethodIndex()).getNameIndex());
        String className = dex.typeNames().get(classDef.getTypeIndex());
        //native函数,abstract函数的codeoffset为0
        if(method.getCodeOffset() == 0){
            String log = String.format("method code offset is zero,name =  %s.%s , returnType = %s",
                    TypeUtils.getHumanizeTypeName(className),
                    methodName,
                    TypeUtils.getHumanizeTypeName(returnTypeName));
            logger.warn(log);
            return null;
        }
        Instruction instruction = new Instruction();//创建一个instruction的类来保存方法代码
        //16 = registers_size + ins_size + outs_size + tries_size + debug_info_off + insns_size
        int insnsOffset = method.getCodeOffset() + 16;//方法的ins是从偏移16开始的
        Code code = dex.readCode(method);//读取方法的code
        //容错处理
        if(code.getInstructions().length == 0){
            String log = String.format("method has no code,name =  %s.%s , returnType = %s",
                    TypeUtils.getHumanizeTypeName(className),
                    methodName,
                    TypeUtils.getHumanizeTypeName(returnTypeName));
            logger.warn(log);
            return null;
        }
        int insnsCapacity = code.getInstructions().length;//获取指令长度
        //insns容量不足以存放return语句,跳过
        byte[] returnByteCodes = getReturnByteCodes(returnTypeName);//根据类型缩写获取return语句的code
        if(insnsCapacity * 2 < returnByteCodes.length){
            logger.warn("The capacity of insns is not enough to store the return statement. {}.{}() ClassIndex = {}-> {} insnsCapacity = {}byte(s) but returnByteCodes = {}byte(s)",
                    TypeUtils.getHumanizeTypeName(className),
                    methodName,
                    classDef.getTypeIndex(),
                    TypeUtils.getHumanizeTypeName(returnTypeName),
                    insnsCapacity * 2,
                    returnByteCodes.length);
            return null;
        }
        instruction.setOffsetOfDex(insnsOffset);
        //这里的MethodIndex对应method_ids区的索引
        instruction.setMethodIndex(method.getMethodIndex());
        //注意:这里是数组的大小
        instruction.setInstructionDataSize(insnsCapacity * 2);
        byte[] byteCode = new byte[insnsCapacity * 2];
        //循环读取原先方法的指令写入到bytecode数组中, 然后填入nop到新dex中
        for (int i = 0; i < insnsCapacity; i++) {
            outRandomAccessFile.seek(insnsOffset + (i * 2));
            byteCode[i * 2] = outRandomAccessFile.readByte();
            byteCode[i * 2 + 1] = outRandomAccessFile.readByte();
            outRandomAccessFile.seek(insnsOffset + (i * 2));
            outRandomAccessFile.writeShort(0);//写入两条nop
        }
        instruction.setInstructionsData(byteCode);//将原先的code填入instruction结构体
        outRandomAccessFile.seek(insnsOffset);
        //写入return语句
        outRandomAccessFile.write(returnByteCodes);
        return instruction;
    }
其实他这里是直接存放了原先dex的code,没有加密,我们可以加密存放,增加安全性,避免能直接从assets/OoooooOooo文件中把本来的dex code拿到
AndroidManifest.xml修改及其修改后的影响
主要是修改了两个地方,也有较多其他壳会修改这个andoroid:name和android:appComponentFactory,写了下application里面android:name的影响以及android:appComponentFactory是怎么被获取到的分析
//获取AndroidManifest.xml里的application标签内的android:name属性保存到**app_name**文件中
ApkUtils.saveApplicationName(apkMainProcessPath);
//写入com.luoyesiqiu.shell.ProxyApplication到application标签内的android:name属性中
ApkUtils.writeProxyAppName(apkMainProcessPath);
//获取AndroidManifest.xml里的android:appComponentFactory属性保存到**app_acf**文件中
ApkUtils.saveAppComponentFactory(apkMainProcessPath);
//写入com.luoyesiqiu.shell.ProxyComponentFactory到application标签内的android:appComponentFactory属性
ApkUtils.writeProxyComponentFactoryName(apkMainProcessPath);
application中的android:name属性指定了当应用程序进程开始时,该类在所有应用程序组件之前被实例化。
AppComponentFactory理解:原本代码
public class AppComponentFactory {
        //提供类加载器
    public @NonNull ClassLoader instantiateClassLoader(@NonNull ClassLoader cl,
            @NonNull ApplicationInfo aInfo) {
        return cl;
    }

        //创建Application
    public @NonNull Application instantiateApplication(@NonNull ClassLoader cl,
            @NonNull String className)
            throws InstantiationException, IllegalAccessException, ClassNotFoundException {
        return (Application) cl.loadClass(className).newInstance();
    }

        //Activity组件
    public @NonNull Activity instantiateActivity(@NonNull ClassLoader cl, @NonNull String className,
            @Nullable Intent intent)
            throws InstantiationException, IllegalAccessException, ClassNotFoundException {
        return (Activity) cl.loadClass(className).newInstance();
    }

        //BroadcastReceiver组件
    public @NonNull BroadcastReceiver instantiateReceiver(@NonNull ClassLoader cl,
            @NonNull String className, @Nullable Intent intent)
            throws InstantiationException, IllegalAccessException, ClassNotFoundException {
        return (BroadcastReceiver) cl.loadClass(className).newInstance();
    }

    //server组件
    public @NonNull Service instantiateService(@NonNull ClassLoader cl,
            @NonNull String className, @Nullable Intent intent)
            throws InstantiationException, IllegalAccessException, ClassNotFoundException {
        return (Service) cl.loadClass(className).newInstance();
    }

        //ContentProvider组件
    public @NonNull ContentProvider instantiateProvider(@NonNull ClassLoader cl,
            @NonNull String className)
            throws InstantiationException, IllegalAccessException, ClassNotFoundException {
        return (ContentProvider) cl.loadClass(className).newInstance();
    }

    public static final AppComponentFactory DEFAULT = new AppComponentFactory();
}
这个类主要有六个方法和一个指向自己的变量,六个方法包括一个方法是提供类加载器,一个是创建Application,例外四个是创建Android的四大组件。
只要在application中配置了android:appComponentFactory,系统在创建Application和四大组件时就会调用到这里配置的这个类,如果没有配置,那么就会直接使用上面类内部定义的DEFAULT变量。
在android启动流程中,ActivityThread.main()是进入app的大门,在进程创建后会在其中调用ActivityThread的attach(),接着就会调用到ActivityManagerService.attachApplication()—>attachApplicationLocked(),在attachApplicationLocked()又会调用到ActivityThread.ApplicationThread.bindApplicaiton(),其实这个主要就是赋值,然后通过handler发送消息,最终调用到的是ActivityThread.handleBindApplication
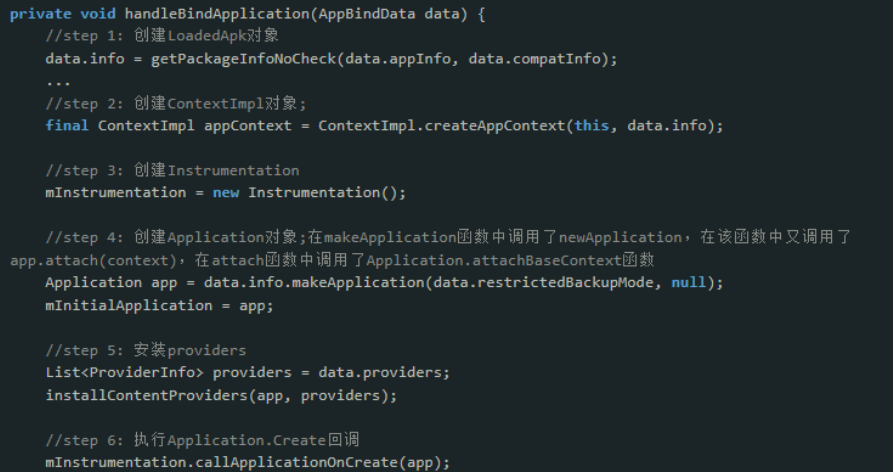
在step4,调用了makeApplication,里面又调用了newApplication
public Application newApplication(ClassLoader cl, String className, Context context)
            throws InstantiationException, IllegalAccessException,
            ClassNotFoundException {
        Application app = getFactory(context.getPackageName())
                .instantiateApplication(cl, className);
        app.attach(context);
        return app;
    }

    private AppComponentFactory getFactory(String pkg) {
        if (pkg == null) {
            Log.e(TAG, "No pkg specified, disabling AppComponentFactory");
            return AppComponentFactory.DEFAULT;
        }
        if (mThread == null) {
            Log.e(TAG, "Uninitialized ActivityThread, likely app-created Instrumentation,"
                    + " disabling AppComponentFactory", new Throwable());
            return AppComponentFactory.DEFAULT;
        }
        LoadedApk apk = mThread.peekPackageInfo(pkg, true);
        // This is in the case of starting up "android".
        if (apk == null) apk = mThread.getSystemContext().mPackageInfo;
        return apk.getAppFactory();
    }
调用getFactory获取AppComponentFactory实例化Application,然后调用Application的attach()方法,进而调用Application的attachBaseContext(),这也说明attachBaseContext()比ContentProvide先执行,这里我们继续看AppComponentFactory的获取LoadedApk.getAppFactory():
public AppComponentFactory getAppFactory() {
        return mAppComponentFactory;
    }
只是简单的返回mAppComponentFactory属性,因为AppComponentFactory的创建是在LoadedApk的构造函数中调用createAppFactory()创建的
private AppComponentFactory createAppFactory(ApplicationInfo appInfo, ClassLoader cl) {
  if (appInfo.appComponentFactory != null && cl != null) {
      try {
          return (AppComponentFactory)
                  cl.loadClass(appInfo.appComponentFactory).newInstance();
      } catch (InstantiationException | IllegalAccessException | ClassNotFoundException e) {
          Slog.e(TAG, "Unable to instantiate appComponentFactory", e);
      }
  }
  return AppComponentFactory.DEFAULT;
}
这里就获取了我们在Manifest中配置的AppComponentFactory。
然后上面填写的com.luoyesiqiu.shell.ProxyApplication和com.luoyesiqiu.shell.ProxyComponentFactory我们一会儿再仔细分析(这两个类都在后面会打包进新apk的代理dex中)
代理dex添加、删除meta-data、壳lib支持添加、重打包及重签名
//往apk中添加代理dex(将项目文件shell-files/dex/classes.dex写入到apk目录中)
ApkUtils.addProxyDex(apkMainProcessPath);
//删除meta-data
ApkUtils.deleteMetaData(apkMainProcessPath);
//把shell-libs(壳的so文件)也copy到apk目录中
ApkUtils.copyShellLibs(apkMainProcessPath, new File(outputApkFileParentPath,"shell-files/libs"));
//重打包以及签名
new BuildAndSignApkTask(false, apkMainProcessPath, output).run();

//删除工作目录
File apkMainProcessFile = new File(apkMainProcessPath);
if (apkMainProcessFile.exists()) {
    FileUtils.deleteRecurse(apkMainProcessFile);
}
代理dex结构: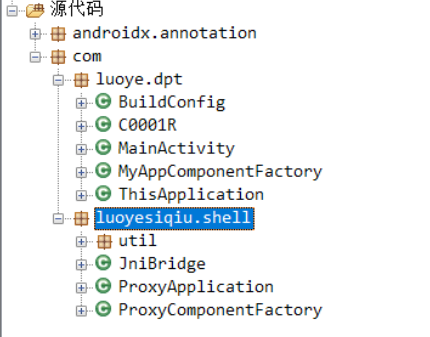
shell模块-源码分析
我们先来分析代理实现(就是上面往apk中添加的那个dex),也就是
android:appComponentFactory="com.luoyesiqiu.shell.ProxyComponentFactory"
android:name="com.luoyesiqiu.shell.ProxyApplication"
其实主要是com.luoyesiqiu.shell.ProxyApplication
首先我们要知道在ActivityThread启动流程中,handleBindApplication会调用makeApplication,然后makeApplication又会调用newApplication,而newApplication就是调用getFactory获取AppComponentFactory实例化Application,然后调用Application的attach()方法,进而调用Application的attachBaseContext(),然后回到handleBindApplication进入callApplicationOnCreate()函数就执行了Application.onCreate()方法
而这个项目的com.luoyesiqiu.shell.ProxyApplication就是Override了OnCreate方法和attachBaseContext方法
ProxyApplication-attachBaseContext重写解析
我们先看attachBaseContext
先调用原本的(父类的)attachBaseContext,然后调用native的init_app函数,并重新加载了一次dex,将新的dex也添加到本来的classload的DexPathList obj中, 以便classloader从中加载类
@Override
    protected void attachBaseContext(Context base) {
        super.attachBaseContext(base);//先调用原本的attachBaseContext
        Log.d(TAG,"dpt attachBaseContext");

        Log.d(TAG,"attachBaseContext classloader = " + base.getClassLoader());

        if(!initialized) {

            Log.d(TAG,"ProxyApplication init");//ProxyApplication初始化

            //调用native的init_app函数
            //init_app函数(将zip open后mmap到内存中, 然后获取加载到内存中apk的assets/OoooooOooo文件的指针, 然后调用readCodeItem将这个MultiDexCode结构体解析出来获得各个dex的代码, 然后添加到dexMap中)
            JniBridge.ia(base,base.getClassLoader());

            //获取原本的ClassLoader
            ClassLoader oldClassLoader = base.getClassLoader();
            //获取新的ClassLoader, 重新加载一次dex
            //dex在App启动的时候已经被加载过一次了,但是,我们为什么还要再加载一次?因为系统加载的dex是以只读方式加载的,我们没办法去修改那一部分的内存
            //而且App的dex加载早于我们Application的启动,这样,我们的代码根本没法感知到,所以我们要重新加载dex
            //loadDex, 实际上就是查找了下路径然后然后调用super实例化了PathClassLoader并返回
            ClassLoader shellClassLoader = ShellClassLoader.loadDex(base);

            //然后利用获取到的shellClassLoader, 将新的dex也添加到本来的classload的DexPathList obj中, 以便classloader从中加载类
            JniBridge.mde(oldClassLoader,shellClassLoader);
            initialized = true;
        }
    }
我们先看init_app,其实上面我已经注释的很详细了,就是将zip open后mmap到内存中, 然后获取加载到内存中apk的assets/OoooooOooo文件的指针, 然后调用readCodeItem将这个MultiDexCode结构体解析出来获得各个dex的代码, 然后添加到dexMap中,dexMap后面回填代码的时候会被用到
其实native定义的CodeItem类和我们的Instruction类相对应,成员都是一样的
//在dex中的偏移
private int offsetOfDex;
//对应dex中的method_idx
private int methodIndex;
//instructionsData数组的长度
private int instructionDataSize;
//指令数据
private byte[] instructionsData;


uint32_t mMethodIdx; //和上面相同
uint32_t mOffsetDex;
uint32_t mInsnsSize;
uint8_t* mInsns;
ProxyApplication-onCreate重写解析(hook点)
先调用本身的onCreate,然后调用了两个native的函数,callRealApplicationAttach和callRealApplicationOnCreate
@Override
    public void onCreate() {
        super.onCreate();//先调用本身的onCreate
        Log.d(TAG, "dpt onCreate");

        Log.d(TAG, "onCreate() classLoader = " + getApplicationContext().getClassLoader());

        //读取app真实名称
        String realApplicationName = FileUtils.readAppName(getApplicationContext());

        if (!TextUtils.isEmpty(realApplicationName)) {//字符串非空会进入
            //调用native的callRealApplicationAttach函数去调用原始apk Application类的attach方法
            JniBridge.craa(getApplicationContext(), realApplicationName);
        }


        if (!TextUtils.isEmpty(realApplicationName)) {
            JniBridge.craoc(realApplicationName);
            //调用native的callRealApplicationOnCreate函数调用原始apk Application类的onCreate方法
        }
    }
craa和craoc中都会调用getApplicationInstance, 然后里面会调用_init函数, 也就是去调用dpt_hook函数
extern "C" void _init(void)
{
    DLOGI("_init!");

    dpt_hook();
}
void dpt_hook()
{
    bytehook_init(BYTEHOOK_MODE_AUTOMATIC, false);
    g_sdkLevel = android_get_device_api_level(); //获取sdklevel
    hook_mmap();                                 //修改mmap以便在我们加载dex后能够修改dex的属性为可写
    hook_ClassLinker_LoadMethod();               // hook loadmethod以便将我们存放到dexmap中的代码写回到内存中的dex原本位置(里面也调用了changeDexProtect, 利用mprotect来修改了dex权限为可读写),一次回填一个method
    hook_GetOatDexFile();
}
重写了AppComponentFactory类
反正六个方法里面都是getTargetAppComponentFactory获取自身这个ProxyComponentFactory类并实例化,并设置到返回sAppComponentFactory静态变量且返回这个对象,然后方法里面回去判断是否为null,如果≠null就重新调用本类的本方法,否则就调用super AppComponentFactory的本方法
总之就是为了尽早初始化,不太重要
package com.luoyesiqiu.shell;

import android.app.Activity;
import android.app.AppComponentFactory;
import android.app.Application;
import android.app.Service;
import android.content.BroadcastReceiver;
import android.content.ContentProvider;
import android.content.Intent;
import android.content.pm.ApplicationInfo;
import android.util.Log;

import com.luoye.dpt.ThisApplication;
import com.luoyesiqiu.shell.util.ShellClassLoader;
import com.luoyesiqiu.shell.util.StringUtils;

import androidx.annotation.NonNull;
import androidx.annotation.RequiresApi;
import java.lang.reflect.Method;

@RequiresApi(api = 28)
public class ProxyComponentFactory extends AppComponentFactory {
    private static final String TAG = "dpt " + ProxyComponentFactory.class.getSimpleName();
    private static AppComponentFactory sAppComponentFactory;

    //readAppComponentFactory, 读取我们设置的AppComponentFactory属性的值
    //也就是com.luoyesiqiu.shell.ProxyComponentFactory
    private String getTargetClassName(ClassLoader classLoader){
        return JniBridge.rcf(classLoader);
    }

    //加载自身类,并实例化类,从此系统中有了两个类
    private AppComponentFactory getTargetAppComponentFactory(ClassLoader classLoader){
        if(sAppComponentFactory == null){
            String targetClassName = getTargetClassName(classLoader);//获取到com.luoyesiqiu.shell.ProxyComponentFactory
            Log.d(TAG,"targetClassName = " + targetClassName);
            if(!StringUtils.isEmpty(targetClassName)) {
                try {//用目标类名创建一个新的AppComponentFactory对象并返回
                    sAppComponentFactory = (AppComponentFactory) Class.forName(targetClassName).newInstance();
                    return sAppComponentFactory;
                } catch (Exception e) {
                }
            }
        }

        return sAppComponentFactory;
    }

    private void init(ClassLoader cl){

        if(!ProxyApplication.initialized){

            ProxyApplication.initialized = true;

            JniBridge.ia(null,cl);//init app
            String apkPath = JniBridge.gap(cl);//getApkPath
            ClassLoader classLoader = ShellClassLoader.loadDex(apkPath);
            //将新的dex也添加到本来的classload的DexPathList obj中, 以便classloader从中加载类
            JniBridge.mde(cl,classLoader);

            Log.d(TAG,"ProxyComponentFactory init() classLoader = " + classLoader);

        }
    }

    //重写Activity
    @Override
    public Activity instantiateActivity(ClassLoader cl, String className, Intent intent) throws ClassNotFoundException, IllegalAccessException, InstantiationException {
        Log.d(TAG, "instantiateActivity() called with: cl = [" + cl + "], className = [" + className + "], intent = [" + intent + "]");

        AppComponentFactory targetAppComponentFactory = getTargetAppComponentFactory(cl);
        if(targetAppComponentFactory != null) {//如果是壳程序
            try {
                Method method = AppComponentFactory.class.getDeclaredMethod("instantiateActivity", ClassLoader.class, String.class, Intent.class);
                return (Activity) method.invoke(targetAppComponentFactory, cl, className, intent);

            } catch (Exception e) {
            }
        }
        return super.instantiateActivity(cl, className, intent);//不是壳程序
    }

    //重写Application的加载
    @Override
    public Application instantiateApplication(ClassLoader cl, String className) throws ClassNotFoundException, IllegalAccessException, InstantiationException {
        Log.d(TAG, "instantiateApplication() called with: cl = [" + cl + "], className = [" + className + "]");
        init(cl);

        AppComponentFactory targetAppComponentFactory = getTargetAppComponentFactory(cl);
        if(targetAppComponentFactory != null) {//如果是壳程序
            try {
                Method method = AppComponentFactory.class.getDeclaredMethod("instantiateApplication", ClassLoader.class, String.class);
                return (Application) method.invoke(targetAppComponentFactory, cl, className);

            } catch (Exception e) {
            }
        }
        return super.instantiateApplication(cl, ThisApplication.class.getName());//如果不是

    }

    //重写获取类加载器的instantiateClassLoader
    @Override
    public ClassLoader instantiateClassLoader(ClassLoader cl, ApplicationInfo aInfo) {
        Log.d(TAG, "instantiateClassLoader() called with: cl = [" + cl + "], aInfo = [" + aInfo + "]");
        init(cl);

        AppComponentFactory targetAppComponentFactory = getTargetAppComponentFactory(cl);
        //获取本类自身实例化后的对象
        if(targetAppComponentFactory != null) {
            try {
                Method method = AppComponentFactory.class.getDeclaredMethod("instantiateClassLoader", ClassLoader.class, ApplicationInfo.class);
                return (ClassLoader) method.invoke(targetAppComponentFactory, cl, aInfo);

            } catch (Exception e) {
            }
        }
        return super.instantiateClassLoader(cl, aInfo);
    }

    @Override
    public BroadcastReceiver instantiateReceiver(ClassLoader cl, String className, Intent intent) throws ClassNotFoundException, IllegalAccessException, InstantiationException {
        Log.d(TAG, "instantiateReceiver() called with: cl = [" + cl + "], className = [" + className + "], intent = [" + intent + "]");
        AppComponentFactory targetAppComponentFactory = getTargetAppComponentFactory(cl);

        if(targetAppComponentFactory != null) {
            try {
                Method method = AppComponentFactory.class.getDeclaredMethod("instantiateReceiver", ClassLoader.class, String.class, Intent.class);
                return (BroadcastReceiver) method.invoke(targetAppComponentFactory, cl, className, intent);

            } catch (Exception e) {
            }
        }
        return super.instantiateReceiver(cl, className, intent);
    }

    @Override
    public Service instantiateService(ClassLoader cl, String className, Intent intent) throws ClassNotFoundException, IllegalAccessException, InstantiationException {
        Log.d(TAG, "instantiateService() called with: cl = [" + cl + "], className = [" + className + "], intent = [" + intent + "]");
        AppComponentFactory targetAppComponentFactory = getTargetAppComponentFactory(cl);

        if(targetAppComponentFactory != null) {
            try {
                Method method = AppComponentFactory.class.getDeclaredMethod("instantiateReceiver", ClassLoader.class, String.class, Intent.class);
                return (Service) method.invoke(targetAppComponentFactory, cl, className, intent);

            } catch (Exception e) {
            }
        }
        return super.instantiateService(cl, className, intent);
    }

    @NonNull
    @Override
    public ContentProvider instantiateProvider(@NonNull ClassLoader cl, @NonNull String className) throws ClassNotFoundException, IllegalAccessException, InstantiationException {
        Log.d(TAG, "instantiateProvider() called with: cl = [" + cl + "], className = [" + className + "]");
        AppComponentFactory targetAppComponentFactory = getTargetAppComponentFactory(cl);
        if(targetAppComponentFactory != null) {
            try {
                Method method = AppComponentFactory.class.getDeclaredMethod("instantiateProvider", ClassLoader.class, String.class);
                return (ContentProvider) method.invoke(targetAppComponentFactory, cl, className);

            } catch (Exception e) {
            }
        }
        return super.instantiateProvider(cl, className);
    }

}
脱壳处理(案例:2022网鼎杯-whereiscode)
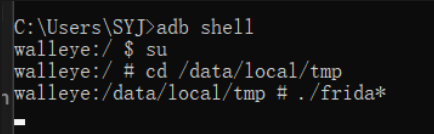
方法1:frida-dexdump直接dump以及能直接dump的原因
原因:frida-dexdump这个工具是直接暴力搜索的内存,这个壳因为是将解析出来的code hook的loadmethod填回了内存中dex的原位,所以能直接dump到,所以为什么说它不是真的抽取壳
记得使用最新版的frida-dexdump,添加-d(deep search)参数
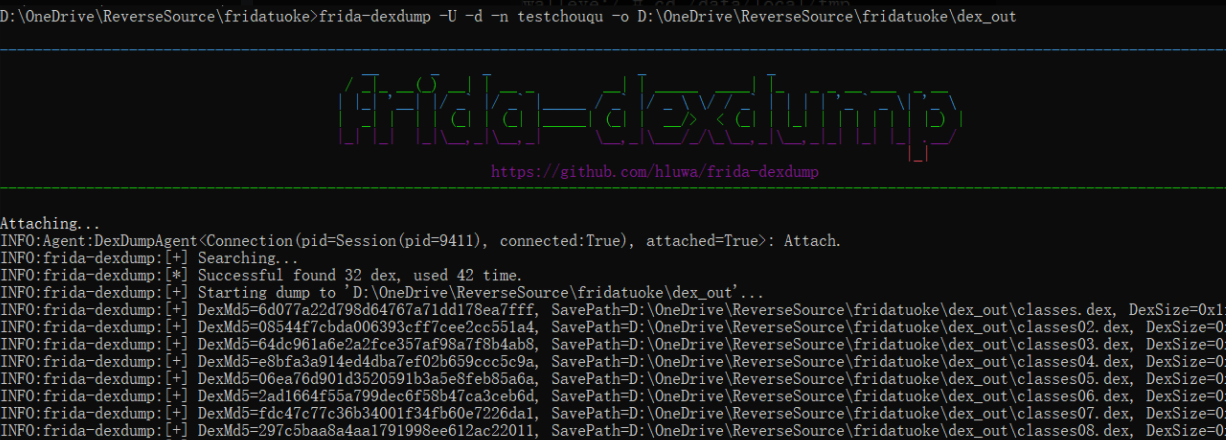
就能看见关键的check代码
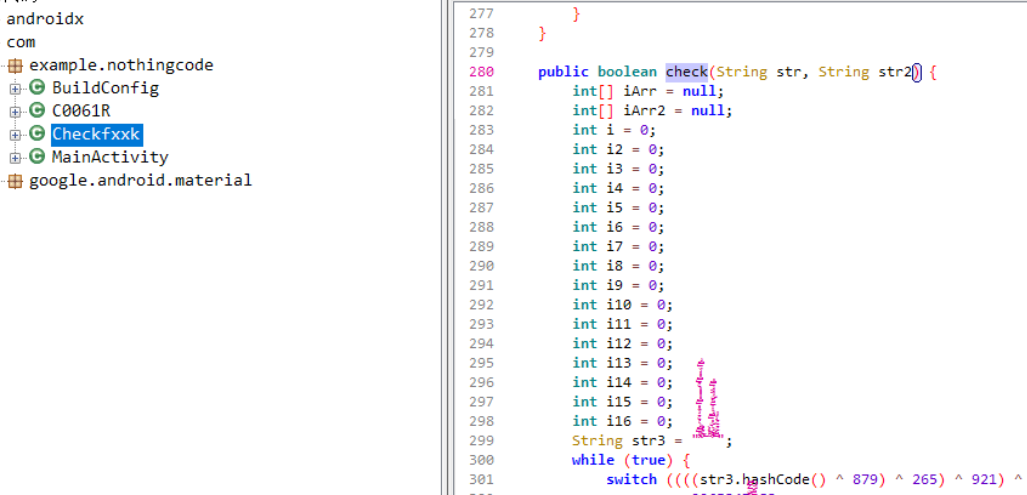
方法2:静态解析assets/OoooooOooo文件
我们分析了源码之后是知道它是怎么提取的代码,以及各种类的结构,实际上这个文件就是MultiDexCode类的对象,我们按照它的代码写个解析即可
仔细看MultiDexCodeUtils.java,尤其是writeMultiDexCode,就是作者将code写入到文件中的操作,我们根据这个把oo..文件解析出来提取到各个dex的code(都恢复成那个List<Instruction> instructions类型)
public class MultiDexCodeUtils {

    /**
     * 生成MultiDexCode结构
     */
    public static MultiDexCode makeMultiDexCode(List<List<Instruction>> multiDexInsns){
        int fileOffset = 0;
        MultiDexCode multiDexCode = new MultiDexCode();
        multiDexCode.setVersion(Const.MULTI_DEX_CODE_VERSION);
        fileOffset += 2;
        multiDexCode.setDexCount((short) multiDexInsns.size());//通过二维数组的长度判断dex个数
        fileOffset += 2;
        List<Integer> dexCodeIndex = new ArrayList<>();
        multiDexCode.setDexCodesIndex(dexCodeIndex);
        fileOffset += 4 * multiDexInsns.size();

        List<DexCode> dexCodeList = new ArrayList<>();
        List<Integer> insnsIndexList = new ArrayList<>();

        for (List<Instruction> insns : multiDexInsns) {
            System.out.println("DexCode offset = " + fileOffset);
            dexCodeIndex.add(fileOffset);
             DexCode dexCode = new DexCode();

            dexCode.setMethodCount((short)insns.size());
            fileOffset += 2;
            dexCode.setInsns(insns);

            insnsIndexList.add(fileOffset);

            dexCode.setInsnsIndex(insnsIndexList);

            for (Instruction ins : insns) {
                fileOffset += 4; //Instruction.offsetOfDex
                fileOffset += 4; //Instruction.methodIndex
                fileOffset += 4; //Instruction.instructionDataSize
                fileOffset += ins.getInstructionsData().length; //Instruction.instructionsData
            }

            dexCodeList.add(dexCode);
        }
        System.out.println("fileOffset = " + fileOffset);

        multiDexCode.setDexCodes(dexCodeList);

        return multiDexCode;
    }

    /**
     * 写入MultiDexCode结构
     * @param multiDexCode MultiDexCode结构
     */
    public static void writeMultiDexCode(String out, MultiDexCode multiDexCode){
        if(multiDexCode.getDexCodes().isEmpty()){
            return;
        }
        RandomAccessFile randomAccessFile = null;

        try {
            randomAccessFile = new RandomAccessFile(out, "rw");
            //写入版本号(short)
            randomAccessFile.write(Endian.makeLittleEndian(multiDexCode.getVersion()));
            //写入dex数量(short)
            randomAccessFile.write(Endian.makeLittleEndian(multiDexCode.getDexCount()));

            //写入每个dex在文件中的位置
            for (Integer dexCodesIndex : multiDexCode.getDexCodesIndex()) {
                    //DexCode的索引,List长度为dex的数量     private List<Integer> dexCodesIndex;
                randomAccessFile.write(Endian.makeLittleEndian(dexCodesIndex));
            }
            //写入每个dex的数据
            for (DexCode dexCode : multiDexCode.getDexCodes()) {
                List<Instruction> insns = dexCode.getInsns();

                int methodCount = dexCode.getMethodCount() & 0xFFFF;

                System.out.println("insns item count:" + insns.size() + ",method count : " + methodCount);
                //写入该dex的方法数
                randomAccessFile.write(Endian.makeLittleEndian(dexCode.getMethodCount()));
                for (int i = 0; i < insns.size(); i++) {//写入单个dex的方法代码(长度的话就读取4+4+4+1*getInstructionDataSize() )
                    Instruction instruction = insns.get(i);
                    randomAccessFile.write(Endian.makeLittleEndian(instruction.getMethodIndex()));
                    randomAccessFile.write(Endian.makeLittleEndian(instruction.getOffsetOfDex()));
                    randomAccessFile.write(Endian.makeLittleEndian(instruction.getInstructionDataSize()));
                    randomAccessFile.write(instruction.getInstructionsData());
                }
            }

        }
        catch (IOException e){
            e.printStackTrace();
        }
        finally {
            IoUtils.close(randomAccessFile);
        }
    }
}
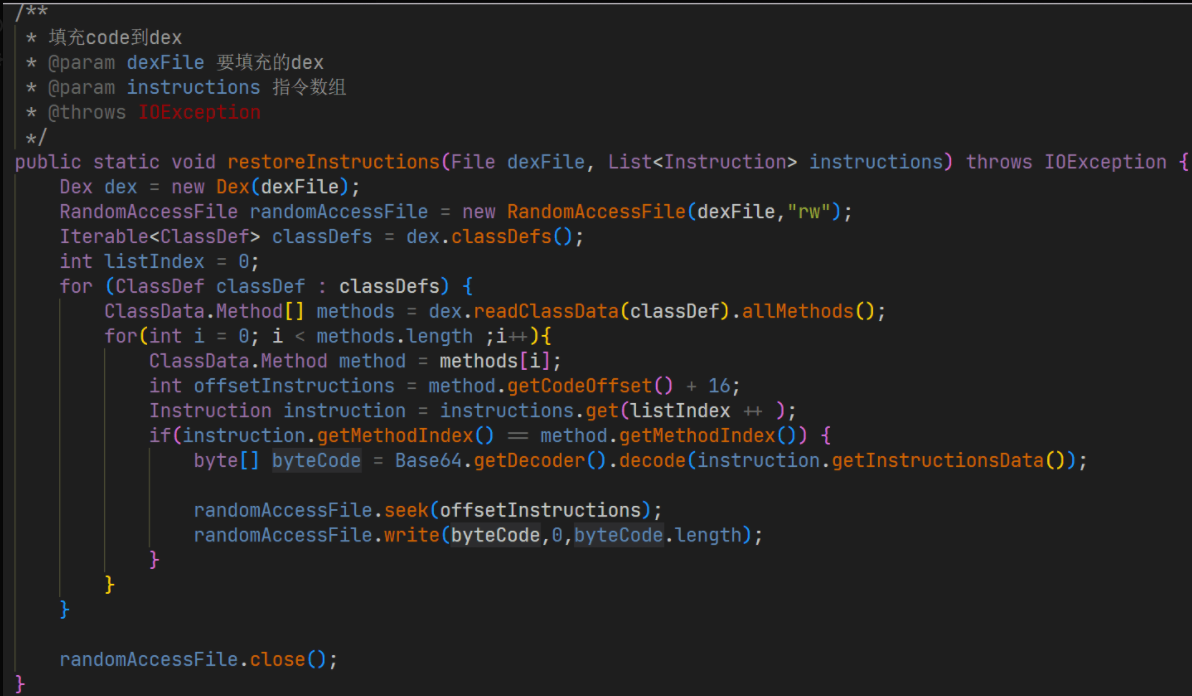
最后调用这个代码即可恢复
资料:
https://github.com/luoyesiqiu/dpt-shell
https://github.com/luoyesiqiu/dpt-shell/blob/main/doc/HowItWorks.md
https://bbs.pediy.com/thread-273293.htm#msg_header_h2_1