0x00 前言
测试了一下dionaea这个蜜罐,算是一篇总结吧
0x01 环境
CentOS release 6.2 (Final)
Linux www.centos.com 2.6.32-220.el6.x86_64 #1 SMP Tue Dec 6 19:48:22 GMT 2011 x86_64 x86_64 x86_64 GNU/Linux
0x02 依赖性
libev >=4.04
libglib >=2.20
libssl
liblcfg
libemu
python >=3.2
sqlite >=3.3.6
readline >=3
cython >0.14.1
libudns
libcurl >=7.18
libpcap >=1.1.1
libnl(可选,不加也没啥影响)
libgc >=6.8
0x03 安装
mkdir /opt/dionaea
yum install git autoconf* libtool-*
liblcfg
git clone git://git.carnivore.it/liblcfg.git liblcfg
cd liblcfg/code
autoreconf -vi
./configure --prefix=/opt/dionaea
make install
libemu
git clone git://git.carnivore.it/libemu.git libemu
cd libemu
autoreconf -vi
./configure --prefix=/opt/dionaea
make install
libev
wget http://dist.schmorp.de/libev/Attic/libev-4.04.tar.gz
tar xfz libev-4.04.tar.gz
cd libev-4.04
./configure --prefix=/opt/dionaea
make install
Python 3.2
yum groupinstall "Development tools"
yum install zlib-devel bzip2-devel openssl-devel ncurses-devel sqlite-devel readline-devel tk-devel
wget http://www.python.org/ftp/python/3.2.2/Python-3.2.2.tgz
tar xfz Python-3.2.2.tgz
cd Python-3.2.2/
./configure --enable-shared --prefix=/opt/dionaea --with-computed-gotos --enable-ipv6 LDFLAGS="-Wl,-rpath=/opt/dionaea/lib/ -L/usr/lib/x86_64-linux-gnu/"
make
make install
Cython
wget http://cython.org/release/Cython-0.15.tar.gz
tar xfz Cython-0.15.tar.gz
cd Cython-0.15
/opt/dionaea/bin/python3 setup.py install
udns
wget http://www.corpit.ru/mjt/udns/old/udns_0.0.9.tar.gz
tar xfz udns_0.0.9.tar.gz
cd udns-0.0.9/
./configure
make shared
cp udns.h /opt/dionaea/include
cp *.so* /opt/dionaea/lib/
cd /opt/dionaea/lib
ln -s libudns.so.0 libudns.so
libpcap
wget http://www.tcpdump.org/release/libpcap-1.1.1.tar.gz
tar xfz libpcap-1.1.1.tar.gz
cd libpcap-1.1.1
./configure --prefix=/opt/dionaea
make
make install
libcurl
#可以源码编译,也可以直接安装
git clone https://github.com/bagder/curl.git curl
cd curl
autoreconf -vi
./configure --prefix=/opt/dionaea
make
make install
dionaea
#nl模块会出问题,各种问题....
#实在不行/usr/include/netlink/netlink.h,mv到其他目录,
#安装好了再复原了
git clone git://git.carnivore.it/dionaea.git dionaea
cd dionaea
autoreconf -vi
./configure --with-lcfg-include=/opt/dionaea/include/ \
      --with-lcfg-lib=/opt/dionaea/lib/ \
      --with-python=/opt/dionaea/bin/python3.2 \
      --with-cython-dir=/opt/dionaea/bin \
      --with-udns-include=/opt/dionaea/include/ \
      --with-udns-lib=/opt/dionaea/lib/ \
      --with-emu-include=/opt/dionaea/include/ \
      --with-emu-lib=/opt/dionaea/lib/ \
      --with-gc-include=/usr/include/gc \
      --with-ev-include=/opt/dionaea/include \
      --with-ev-lib=/opt/dionaea/lib \
      --with-curl-config=/usr/bin/ \
      --with-pcap-include=/opt/dionaea/include \
      --with-pcap-lib=/opt/dionaea/lib/
make
make install
创建指定特定的用户和组,用来运行dionaea
groupadd dionaea
useradd -g dionaea -s /usr/sbin/nologin dionaea
chown -R dionaea:dionaea /opt/dionaea/
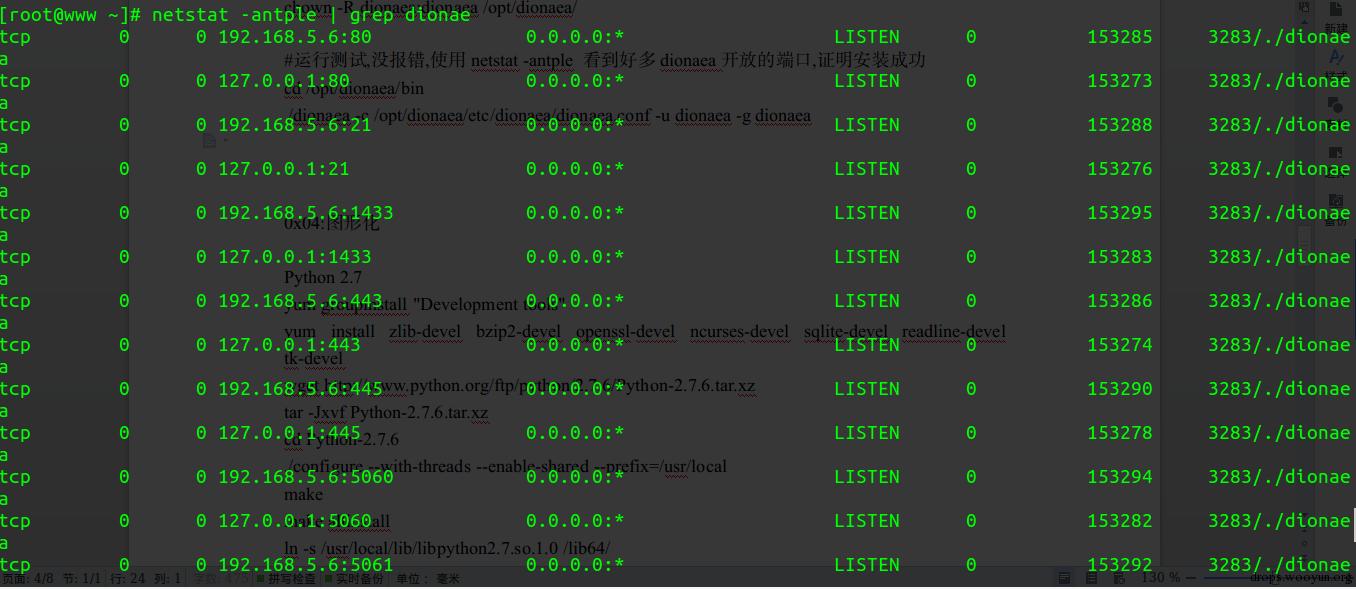
运行测试,没报错,使用netstat -antple 看到好多dionaea开放的端口,证明安装成功
cd /opt/dionaea/bin
./dionaea -c /opt/dionaea/etc/dionaea/dionaea.conf -u dionaea -g dionaea
0x04 图形化
Python 2.7
yum groupinstall "Development tools"
yum install zlib-devel bzip2-devel openssl-devel ncurses-devel sqlite-devel readline-devel tk-devel
wget http://www.python.org/ftp/python/2.7.6/Python-2.7.6.tar.xz
tar -Jxvf Python-2.7.6.tar.xz
cd Python-2.7.6
./configure --with-threads --enable-shared --prefix=/usr/local
make
make altinstall
ln -s /usr/local/lib/libpython2.7.so.1.0 /lib64/
pip
wget http://pypi.python.org/packages/source/d/distribute/distribute-0.6.49.tar.gz
tar zxvf distribute-0.6.49.tar.gz
cd distribute-0.6.49
python2.7 setup.py install
easy_install-2.7 pip
django
pip2.7 install Django pygeoip django-pagination django-tables2 django-compressor
django-htmlmin django-filter
wget https://github.com/benjiec/django-tables2-simplefilter/archive/master.zip -O
django-tables2-simplefilter.zip
unzip django-tables2-simplefilter.zip
mv django-tables2-simplefilter-master/
django-tables2-simplefilter/
cd django-tables2-simplefilter/
python2.7 setup.py install
python-netaddr
wget https://pypi.python.org/packages/source/n/netaddr/netaddr-0.7.11.tar.gz
tar xzvf netaddr-0.7.11.tar.gz
cd netaddr-0.7.11
python2.7 setup.py install
PySubnetTree
git clone git://git.bro-ids.org/pysubnettree.git
cd pysubnettree/
python2.7 setup.py install
Nodejs
wget http://nodejs.org/dist/v0.8.16/node-v0.8.16.tar.gz
tar xzvf node-v0.8.16.tar.gz
cd node-v0.8.16
./configure
make
make install
npm install -g less

cd /opt/
wget https://github.com/RootingPuntoEs/DionaeaFR/archive/master.zip -O DionaeaFR.zip
unzip DionaeaFR.zip
mv DionaeaFR-master/ DionaeaFR
GeoIP&&GeoLiteCity
cd /opt/DionaeaFR/DionaeaFR/static
wget http://geolite.maxmind.com/download/geoip/database/GeoLiteCity.dat.gz
wget http://geolite.maxmind.com/download/geoip/database/GeoLiteCountry/GeoIP.dat.gz
gunzip GeoLiteCity.dat.gz
gunzip GeoIP.dat.gz
运行图形界面
cd /opt/DionaeaFR/
python2.7 manage.py collectstatic #type yes when asked
可能提示要运行一次python manage.py migrate, 提示就运行一次,有时候报错,但是好像不影响使用..........
python2.7 manage.py runserver 0.0.0.0:8000
Validating models...
0x05 debug
更改时区,默认是美国的
settings.py
TIME_ZONE = 'Asia/Shanghai'
更改时间格式,一直没有生效,不知道是为啥
访问web的时候
Error: Cannot find module 'promise'
运行
npm install -g promise
访问DionaeaFR的GRAPHS页面报
TypeError: __init__() got an unexpected keyword argument 'mimetype'
修改/opt/DionaeaFR/Web/views/graph.py,
mimetype="application/json"全部修改成
content_type="application/json"。
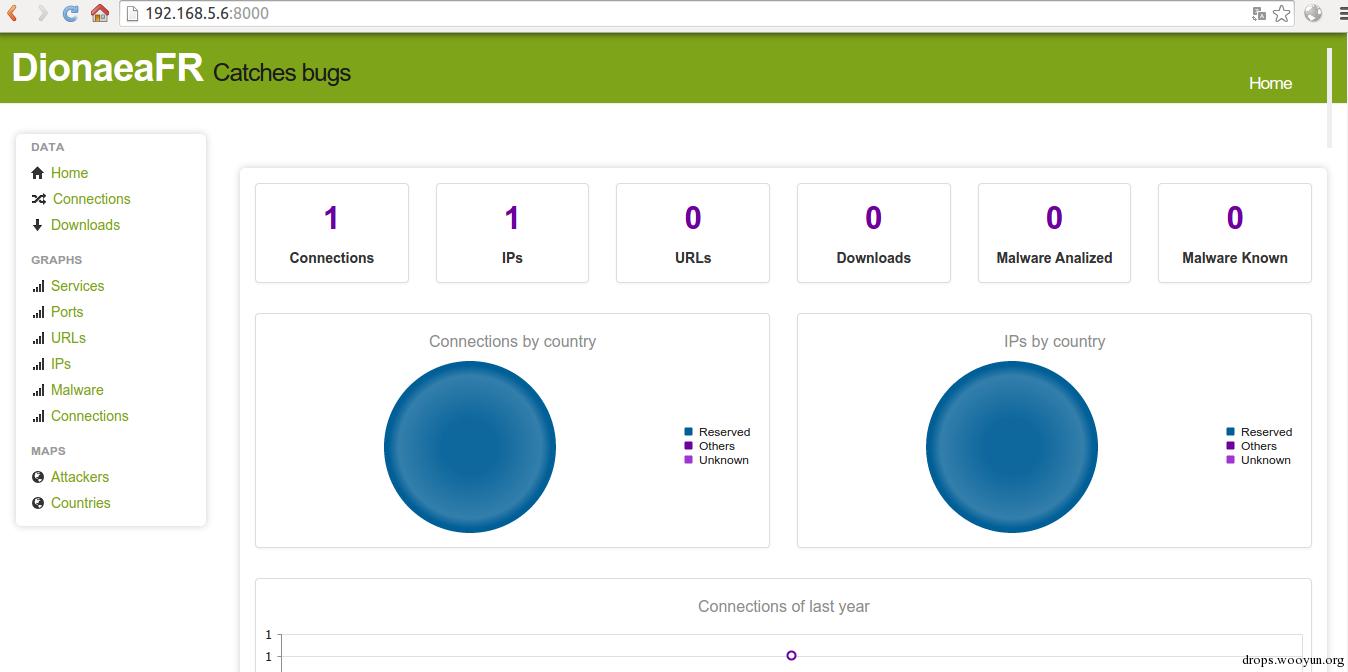
访问http://ip:8000
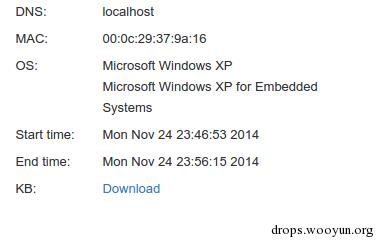
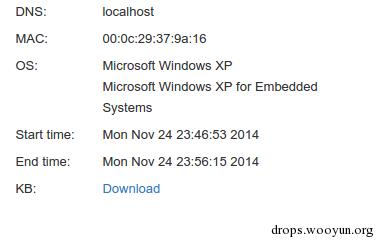
Nessus扫描

主机识别的结果
0x06 结构
命令格式
Dionaea 具体的命令格式如下:
dionaea [-c, --config=FILE] [-D, --daemonize] [-g, --group=GROUP]
        [-h, --help] [-H, --large-help][-l, --log-levels=WHAT] [-L, --log-domains=WHAT]
        [-u, --user=USER][-p, --pid-file=FILE] [-r, --chroot=DIR] [-V, --version]
        [-w, --workingdir=DIR]
选项的意义分别是: -c:指定运行程序所使用的配置文件,默认下配置文件是/opt/dionaea/etc/dionaea.conf。 -D:后台运行。 -g:指定启动后切换到某个用户组,默认下保持当前组。 -h:帮助信息。 -H:帮助信息,包括默认值信息。 -l:选择事件记录级别,可以选择 all, debug, info, message, warning, critical, error 这些值,多选使用“,”做分隔,排除使用“-”。 -L:选择域,支持通配符“*”和“?”,多选使用“,”,排除使用“-”。 -u:指定启动后切换到某个用户,默认下保持当前用户。 -p:记录 pid 到指定文件。 -r:指定启动后切换根目录到指定目录,默认下不切换。 -V:显示版本信息。 -w:设定进程工作目录,默认下为/opt/dionaea。
例子:
dionaea -l all,-debug -L '*'
dionaea -l all,-debug -L 'con*,py*'
dionaea -u nobody -g nogroup -w /opt/dionaea -p /opt/dionaea/var/run/dionaea.pid
配置文件
默认配置文件/opt/dionaea/etc/dionaea/dionaea.conf
里面包含以下几个模块
logging: 普通日志和错误日志存放的位置,等级和所属的域.
processors: 处理器 processors 部分配置 libemu 和用于导出数据流的模块 streamdumper. libemu 部分可增减允许的协议,配置 shellcode 检测时支持的最大流大小、跟踪步数限制和并发执行数等性能参数。streamdumper 部分配置导出数据流时允许和拒绝的协议,数据流保存的位置。
downloads: 文件下载保存的位置 bistreams: 配置数据流保存的位置 submit: 指定恶意文件自动提交的网址 listen: 指定监听的IP和接口
    一共有三种模式:

    getifaddrs:对所有的ip上都开启相关端口的监听,127.0.0.1也会监听,默认的选项
    manual:只在指定ip上开启端口监听
    nl:指定监听的接口
    配置子接口,一个网卡上多个IP被监测

listen =
{
        mode = "manual"
        addrs = { eth0 = ["10.1.2.3", "11.1.2.3"]}
}
modules: 配置各种模块的工作参数.部分"必须模块": curl、libemu、pcap模拟的服务等信息
    pcap:用来拒绝连接的请求.

    curl:用来传输文件,下载文件或者向第三方站点提交样本

    emu:用来检测或者模拟shellcode执行

    python:被dionaea调用,来模拟服务
0x07 端口指纹信息修改
提供以下这些服务
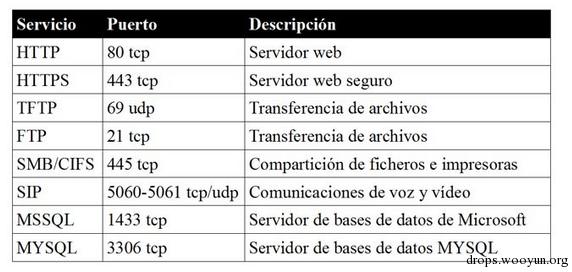
nmap -sV端口识别,信息太明显,显示" Dionaea honeypot"等字样

修改配置文件,变更指纹信息 SMB的445端口指纹: /opt/dionaea/lib/dionaea/python/dionaea/smb/include/smbfields.py 中
MConditionalField(UnicodeNullField("OemDomainName", "WORKGROUP")
ConditionalField(UnicodeNullField("ServerName", "HOMEUSER-3AF6FE")
WORKGROUP和HOMEUSER-3AF6FE,变更信息
MSSQL的1433端口指纹: /opt/dionaea/lib/dionaea/python/dionaea/mssql/mssql.py的 r.VersionToken.TokenType = 0x00修改为0xAA
FTP的21端口指纹: /opt/dionaea/lib/dionaea/python/dionaea/ftp.py self.reply(WELCOME_MSG, "Welcome to the ftp service") 修改为 self.reply(WELCOME_MSG, "Welcome to the svn service")
识别为正常的服务

0x08 通过uwsgi+nginx来发布页面
配置uwsgi
安装pip
curl -O https://raw.github.com/pypa/pip/master/contrib/get-pip.py
python get-pip.py
安装uwsgi
export LDFLAGS="-Xlinker --no-as-needed"
pip install uwsgi
测试uwsgi是否安装成功
vim test.py

# test.pydef application(env, start_response):    start_response('200 OK', [('Content-Type','text/html')])    return "Hello World"
执行shell命令
uwsgi --http :8001 --wsgi-file test.py
访问http://ip:8001是否有Hello World
配置django
编辑django_wsgi.py
# coding: utf-8
import os
import sys
reload(sys)
sys.setdefaultencoding('utf8')
需要修改的
#os.environ.setdefault("DJANGO_SETTINGS_MODULE", "mysite.settings")
#from django.core.handlers.wsgi import WSGIHandler
#application = WSGIHandler()

os.environ.setdefault("DJANGO_SETTINGS_MODULE", "DionaeaFR.settings")
from django.core.wsgi import get_wsgi_application
application = get_wsgi_application()
连接django和uwsgi
uwsgi --http :8000 --chdir /opt/DionaeaFR --module django_wsgi
访问http://ip:8000,可以看到项目
编写配置文件,来运行uWSGI
vim /opt/DionaeaFR/djangochina_socket.xml

<uwsgi>
        <socket>127.0.0.1:9001</socket>
        <chdir>/opt/DionaeaFR/</chdir>
        <module>django_wsgi</module>
        <processes>1</processes> <!-- 进程数 -->
        <daemonize>/opt/DionaeaFR/var/uwsgi.log</daemonize>
        <pidfile>/opt/DionaeaFR/var/uwsgi.pid</pidfile>
</uwsgi>
mkdir /opt/DionaeaFR/var/
配置nginx
location / { include uwsgi_params; uwsgi_pass 127.0.0.1:8077; }
配置目录,要不然css这些就没有了
location /static/ {
alias /opt/DionaeaFR/static/;
        }
重新载入nginx配置文件
nginx -s reload
运行uwsgi
cd /opt/DionaeaFR
uwsgi -x djangochina_socket.xml
4.简单的控制脚本
UWSGI='/usr/local/bin/uwsgi'
UWSGIPID='/opt/DionaeaFR/var/uwsgi.pid'
UWSGIXML='/opt/DionaeaFR/djangochina_socket.xml'
KILL='/bin/kill'
RM='/bin/rm'


#start
start() {
                if [ -f $UWSGIPID ]
                then
                        echo "uwsgi has running"
                        return 1
                fi
                $UWSGI -x $UWSGIXML
                echo "uwsgi have running"
                return 0
        }

#stop
stop() {
                if [ ! -f $UWSGIPID ]
                then
                        echo "uwsgi not running"
                        return 1
                fi
                $KILL -HUP `cat $UWSGIPID` && $RM -f $UWSGIPID
                if [ $? -eq 0 ]
                then
                        echo "uwsgi is stop"
                        return 0
                fi
                echo "uwsgi stop fail"
                return 1
        }
#status
status() {
                if [ -f $UWSGPID ]
                then
                        echo "running"
                        return 0
                fi
                echo "not running"
                return 0
        }

#see how we were called.
case "$1" in
  start)
        start
        ;;
  stop)
        stop
        ;;
  status)
        status
        ;;
  *)
        echo "Usage: dionaea {start|stop}"
Esac
0x09 后记
“征用”了基友@太阳风的vps,收集了一些数据,这个比ssh的蜜罐多了太多!!!!!
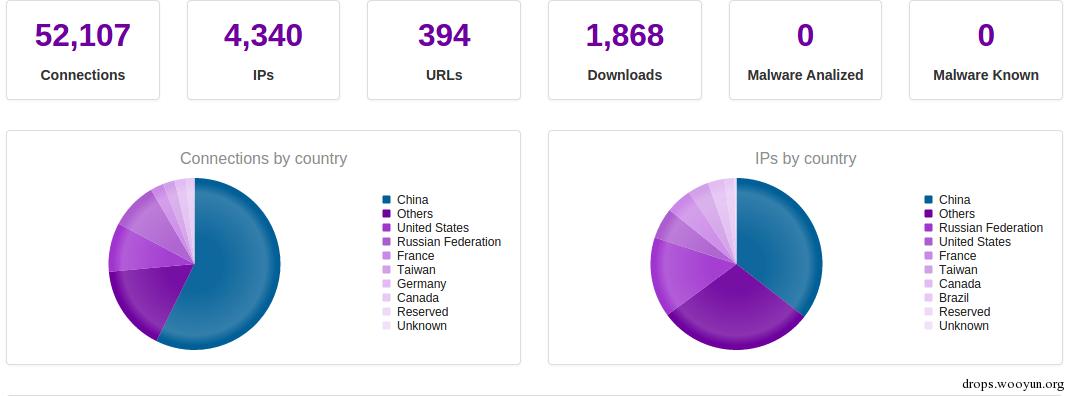
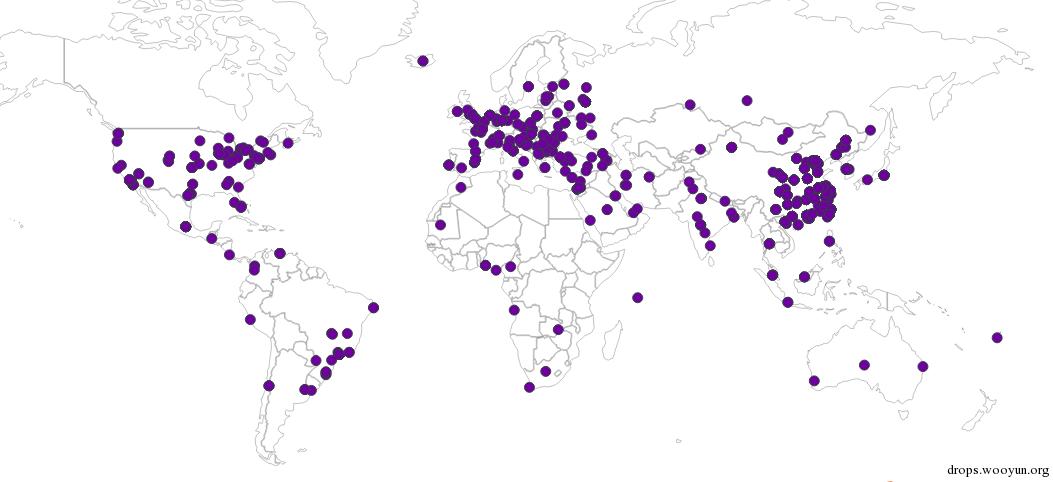

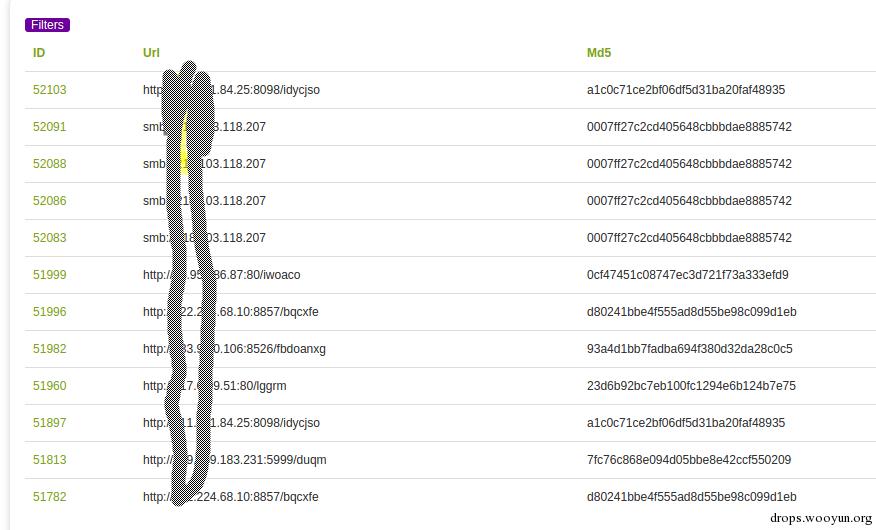
有大量的恶意程序,有兴趣的可以私信我啊<sub>~</sub>
最后给team的博客打个广告,大家手下留情........ http://www.sigma.ws/
参考:
http://takahoyo.hatenablog.com/entry/2014/05/26/023409
http://takahoyo.hatenablog.com/entry/2014/06/07/233059
http://bruteforce.gr/visualizing-dionaeas-results-with-dionaeafr.html
http://rubenespadas.github.io/DionaeaFR/
http://www.freebuf.com/articles/system/12696.html
http://www.securityartwork.es/2014/06/05/avoiding-dionaea-service-identification/?lang=en
Dionaea低交互式蜜罐介绍.pdf
 跳跳糖
跳跳糖
